 |
| Just Enough Clamps and Old Brown Glue |
I placed the boxwood inlay strips in their position and held them with veneer tape to the center panels. Then I squared off the edges of the rather short strips of olive wood crossbanding so they would nicely fit side to side along the edge. I taped them together with veneer tape, so that I had the entire frame of crossbanding and boxwood inlay assembled in one piece.
Then I carefully cut away this veneer "frame" from the center panels, which were already glued down in place. I warmed up some Old Brown Glue, and heated up an aluminum panel for the manual press. By brushing the OBG onto the edge of the panel, all the way around the center oysters or marquetry, depending on which part I was gluing at the time, I could then simply replace the taped "frame" of crossbanding in place and put the panel into the press, face down on newsprint. The heated aluminum caul would allow the glue to liquify and flow evenly under the veneer.
Removing the panels from the press the next day, I moistened the veneer tape and scraped it off. That exposed the nice crossbanding, inlay and oysters, which are similar to the original Lecount clock case that I saw on the internet.
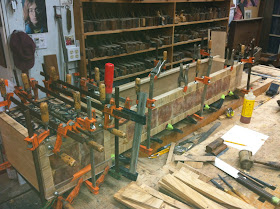
Now I could add OBG to all the joints and clamp up the case on the bench. The lower box has full blind dovetails on the corners, and a dado joint on the back board edge. The side panels are also joined to the back board with a dado, and the face frame is loosely clamped in place to keep it square.
This morning I removed the clamps and, for the first time, sat the Lecount works in place, in a case which is a copy of the original long lost marquetry case, from about 1690.
 |
| Lecount Stands Again |
It's about time...(pun intended).
Hi Patrick,
ReplyDeleteI was checking out a couple of auction houses in Britain and came across the longcase dial that I thought you might be interested in.
http://gardinerhoulgate.co.uk//Catalogues/cw210213/lot0873.html
All the best
Keith
Hello Pat,
ReplyDeleteWhy have You chosen to work with OBG and hot plate in the press instead off hot hide glue(from the iron cast gluepot)?
How did You prevent the center oysters from slipping?
If i understood well the crossbanding on the base have to be cut off in 45°because the corners are made in hidden dovetails?
Is the back in the middle piece in a rabbit and unceasing in the base and bonnet?
Sorry for so many questions,but i couldn't resist to ask
Filip
Filip,
ReplyDeleteI use both hot glue and OBG when I build, depending on the specific application. For example, the oysters are first glued with hot glue to paper on the face side, then cut together and assembled face down on an assembly board with Kraft paper. That means there are actually two layers of paper on the face, but that is not a problem.
When the oyster pattern is done, I glue it to the substrate using liquid glue in a cold press. Then I clean up the paper from the face and finish with the edge banding using either hot or liquid glue.
The substrate on the case is joined with full blind hidden dovetails. On the sides the face veneer (which is sawn material) is applied first and then cleaned up flush with the face substrate. After the sides are done I apply the face cross banding which overlaps the side veneer. There is no need to mitre the edge of the veneer. In fact, the overlap of the front protects the edge of the side.
If I understand your question about the back of the clock. I always start a clock build with a single board for the back. All the clocks i have made or restored have a single back board. The sides and front are all built on this board, and I use a rebate for the joint along the edge.
I am making two clocks now and will post photos soon.
Thanks for asking.
Hello Pat,
ReplyDeleteThanks for the reply! I tought You were glueing all the crossbanding in the press but it seems this was only for the sides.Englisch stays difficult but i am getting better(thanks to Luke)I would have done the case just like You did.
Yes,You understood me correct about the back(You call it back board)and it seems to me logic to start with the backboard.
Now i read You are making 2 new clocks and i am very curious to see Your next post about it! Is it possible to make photos wich are showing the way you build the carcas and the back of the clocks as i believe the construction will be very similar to the Lecount?
I know You are buiding everything with handtools and for that i take my hat off! Thank You very much for Your time and i am looking forward to see Your next post!
Filip (from Belgium)
It is my belief that the style of decorative veneer surfaces traditionally includes a cross banding around the edges. You can either use a press or veneer hammer to lay down the central panel. At that point you can easily clamp the sides and front together and make adjustments, since there is no cross banding.
ReplyDeleteAfter the case is glued you can add the cross banding over the edge, clean it up flush with the front surface and then lay the cross banding on the front, letting it overhang the edge.
This makes for a clean corner and also makes it easy to properly center the decoration in the center relative to the edges.
In my case I like to use the manual press to apply all the center decoration on the sides, front and door.
I should have some new posts on the current clock projects soon.