Showing posts sorted by relevance for query vector clamping. Sort by date Show all posts

Sunday, October 9, 2011

Vector Clamping


Question: Can you have too many clamps?

I think you know the answer...

A lot of woodworkers like to read books, magazines and posts about their craft. There are literally hundreds of authors who discuss dovetail drawers, finishing methods, the best tools, etc. I am no different. I have bought books that I was sure would be poorly written and contain misleading information just so I could read them and be proven right. I have many old and out of print books which also were essential for my career. I not only have all the magazines, but I have the promo leaflet for FineWoodworking which was sent out before the first issue.

In all this material, there is one aspect of furniture which is difficult to address: proper clamping methods. Sure, there are stories on vacuum bags, some on veneer presses, a few on specific clamping issues, and so on, but so far I have not seen an article which clearly addresses what I call "vector clamping."

I am sure that my mathematics, geometry and "proper" education in those fields lets me think differently about clamping, but at the same time it is said: "If you scratch the surface of a woodworker, you will find an engineer." This statement was proven at the first SAPFM dinner so many years ago. I found myself sitting at one of the tables in the front with Underhill, Breed, and a dozen other veterans, in a room with about 200 members. The speaker asked the group, "How many of you are making a living at traditional woodworking?" Most of those sitting at my table raised their hands, in total about 10% of the group. Then the speaker asked, "How many of you are engineers?" It was a clear majority.

So I assume that, when I use the term "vector," many woodworkers will know what I mean. A vector is a little arrow which shows the direction of the force under consideration. So a clamp applies pressure in a direction perpendicular to the face of the clamp. Of course, this pressure is not constrained in a single linear vector, but forms a cone of force as it leaves the surface of the clamp. As an example, my veneer press screws exert pressure over 81 square inches, or a 9x9" area, and I placed them on the press 9" apart to form a grid.

The primary purpose of discussing vector clamping is to illustrate how I restore antiques, which very often have curved surfaces. Tripod tables, cabriole legs, bent wood windsors, and many, many traditional forms of furniture rely on curved elements, which often break. These breaks can occur at a joint, like the leg on a tripod table, or in the grain of the wood, like the foot breaking off of a cabriole leg.

In many cases these breaks are treated in a way which makes my life miserable. The repairman will take some synthetic glue, epoxy or "the strongest glue on planet earth" and paint it on the break, then frantically search for a way to clamp it before the glue sets. The result is a mess, and I am constantly trying to undo the damage, scraping off the glue and starting over.

I usually will tell the client: "If you had not had it repaired before, I could do it for half the cost."

Assuming you have a fresh break with good wood surfaces, the first thing you need to do is determine the center of the break or joint, and imagine a vector line perpendicular to that point in space. (Editor's note: see comments below)  If you are able to put pressure with a single clamp on that vector line, it will clamp the repair properly. That is all there is to it.

Now, it is often the case that the vector line which pushes directly perpendicular to the center of the break goes off into air, away from the wood surface. Like the curved leg on a pedestal table, the line goes off the curved top edge of the leg, and a clamp will not gain a purchase there. That is why you need to create a proper place for the clamp to press.

Select a softer wood than the object, like pine, poplar or other wood. Shape the wood to exactly fit the surface of the curve, and leave a length of wood for another clamp to hold it in place. Clamp this new piece in position and locate the vector line on it. Draw a perpendicular line on the new piece which crosses the vector line at 90 degrees and cut to this line with a saw or chisel. This will be the place to put your clamp for the repair.

In every place where you need it to press directly on the vector line for the repair, you will need to cut a softer piece of wood and clamp it in place. Do this before you reach for the glue. Now your repair has little pieces of soft wood clamped all over it in places where you need to make the repairs. Grab your glue and put it on the repair, place the pieces in position and use a single clamp to press the vector line together.

It is rewarding to see a single clamp pull a complicated joint together, without slipping to one side or another. When done, all the soft wood pieces can be kept in a box for reuse in similar jobs which will certainly happen.

I do not need to stress that you use animal protein glues...

Sunday, March 3, 2013

A Simple Vector Clamping Repair

NOT a simple Vector Clamping example


When a client presents a job, I always take the time to fully explain every detail of the work that needs to be done and then, if they want to do it themselves, they can make that decision.  Part of the reason I do that is to educate the consumer, and the other part is that I would be happy if they decide that they want to actually do it.  For whatever reason, over the many years I have repaired furniture, very few clients make that decision.  In the end, they are always happy to pay me to do it.

When it comes to gluing curved surfaces, I need to explain that it is necessary to make clamping parts which they will never see, just to hold the clamps in the right position.  Often they note the hundreds of different clamps hanging on the wall near the bench, and they conclude that it will take that many to do the job.  However, as I explain the reason I need to make these special shaped wood clamping parts, I point out that, properly done, the joint can be pulled together using only one clamp.

The "secret" is that that single clamp needs to put pressure directly perpendicular to the center axis of the joint face.  On a straight break that is simple.  On more complicated breaks there may be several different faces and all the vectors need to be considered, so several clamps will be required.

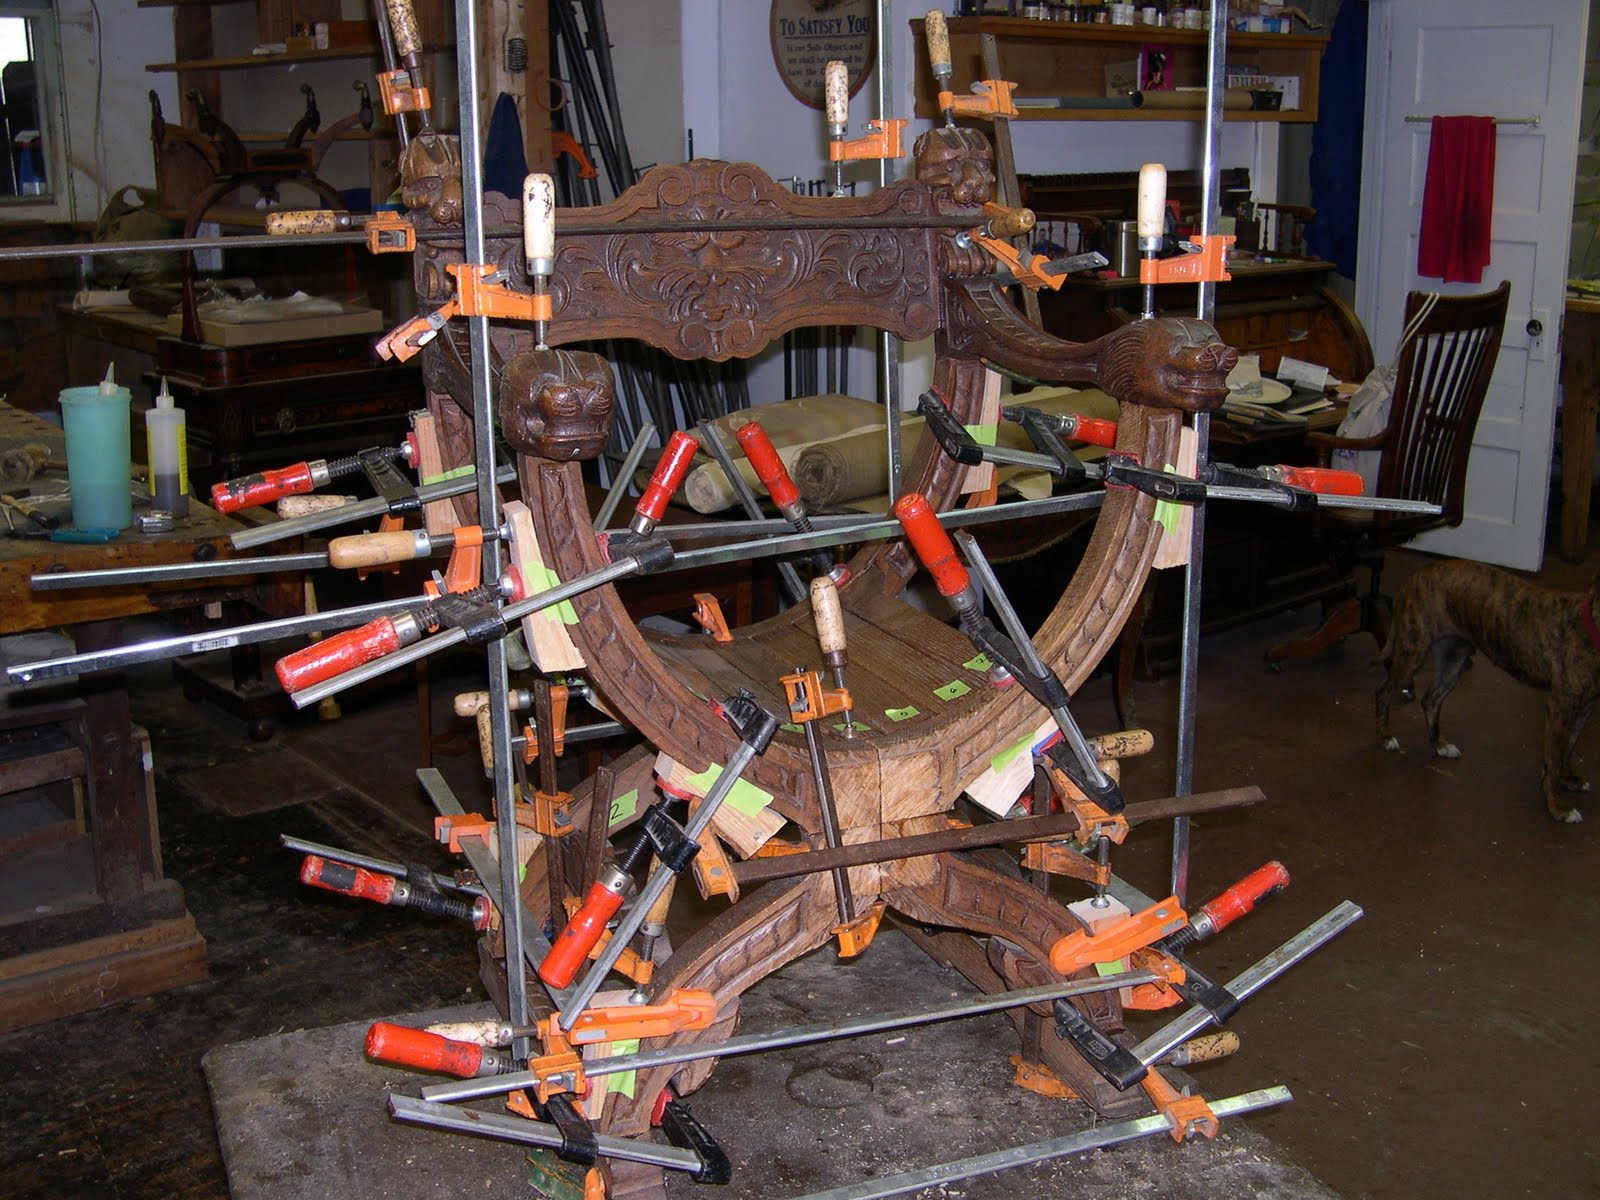
In the past I have posted photos of this type of clamping.  Recently I posted a picture of a chair for the "Why Cuban Mahogany?" post.  In these photos there are many clamps and it may be difficult to easily understand which clamps are doing what.

In this post I selected a very simple repair.  This project is a lyre shaped mirror support for a late Victorian bureau.  It is made of walnut with a face veneer.  It broke at the weak part of the grain.  The break is fairly straight and clean, and it has not previously been repaired with synthetic glue.  I think it is a clear example to illustrate the Vector Clamping procedure concept.

First I determine a line (vector) which is perpendicular to the center of the break.


Second I cut some wood clamping parts of a wood that is softer than the walnut, like pine or poplar.  These parts have "legs" which allow them to be attached to the walnut in the right position, and a "purchase" for the clamp to sit, directly in line with the vector.


Third, I use plexiglass on each side of the repair to keep the faces flush.  The plexiglass doesn't stick to the glue and allows me to see the joint as I work.  I apply warm Old Brown Glue and the long clamp which pulls the joint together perfectly.  I grin as the glue squeezes out evenly on all sides, indicating my calculations were correct.  After the joint closes, I apply a final tightening of the plexiglass clamp.


It is so easy, when you know what you are doing, that even the client could do it.

Friday, January 13, 2017

Carpenters, Electricians or Plumbers?

I have quite a few clients who are doctors.  Now that I think of it I also have had quite a few doctors as students.  Years ago (many years ago) I taught a series of classes on Decorative Arts at my alma mater, U.C.S.D.  In one of these classes I had a distinguished looking gentleman who always sat in the front row, directly in front of me, and asked very intelligent questions.  After several lectures, I asked him who he was and he responded, "I'm Dr. U".  It impressed me, since he confirmed that his last name was the singular letter "U".  I asked him what kind of doctor he was and he replied "brain surgeon."

As my degree was in High Energy Particle Physics, I thought this was interesting.  I can see the headlines now: "Rocket Scientist teaches Brain Surgeon."

In conversation after class, I asked him why he would take the time to sit through my lectures, as he must be rather busy with his profession.  He complimented me very much when he simply replied, "You are a good teacher."

Some years later I noted in the news that a difficult medical case had been treated at UCSD Medical Center, where a tumor was removed from a patient's brain in a 23 hour procedure.  The doctor who stood in one position for 23 hours and patiently cut away the tumor, stitching each vessel with 10 microscopic stitches was Dr. U.

When I taught my first class at Marc Adams School of Woodworking I had the school make 8 chevalets, and I thought they would be in different sizes.  However, they made them all the same size, 61cm tall, which would be perfect if the student was 6'2".    Naturally all the students were different heights, so I had to make risers for the seats.  In that first class I had a very enthusiastic woman who was 4' 11" tall.  Her name was Pepper and she was a medical doctor.  Doctor Pepper.  She was an exceptional worker and impressed me with her attitude.  Out of the 8 students 3 were medical doctors and one was a medical nurse.

At some point (I can't remember who or where) I had a client who was a doctor tell me that "We're all either carpenters, electricians or plumbers."  I thought that was a rather humble description of one of the most important professions on earth.  "Carpenters" fix broken bones, "Electricians" repair damaged nerves and "plumbers" solve leaky pipes.  (I don't want to be more specific...)

If I had entered the medical profession I would be a good doctor.  I would be a "Carpenter" since I understand how to repair structural damage, with the least invasive methods.  When I fix something it is fixed.  I spend a lot of my work repairing the damage caused not only by the accident but also (and much worse) the damage caused by amateur attempts to repair it, before it was brought to me.

I have posted before about Vector Clamping.  It is my way of teaching about proper methods of applying pressure on a glue joint.  When the joint is straight and even and the clamping surface is parallel to the joint, it is obvious where to clamp.  However, when the repair involves complicated curves and many different breaks it becomes more difficult to visualize where to apply the clamps.

This is where amateur woodworkers get in trouble.  Either they don't have enough clamps or the proper clamps, or the proper glue, or they try to just flood the break with glue, thinking it will fill all the gaps.  In any case, the repair is usually horrible.  By understanding Vector Clamping theory the repair will be easy, and the minimum number of clamps will be needed.

Vector Clamping means that a single clamp must be applied in the center of the joint and perpendicular to its surface.  On curves this means an additional scrap piece of material must be attached temporarily to properly provide a place for the main clamp to do its work.

Repairing a curved leg on a tripod table is a good example.  This nice early table came in last week with a broken leg.  An effort to repair it involved a large dowel going sideways, lots of yellow glue and a lot of missing wood.  The person who had attempted to repair it had damaged much of the surface of the joint so that it was no longer useable.

I used a toothing plane to clean up the glue residue.  You must glue to clean wood.  You cannot glue to dirt, old glue (unless it is a protein glue), or any other contaminant.  The success of the repair depends on the wood to wood surface contact.  This is why dowels are not as good as tenons.  Dowels present a circular surface which contacts as much end grain as side grain.  Tenons contact a larger area of side grain than end grain, so are stronger.

To begin the repair I fashioned pine clamping jigs, which are attached to the leg and foot.  If you study the photo you will see only two of the clamps do the actual work on the repair.  The vertical center clamp holds the piece in position while the diagonal clamp (on the back of the leg, difficult to see) is pulling the foot towards the leg. The rest of the clamps are used to hold the jigs.

Wood Elements Added for Vector Clamping 

I used a pattern to determine the shape of the new piece.  In this case I used a piece of recycled Cuban mahogany, as the table was made in that wood.  Note the tenon extension I provided which fit into the foot element, as there was not enough end grain on the foot piece to guarantee strength.

Foot on Left Photo, Leg on Right Side, Pattern for Repair

This shows the repair after the clamps were removed:


Cuban Mahogany Element Before Shaping 
Looking at the leg from the end to be sure it was straight:

Looks Straight To Me
A second piece of mahogany was added to the bottom of the leg for extra strength across the weakest part of the repair:

Second Piece of Mahogany Added to Bottom of Leg
This is the repair before finishing:
Note The Curve Is Continuous and Smooth
I actually don't like the term "Carpenter".  I am not a "Carpenter".  Carpenters build houses and use nails to fasten wood together.  For the purposes of this post I will not complain.  It is a metaphor.

I am a Problem Solver.


Monday, October 24, 2011

Simple Example of Vector Clamping


I was just looking at the photos I posted of the chair with all the clamps. Unless you go through a sequence of applying the clamps it is difficult to fully understand why each clamp is placed where it is. After dozens of clamps are in place it just looks like a mess.

I may be accused of using more clamps then necessary in my repairs. That may be simply because I have collected more clamps then a single person should have over the years. However, it is also because I study each repair carefully to fully understand where all the forces need to be applied.

If the part is shattered or previously repaired badly, it is necessary to take apart all the fragments and clean the glue off of each using small chisels or a small toothing plane iron I keep for that job. I use an Optivisor to see more closely what I am doing and I am extremely careful to not remove any wood.

Then it is important to begin the repair by gluing several small parts together, wait overnight, and continue adding fragments day by day until the repair is complete. Sometimes with chairs I have more than a dozen fragments to assemble just for one joint.

In other cases, the repair is simple and easy. Just remove the modern glue, clean up the wood surface and add protein glue.

In the case of this American Empire center table, pictured above, the two rear legs had come loose. Since the top of this table is marble, there was a lot of force on the joint, which was originally held by three dowels. The owner had had some person try to glue it with the "strongest glue on planet Earth" with horrible results. Part of his problem was the glue and part of the problem was the failure to understand clamping pressure on this joint.

Note the central axis of the joint, perpendicular to the face of the plinth, extends above the toe of the foot, out in space. There is no way to put a clamp there, unless you add a block. That illustrates very clearly what I intend to show about vector clamping. Just by adding a pine block of wood on the foot I was able to create a purchase for the primary clamp. The red clamp is the primary clamp. Since gravity also creates a force downward on the clamp in this position, I added a second, orange, clamp to compensate. These two clamps are all that are required to achieve a correct vector force on the face of the joint.

The entire operation took 15 minutes and made me a profit and the owner of the table happy. I have always guaranteed my repairs for life. Sometimes the project will return for more repair but never in the place where I repaired it. I can say, with some satisfaction, that I have never had a repair failure in my career of restoring antiques. Do it right and forget it.

Sunday, December 29, 2013

Spring Clamps...Literally

Hand Surgery


I must have an unlimited source of clamping choices.  When you spend over 40 years repairing antiques you get creative with unique problem solving.

Most of the repairs I see come into the shop which have failed are the result of poor clamping efforts.  Face it, when the wood surfaces do not meet under precise pressure, even the best glues do not solve the problem.  A good example was the last post, where it was obvious that the person who wanted to reattach the table leg simply injected lots of plastic glue and pushed the leg back in place.  The result was a large surface of dried plastic glue which held nothing and prevented the wood joint from closing.

In that case, a simple pipe clamp would have worked, but I suspect that repair person did not have one available.
Clamps Where You Want Them

Not all cases of clamping are that obvious.  Today I needed to reattach several fingers on a carved chair.  This chair was made in Italy and had two "servants" carved at the front to hold up the arms of the chair.  I'm in no position to judge the political correctness of this subject; my job was to repair the broken hands, which had lost several elements.

As with all carving, there was no flat surfaces to clamp and the elements I needed to reattach were tiny. Fortunately, I have spent years upholstering and had a good supply of springs in the shop.  Taking these springs and cutting away loops gave me a good supply of clamps.  This is a neat trick, and I think all shops should have them available.

Available In All Sizes
I know this idea is not new.  There are spring clamps sold, with a special tool to hold them in place.  But the last time I looked, those kits were expensive and I hate to buy stuff, unless I simply have no choice.

Old springs are free, and by cutting the loops I have several sizes to choose from.  I take a file and make points on each end, so the clamp bites into the wood with the smallest mark visible after the job.  I can bend and shape these clamps to suit the job.  The important thing is that the points of the ends line up, creating a direct clamping force.  See my post again on Vector Clamping.

Add Points With File
I made some rough fingers and cleaned up the broken ends so I had a good fit.  Then I just applied a small bit of Old Brown Glue and the spring clamp.  Final result is a good amount of pressure and a repair which will allow me to finish the carving as I wish.

Simple.  Effective.  And Free.

Saturday, March 5, 2016

It's A Gift To Be Simple

One of these days I am going to post some of the experiences I had some 30 years ago, visiting all the Shaker villages, and, at the invitation of Faith Andrews, having lunch with several of the last living Shaker sisters...those were the days!

However, as my posts tend to be lengthy and "wordy" I thought I would just post a simple thought for today.  (As the King says in the movie, "Mozart", "too many notes!)

In the past I posted my methods of vector clamping, and you can use the search box to find that.  Today I was cutting some more clamping blocks and I thought that it might be interesting to some of you, as a kind of a "Shop Tricks" feature.

I am not related to Dunn-Edwards!

Whenever I visit the paint store for stains or paint, they always hand me a bunch of stir sticks.  Even though I might actually need only one, they generously hand me a dozen or so.  My first thought was, "Hey, they are cutting down the forest to make these, so be careful how many you give out!"  But, as I approach my 7th decade on Earth, I am resigned to the fact that the majority of humans really don't think about how their actions might affect the rest of us.


Quick and Simple

So I take this handful of clean white wood sticks and cut them up at the band saw into small pieces.  This wood is nice and soft, so it makes a perfect clamping pad for any clamp.  I always keep a small box of them at the bench or wherever I do my clamping.  They last for a long time and are free.


Clamp pads in use

Another trick is to take some thicker wood and cut it into small blocks with a "V" sawn on one side.  Now, when you need to apply a clamp on the outside corner this "V" block provides a perfect clamping pad.


"V" Clamp Blocks

Just thought you would like to know.

Works Every Time

Tuesday, May 8, 2012

More Vector Clamping

I make a lot of my income from repairs. They are often quick and the simple methods I use guarantee results. I have always told customers that, if I fix it and it breaks where I fixed it, then I will repair it free. I can't recall a time in the past 43 years when I have had to fix something for free due to that guarantee.

 The reason I want to have the customer return it to me, if it breaks, is so I can learn from the failure and not repeat it in the future. Also, in the rare instance that I could not repair it properly, I don't want my work to end up in some other workshop. I value my reputation; it is all I have and it is good.

 Take chairs, for example. Nothing else comes close to making me money as broken chairs. There is no way I can even think of how many chairs I have fixed. Usually they come to me after other people have tried and failed. Therefore, I have also learned from other's mistakes. I have seen iron braces, iron rods, bolts, screws, epoxy, wire, staples, string, tape, "the strongest glue on planet Earth", and auto body filler, just to mention a few tricks, and all of them failed. At some point, the owner finds out about me and they end up on my bench. Always a challenge to undo the damage of previous repairs, which usually are worse than the original problem.

 Chairs take a beating. They are designed to be attractive, stylish and comfortable. They are not designed to support modern American bodies which are heavy and tend to force the structure in ways that it was not designed support. Add to that problem the fact that a majority of old chairs have suffered at least one repair in their life and you understand why I have so much work.

 Last week I was searching on the internet for Ming dynasty chairs, and I found a story about a visitor to a museum in China who felt tired and decided to sit down in a Ming chair which was on a pedestal behind a barrier rope. He broke the chair in three places, fortunately all places where there had been previous breaks. Like I said, antique chairs were not designed for the modern man. I think Frank Lloyd Wright had a point when he designed chairs so uncomfortable that no one wanted to sit in them.

 In any event, I repair chairs practically every day I work. Here are a few simple rules which I follow that make it pleasant. First of all, try to remove all other repairs. This means that, in the case where you have severely fractured wood, and lots of small fragments, you must do the repair over several days. Each day you glue two or three fragments together to form a larger piece. The next day this piece is glued to another, and so on, until you have a two large elements to assemble properly. Most workers try to put all the little pieces together at one time and it makes a mess, as they move around under clamping and the glue gets into the voids.

 Another rule is that it is always necessary to remove all traces of dirt and glue from the wood surface. Usually, with synthetic glues, this requires scraping and using a chisel to carefully remove the glue from the wood, without removing any wood. I prefer to use a toothing plane iron to scrape away, with the grain, the glue and dirt. You can use a small section of a hack saw blade (with larger teeth) to do the same thing, if you cannot find a toothing plane iron. Remember, you cannot glue dirt and expect it to work. Always consider the surface area of the wood in the repair to calculate the potential success of the job.

 End grain surfaces don't count. Long grain surfaces are the only areas where glue holds, and experience will tell you if there is sufficient surface area inside the joint to hold the stress. If not, you may need to add wood to the repair to make it work, either with an internal tenon or external "blister patch". Always use the most conservative repair that you can to protect the value of the object.

 I do not need to stress that the only glue to use is animal protein glue. Any reader of this blog knows where I stand on this question. As I've said for years, "I will use a synthetic glue only if it can be shown that my preferred animal glue won't work and the synthetic glue is better." Never gonna happen.

 The final advice is to understand vector forces when you apply your clamps. Most people do not have enough clamps or the proper variety of clamps to do the job professionally. I have many hundreds of clamps, of every imaginable type. I also have a large box of wood scraps to fit most common furniture shapes. You cannot clamp on curves or complex surfaces without adding wood blocks to provide a purchase for the clamps. The essential rule of vector clamping is that the primary clamp, which actually pulls the joint together, provides its force directly perpendicular to the center of the joint. With curves that means the clamp needs to be out in space, somewhere away from the actual furniture. Therefore, you need to provide a piece of wood shaped to fit the furniture, with a spot on that scrap of wood to hold the primary clamp in its proper position.

 I use a soft wood, like pine or tulip, so as to not damage the antique surface. I cut it to fit the shape of the curve. I provide enough surface area for the scrap to not slip and clamp it firmly to the chair part, before I use any glue. I use scraps of cork under the clamp blocks to protect the surface. I make a dry run after all the scraps are attached to see that it works properly. Then and only then do I reach for the glue.

 Old Brown Glue gives me the additional working time I need to assemble complicated repairs, and has amazing holding power. I apply the glue and then the primary clamp. If I have done my job properly, then I am rewarded with a nice bead of glue evenly squeezing out under pressure as I tighten the primary clamp. No slipping, no change in alignment, no panic. Just success.


 I am rewarded with a happy customer who can use his antique chair, and a quick paycheck. When i make $100 for a 15 minute repair, I am reminded that the 15 minutes took 43 years to learn.

Saturday, January 4, 2014

Complex Curve Repair Simplified

Another Day Another Chair Repair
I work very hard at being humble and modest.  People who know me will laugh at that statement, but I rarely, in fact, say that I am the "best" at anything I do.  That is because I know others who are my inspiration, who are dramatically better at what they do than I am.

However, I often walk home from work thinking to myself, "I am the best chair repair man in this city."

I don't say it out loud, since, these days, other pedestrians will think I am talking to someone on the phone while I walk.  (In the past you had to be mentally unstable to walk around talking to yourself; these days it is the norm.)

Yesterday I was thinking, with a bit of satisfaction, how well this particular repair had gone.  I visualize in my mind all the elements of the repair and the way it will survive the stress of use and, if every little element of the project went well, I know I earned my pay.  Perhaps I'm obsessive.  No, to be honest, I AM obsessive!

This project was a pair of Louis XV revival 19th century armchairs which had a brass leaf gilt finish.  They had been poorly repaired over the years, including many small brad nails sunk into each of the joints and missing areas filled with epoxy filler.  Using nails to repair furniture is a crime.  First of all, it just doesn't work.  Second, it prevents the actual repair, since the joint cannot be opened easily.  Third, it requires some amount of damage to remove the nails, either by punching them out, or digging them out with tools.

All the nails do, in fact, is prevent the chair from falling apart, while at the same time allowing enough movement that the chair becomes a rocker.

One of the chairs had its crest rail broken and repaired several times.  All the wood around the mortise was damaged, and the tenon in the style was messed up.  There were several elements of the wood which were fractured and areas which were built up with epoxy.  In effect, there was nothing left structurally of the joints.

A Single Clamp Pulls Joint Together
I cleaned each of the small fragments and, over several days, rebuilt the cheeks of the mortise.  Still there was not enough wood to hold properly.  Therefore, I drilled two 3/8" holes by eye into the ends of the tenons and also into the sockets of the damaged mortises.  You need to do this carefully, since there is no mechanical way to accurately align the holes.  I put some light tack masking tape on the wood, each side of the joint, to provide at least a line of sight.  The rest is experience.

Note that the crest and back of these chairs are curved in two directions.  Therefore, this is a perfect example of using vector forces to create proper clamping cauls.  Look at the joint and visualize the single vector which bisects the surface of the joint, in the center, at 90 degrees.  That is where the clamp force needs to be applied.

Search this site for other posts on Vector Clamping.

Now take soft wood, like poplar or pine, and make wood cauls that you can clamp to the frame on each side of the joint.  These cauls need to have a fairly large surface area, so they don't slide and can be clamped securely.  Also these cauls need to have a "purchase" spot where the final clamp will grab.

Perfect Alignment

Note the two cauls on either side of the joint are held by two pony clamps each.  Then the longer single pony clamp is applied which pulls the joint together.  Finally, a second pony clamp is used to provide alignment top to bottom and a "C" clamp is used, with some plexiglass, to align the faces front to back.

The plastic allows visual inspection as all the clamps are tightened, in sequence, to pull everything together.

There is also a weight used on the front of the seat to keep this chair from falling backwards and spoiling my day.

Of course, I only use Old Brown Glue for chair repairs, since it is the best glue "in the universe" for this type of work.  I don't brag about my talents, but I do brag about my glue.

Friday, December 27, 2013

Why Not Period Glue?

Synthetic Glue Sucks
I joined the Society of American Period Furniture Makers in 2000, when they first got together.  I really enjoyed going to Williamsburg, even though it was in January, and I had been there dozens of times before.  The reason I had so much fun was the experience of spending a week with like minded furniture makers, from all over the country.  We talked about furniture styles, different methods of construction and tools from different periods, finishes and just about every aspect of our craft that was important.

Usually, when I am in a social environment and others find out I work in wood, the topic of conversation ends up with someone discussing their efforts to build a coffee table or birdhouse.  It is a completely different situation at these SAPFM events.  Furniture design and construction is a real passion with this group, and nothing is too esoteric or obscure to merit hours of intense dialogue.

What fun.

I was an active member in the early years.  I was fortunate to be asked by Roy Underhill to tape a segment on his show, The Woodwright's Shop, which required me to ship a large container of tools and materials back East.  At the same time, since I was there with all my stuff, I demonstrated on stage during the SAPFM conference and made a short video for them about the chevalet.

It was interesting, since there are two back to back sessions of the "Working Wood in the 18th Century" event, and I had a conflict with the second week.  Therefore, I asked Silas Kopf to stand in for me and use my props.  During my presentation, I had each segment of the talk prepared in boxes ahead of time.  Each box was numbered so all I had to do was reach under the bench and pull out the next box which had the materials for that segment of the talk.

I worked fine for me, since I was familiar with all the props, and had a time tested presentation developed over several years of talks at the Getty museum.  It was not so easy for Silas, who does his marquetry using a completely different method.

I need to stress at this point that I think Silas is the greatest marquetry artist working in the US.

As it turned out, he made the effort to use my props and present the talk on French marquetry methods that we had agreed to.  But, after about 15 minutes of his talk, he abruptly changed direction.  "That's the way Patrick and the French do it.  Now I want to talk about how I do it."  His presentation was excellent, but not what we had planned.

I also wanted to contribute to the new Journal of the SAPFM, called "American Period Furniture."  For issue #1 I wrote "Form Follows Process," which analyzed the different methods of work used by craftsmen before and after the Industrial Revolution.  For issue #3 I wrote about my research into the Price Guides of the early 19th century, documenting the time required to make each aspect of furniture using hand tools, "Period Productivity".

1820 Cuban Mahogany with 1980 Synthetic Glue
In Issue #2 I did something different.  During the first session I attended, I was amazed that all the woodworkers there were passionate about choosing the right woods, following period design exactly, understanding period finishes, and so on.  There was a certain amount of divergence in whether or not to use only hand tools, and that I understand.  Most of the members had access to power tools and the general consensus was that it was ok to use power as long as a certain amount of hand finishing was involved.

The area which startled me involved glues.  Practically every person I talked with used modern synthetic glues to make their period furniture.  I could not understand this "blind spot" in an otherwise very academic group of individuals.

So I wrote an article for issue #2 called "Why Not Period Glue"  I took the position that traditional glues were used for centuries and worked fine.  If there was a modern glue which did something better than these traditional glues, show me the advantage and I will use it.  The only one which comes to mind is epoxy, which can be used to repair metal parts.  Of course epoxy should never be used for wood repairs, or worse, tortoise shell, ivory or any other material.

Missing Tenon/ Covered in Plastic Glue
Most of the woodworkers used glues like yellow glue, carpenter's glue, white glue, and other glues with fancy chemical names I never heard of.  Hardly a glue pot among the entire group.

Only those who made their living restoring antiques seemed to understand why it is important to use traditional glues.

Cleaning Surface with Toothing Iron
I was reminded of this article today, as I worked to repair a broken leg on a period Baltimore dining table.  The leg was originally attached with a double tenon to the apron.  One of the tenons had broken and the repair was made by adding yellow glue and clamping.  That repair did not work, of course.

Old Brown Glue Ready for Use
In typical fashion, the clamping was not done properly.  The wood surface was not cleaned in advance.  The missing tenon was not replaced.  And on other legs of this table, the repair was "enhanced" by a series of nails, which did nothing but damage the wood.

As I removed the leg to begin the repair, it was obvious that the synthetic glue did not stick to the wood.  Using a sharp chisel, I was able to pick off most of the glue chips, which came away like flakes of paint.  I think of synthetic glue as a plastic, and plastic does not stick well to wood.  I typically use a toothing iron to scrape away the glue residue and tooth the surface.  You must be careful to not remove wood; just glue.  It takes a bit of care, and the toothing iron helps.

Tenon Replaced, Ready for OBG
 I just felt good, when I was ready to apply the glue for the repair.  All the wood surfaces were toothed and clean of plastic glue.  The tenon was made and installed.  The clamps were ready and clamping blocks were installed.  (See the post on Vector Clamping)


I warmed the glue, brushed it on and applied the clamps.  Another antique repair done professionally, using the same glue that the original maker would have used some 200 years ago.  I'm sure he would approve.

Gigi Inspecting Protein Glue

Tuesday, November 22, 2011

Old and New Protein Glue


I have had the cast iron glue pot cooking near my bench for over40 years. Every day I turn it on first thing when I open up the shop and every day I turn it off when I turn off the lights. There has been a note inside the front door which asks: "Glue Pot Off?" for as long as I remember. More than once in my career I have woken up at 2am and returned to the shop to see if I forgot to turn it off. About 30% of the time it was on; the rest of the time I just mumbled something and returned to bed.

For the past two decades I have also been developing and using a liquid form of this glue, Old Brown Glue. The demand for this glue has grown tremendously through word of mouth and the fact that it simply works great. It has a long open time, bonds well, penetrates better than hot glue and is much easier to clean up.


Currently I am repairing a nice set of English Regency mahogany chairs. Doing the gluing on a large set of chairs at one time requires that I use a glue with a fairly long open time, so I use the OBG. In some cases there are small fragments of wood which are broken away from the joint. For that I use the hot glue pot, since the bond is almost immediate.

So the glue pot sits next to the OBG system in the center of the shop, just a few feet from my bench and the wall of clamps. For the OBG I use a simple tub of hot tap water, which I change from time to time as it cools. The bottle is kept in the water so it is liquid. On top of the water I float a small plastic cup which holds the brush and glue, ready to use. I can take that small cup to the bench, make my repair and quickly return it to the water so it stays ready. In addition to keeping the glue liquid, I can use the tub of water to wash my hands or wet a paper towel to clean up the joint. Very practical and easy.

And I do not have to wake up at 2am and worry.

This project also serves to demonstrate more vector clamping methods. As the regency chair form is fairly common, I always have blocks ready for clamping in place. First I just tape the block where I want it, so I do not have to have three hands. Then I put the glue on the joint and apply the clamp. Normally, if the blocks are made correctly, only one clamp is needed to close the joint. The second clamp serves to hold the block in position.

Looking closely at the photos, I need to make two comments: First, the wine bottles are full of water based stains, not what you think. Second, there is a belt sander on the floor...one of the few nasty tools I have used and not something I am proud of. However, have you ever tried to hand sand sharkskin? It has the density of teeth!

Monday, February 2, 2015

Old Friends At Work

The Third Hand, Made in Paris
One of the results of not having to move my workshop over the past 45 years is that things tend to stay around.  I suppose that, if I had to move at some time, I would need to make decisions about what to keep and what to get rid of.  Instead I sometimes look around the shop and see things which have been there for years and are so necessary to my work that I take them for granted.

These things are my "friends."  They are always around, waiting to help me with my work.

I thought that I should mention them in a post, so that others who do this kind of work will start thinking about adopting similar shop aids.  These are not exactly the things you will read about in woodworking books.  They are just shop fixtures or tools which are handy and normal but serve to really make life easier.

Better than the Kitchen Sink
For example, here is a disc sander that is one of my first and only "power" tools.  When I started in 1969 there was a junk shop down town where you could find everything.  I had an old kitchen sink which I did not need, so I went down there and asked the owner if I could trade the kitchen sink for a motor.  He said fine, pick one out, and I found this motor with an arbor on each end.  I took it home and made a simple plywood stand, using an old wood box as a base.  I added the 12" disc from my 1952 Shop Smith (the only other power tool I have) and put a buffing wheel on the other side.  This simple tool has been in the corner of my shop ever since, just next to the outside door, so all the dust can escape.

Always Ready to Sit On
Another "friend" is my stool.  This I found in the trash.  It has a round seat which used to be adjustable up and down.  Now it is just down since it is broken.  However, from time to time I change the wheels which wear out and it keeps working.  Every day I use it so I can rest comfortably while working on projects at a low level.  Very handy for upholstering.

Rolling Work Table
In the center or the shop is this small table.  I made it when I started my business and it has turned out to be one of the most useful fixtures in the shop.  It is a low table, with the top covered in a rubber mat.  The table is bolted together and will carry quite a load.  There are metal wheels on the legs.  I do nearly every project on top of this table, and it also helps me to move large objects around the shop without any other help.

Multi Purpose Work Stands
Another way to hold projects is with these small stands.  They are easy to move around, with the hand grip in the top.  They hold tools and materials in the tray underneath.  They are useful for standing on when I need to get to the top of things, and they are practical when I go on site to use as a work bench or tool tray.

Got Glue Blocks?
What looks like a box of wood scraps is something necessary for repairs.  I have several boxes of pieces of pine and poplar which are cut into shapes.  These are glue blocks for curved repairs.  Search this blog for "vector clamping" and you will see what I do with these.  I am sure that they have no real value but, without them, I cannot do the complicated repairs which make my payday each week.

Sorted by Species and Size
Along the wall of the shop I put this wood rack.  It is a simple set of shelves which I use to hold different wood species in small sizes and lengths.  You would be amazed at how much time I save by being able to just walk up and pick out a piece of wood for a repair using this system.

Maxwell's Paper Hammer
Perhaps the strangest tool I have found in all the years of searching is this hammer.  You would not believe it but the head of the hammer is made of paper.  I cannot find a name or maker's mark on it, but the paper is somehow impregnated with a glue which holds it together.  I have used it for 4 decades and it still is in fine shape.  From time to time I run the face of the mallet over the disc sander to clean it up, but it survives.  You cannot believe how much force I can use with this hammer and still not mark the surface of the work.

Follow The Money
This is a system I use for keeping track of the work.  I got these wire racks from somewhere and screwed them to the wall.  By using folders I can easily see what jobs are in progress and where the work priorities are.  It turns out to be a very efficient method for tracking jobs.

These are my "friends" who help me every day.  I posted this topic today as I was listening to the Beatles.  I get by with a little help from my friends.

Friday, January 4, 2013

Why Cuban Mahogany?

I have a lot of books.  I have always found the money for books.  I buy books instead of food.

I have several old editions, large format, which document the history of English furniture by wood.  One set, in four volumes, was published in 1906 by Percy Macquoid, and includes lavish illustrations of important examples of each type and period:  The Age of Oak, The Age of Walnut, The Age of Mahogany, and the Age of Satinwood.

When I started out collecting antiques, I instinctively followed this method of analysis, instead of the historical terms for the periods.  After all, as a young man, it is more difficult to think of Queen Anne and Chippendale, when trying to decide between a walnut chair and a mahogany chair, then to just look at the wood and pick the best example.

As I began my teaching career in Decorative Arts, of course I studied the historical periods and used them to discuss the different styles.  Always, in my mind, there was a clear evolution from domestic woods to imported woods, over time, culminating in the exotic selection of imported woods used in marquetry surfaces, which I found fascinating to look at.

As a collector, my budget determined what I could acquire.  During the 1970's I made a lot of money buying American Oak and refinishing it for the local market.  It was everywhere.  Oak is durable and plentiful.  There are different styles and many different forms, from Golden Oak to Mission Oak and from dining room sets to bedroom sets.  Quarter sawn or flat sawn, carved, turned and veneered.

At one point, I had a 6' diameter round oak table in my dining room with a dozen chairs around.  Many parties were enjoyed around that table, and it survived in good form.  It is now taken apart and stored in the back room of my shop, just because I couldn't get rid of it.

At some point, in the 80's, I started to buy walnut furniture.  That meant that, instead of furnishings from the 1880's to 1900, I was bringing home Victorian Renaissance furniture from the Civil War era.  Soon the oak was gone and the dark walnut was everywhere, accented by white marble tops and black teardrop pulls.

After that, I enjoyed a brief period of rosewood furniture, but it was scarce and expensive and I couldn't furnish the entire house with it.

That is when I discovered mahogany.  Amazing Cuban mahogany.  The true royal wood.  Huge solid slabs of wood, highly figured and rich in color, with a finish that you can fall into.  The perfect wood for furniture, whether veneered, turned or deeply carved.  Overnight the walnut and rosewood was out and the place was filled with mahogany.  Still is.  Can't get enough of it.  Even my 10' tall canopy bed.

See if you can find a book, published in 1926, edited by William Farquhar Payson, called "Mahogany, Antique and Modern."  It is the best and most complete book I have seen on the history of this wood.
As late as 1926, lumber dealers in the East Coast still were able to buy and sell enormous quantities of this wood, as seen in this illustration from the book:

Yes, that is a man standing there next to the pile of logs.  The caption says: "The supply of this mahogany is rather scarce, and the logs are obtainable now in comparatively small sizes only."  I suppose you can complain when you only get 20 foot logs that are nearly 3 feet in diameter. Just imagine the size of the logs that were used a century earlier!

Within 10 years from the publication of this book, the supply was gone, for all practical economic purposes, and the furniture industry began a coordinated effort to justify using African species of the wood.  I have a book published by the Mahogany Association, Inc., which actively promotes African woods as equal to Cuban in all aspects.   It includes a map of the regions where mahogany grows and states: "The map below indicates the only natural habitats of Mahogany trees.  Woods alleged to be Mahogany but coming from other than the regions indicated, are not mahogany.  Woods purporting to be some kind of Mahogany but not from the regions listed above, should not be accepted as Mahogany."

Remember these words when you visit your local lumber yard and try to buy mahogany today.

One of the reasons it matters, what type of mahogany you have to work with, is that Cuban mahogany is much more dense and has a much greater strength than Honduras or African woods.  Most of the Cuban trees were ancient inhabitants of the tropical forest, some as old as 400 years when they were cut down by European invaders and their slaves, some 200 years ago.  That means that the wood in my Empire table started growing some 600 years ago.  I would be surprised to know that any "mahogany" being sold these days was more than 50 years old!

As an example, last week a client brought in a Hepplewhite shield back chair from his dining room set which was nicely carved and well designed.  He had the idea that it was from 1800, but, as soon as I saw it, I complimented him on the quality of his "reproduction."  He was a little surprised and more than a little disappointed to learn that, but I patiently pointed out the various features that clearly indicated it was a reproduction.

Most of all, I said that, if it were made of Cuban mahogany, it probably would have not broken.  By making a true shield back design in Honduras mahogany, it was inevitable that it would break.  The wood does not have the strength to support the normal use that a chair sustains.

Not only was it badly broken, but it had been repaired with a combination of super glue, "the strongest glue on planet Earth," and putty.  None of that worked.  Repairing a shield back chair is one of the most challenging repairs, as the design violates all the normal strength elements of wood.  Add to that problem the difficulty of removing synthetic glues and putty and it becomes an interesting project.

It is hard to see, from the photo above, but I used elastic bands, tape, wood clamps, bar clamps, "C" clamps, and my imagination to reconstruct the chair back.  First I cleaned off all the broken surfaces, using a toothing plane and small chisels.  Then I went through the sequence of assembly, without glue, so that I clearly understood where to start.  Then I cut and attached blocks of pine where I needed to put the clamps (see my post on Vector Clamping).  Then I warmed up the room and glue and started to put it together.  Of course I used Old Brown Glue.

This project took 2 hours of preparation and nearly 30 minutes of actual assembly.

By the way, in 1976 I was quoted a price in Paris for Cuban mahogany elements of antique furniture at $6000 for a cubic meter.  That is one of the reasons I started buying the stuff.  When everything else fails, I can still break up all my furniture and sell it for scrap!