Showing posts with label upholstery. Show all posts

Saturday, March 24, 2018

Eastlake Settee Upholstery

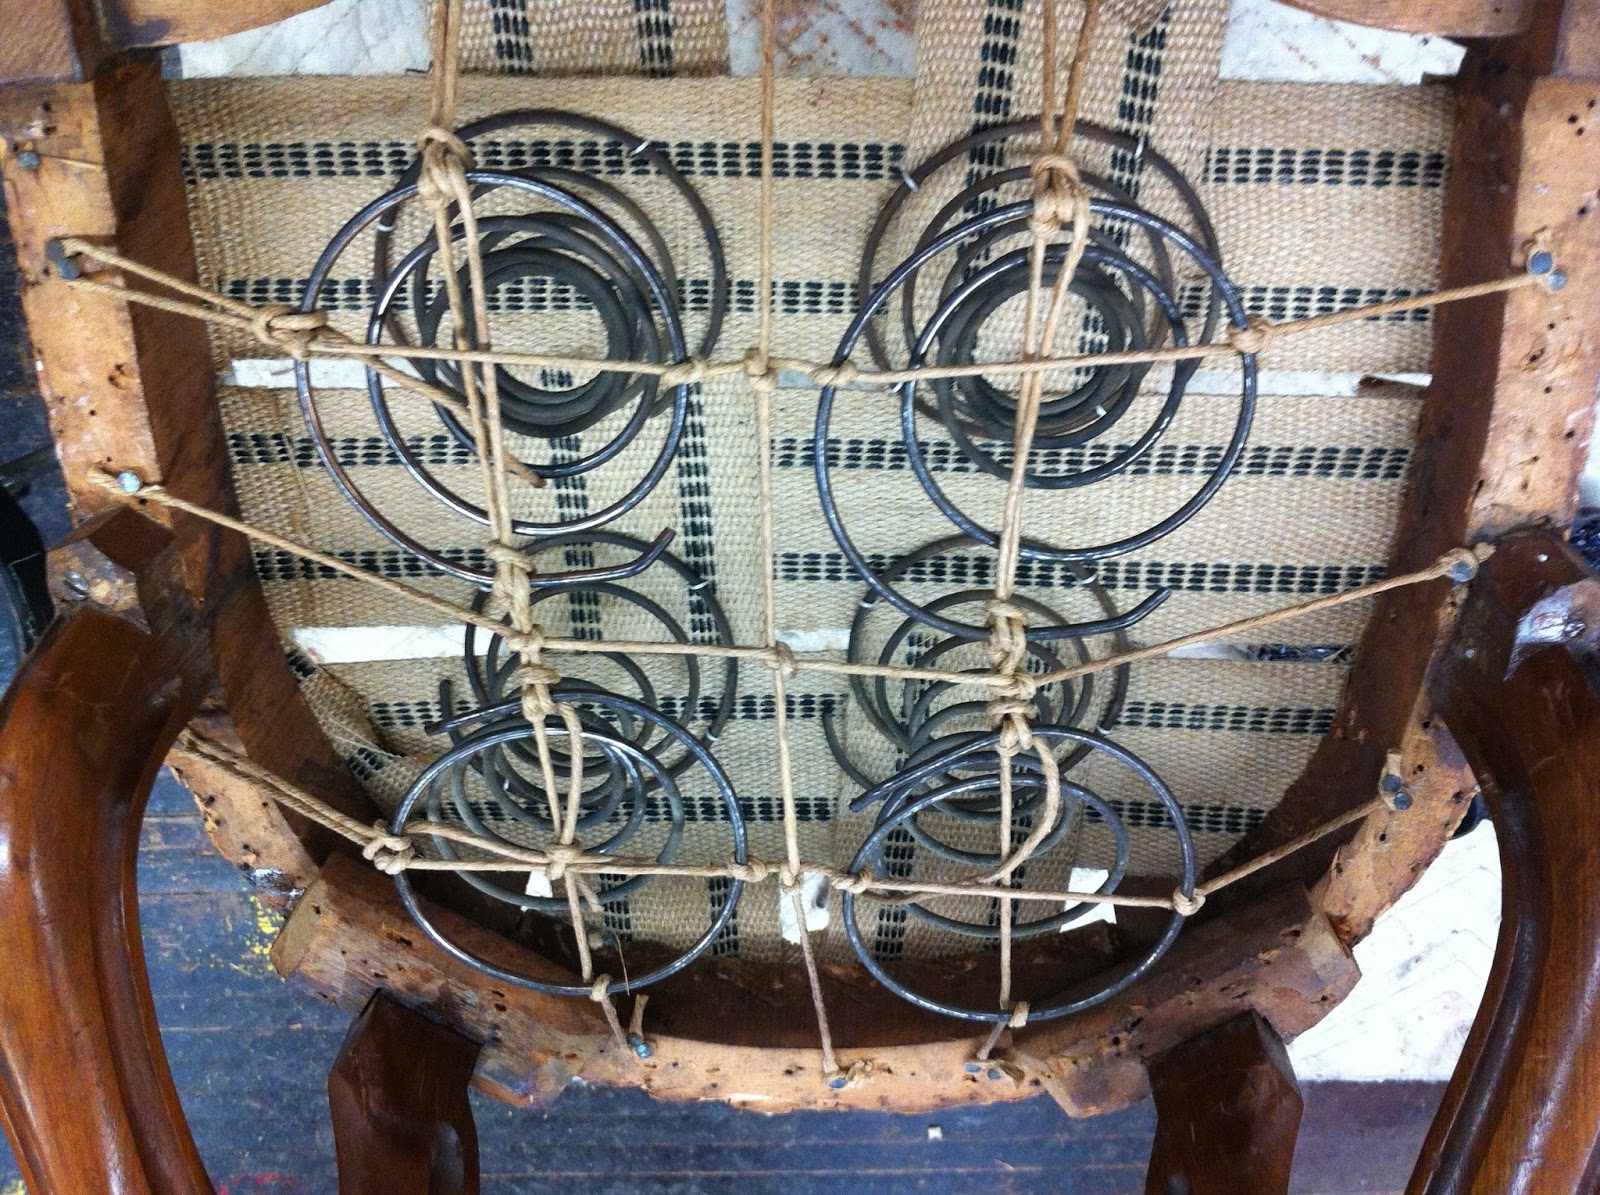
Not Enough Springs and Badly Tied


Dead Foam on Old Cotton on Plant Fibre with Original Edge

Three Days on the Bench for Structural Repairs

More Springs Added and Tied 8 Knot Italian Cord

Original Plant Fibre Edge Back in Place with Burlap

Original Hair Stuffed Arms and Back Panels Conserved


New Horsehair Added for Seat Foundation


Burlap Covers Hair

Front Edge Stitched to Hold Hair


Muslin Covers New Seat Foundation

50/50 Cotton Batting Covers Muslin


Eastlake Sette Ready for New Century of Use

Tuesday, June 27, 2017

"Modern" Upholstery Conservation Methods Destroy Evidence


Grecian Sofa with Modern Upholstery
For the past several years (actually, since "alternative upholstery conservation" methods were first introduced early in the 1980's) I have had a serious problem with museum conservators destroying original upholstery and the evidence of its traditional construction.  I am a scientist by training.  I believe in analysis, documentation, evidence gathering and research.  I am shocked constantly by what I see in the most important museums in America as the practice of upholstery "conservation."

Two recent events are now pushing me to blog once again about my concerns.  First, as you know, I just got back from an extensive tour of the East Coast.  From Williamsburg to the Met to the Boston MFA  and the Getty, I saw the same thing over and over:  Important and iconic examples of early upholstered furniture with obviously fake upholstery, evident from across the room.  It doesn't even pass the smell test.

The second event occurred this week as I picked up a copy of the 1997 book "American Furniture" edited by Luke Beckerdite.  I love this series of books, published each year by the Chipstone Foundation.  They are wonderful and full of research.  But, when such a distinquished journal publishes articles which can damage the field of decorative arts they need to be identified as such and the article needs a full discussion among professionals.


Surviving Example of Easy Chair Upholstery

This is what concerns me.  The process of removing original upholstery and replacing it with modern materials has been established by "tradition" for so long that it is no longer questioned as valid.  I feel like I'm fighting an uphill battle to get authentic upholstery methods understood and properly conserved before they all are lost forever.

The article which caught my eye is by Leroy Graves and F. Carey Howlett, titled "Leather Bottoms, Satin Haircloth, and Spanish Beard: Conserving Virginia Upholstered Seating Furniture" (Pages 267-297).  It represents the state of the art of this process of saving the wood frames at the expense of the upholstery, and, if you go to the Wallace Collection at Williamsburg you will find nearly every piece in the collection has been treated this way.

Let me quote from this article and then respond using simple logic and scientific questioning.

"Because so few objects survive...the preservation of the chair in its current state takes precedence over restoration to its original appearance."

This statement indicates the concern that more and more examples which retain original upholstery layers are being lost.  I would therefore conclude that the surviving examples must be protected in their untouched state for future analysis by more competent conservators.


Untouched Upholstery 

"The conservator is faced with two difficult tasks: preserving extremely fragile upholstery materials when they survive and reconstructing the appearance of the original upholstery..."

Of course the visitor to the collection should be presented with an object which reflects, as nearly as possible, its original condition.  My question is: does the replacement of original upholstery with copper, plexiglass, Ethafoam and Velcro effectively present a visually authentic result?  Also, what methods are to be used to conserve the fragile materials which are surviving?  Are they to be placed in a drawer in a research laboratory completely removed from the object to which they belong?


How Does This Preserve Upholstery Methods?

"The conservator's work is typically complicated by the overlapping evidence of numerous upholstery schemes.  Distinguising individual schemes can be time consuming and in some instances virtually impossible.  To produce a credible reconstruction of historic upholstery, one needs to develop a thorough understanding of the techniques, materials, and tastes of the period and place of production."

This single statement reveals the most important flaw in the logic of this process.  Frankly current museum conservators are not seriously researching the upholstery methods, including subsequent upholstery commercial restoration treatments, as much as they are researching the wood frames.  When a conservator uses "time consuming" as an argument, he is neglecting the most essential part of his job description.  He is tasked, by definition, with taking all the time he needs to fully understand every aspect of the historic object under his control.  Upholstery is actually more important than the frame, but the frame gets all his attention.

There are still many old professional upholsterers in most large cities who understand traditional methods of upholstery, and how those methods changed over the centuries.  I am a good example.  You can just search this blog for "upholstery conservation" and see what I have learned over the past 50 years or so.  In particular look at the post from last November (11/29/16) and see what simple conservation methods can produce.

I have learned traditional methods of upholstery by careful deconstruction of original layers, which allows me to understand what was original and what was restored, and when the restoration must have occurred.  I then simply replace any damaged or rotten materials with similar materials as closely as I can to the original.  Jute, burlap, muslin, cord, twine, cotton are used to replace the same. The springs and organic stuffing are cleaned and retained in all cases.  That means treating horsehair, wool, Spanish moss, straw, excelsior, and any other organic material used as stuffing with respect and care.  The final result is as close to the original appearance as possible, and can still provide comfort for many years.

As to the damage the upholstery nails cause to the wood frame, which is the main reason for this new "non invasive" upholstery method, that can be resolved with proper techniques.  Using the smallest upholstery nail which works is one way.  Using a protein glue and a covering of muslin or burlap on the wood is another.  In serious cases it is also possible to remove a portion of the damaged wood (which is under the upholstery) and replace it with similar wood.

In the worst case, where the wood frame no longer supports the upholstery a "chassis" or new wood frame can be built to fit inside the old frame.  This new frame can then be properly upholstered with traditional techniques and that serves to provide understanding of traditional methods for future analysis.


This Is Not Period Upholstery

"The goal of treatment may be to re-create the appearance of one of the early schemes, but this task must be accomplished using unconventional, nonintrusive techniques."

This final statement, which is at the beginning of the article, represents the actual failure in the logic of this approach.

I consider the task of deconstructing upholstery layers similar to that of archeology.  In each profession it is the job of the scientist to carefully analyze and document each layer in succession as it is exposed.  During the 1870's there was a German archeologist and con man, Heinrich Schliemann, who claimed to have discovered Troy.  In fact, he dug without any consideration to the process, throwing all the debris in a trash pile, passing through the historic layer of Troy itself, continuing until he found gold.

Subsequent archeologists now have the difficult task of digging through the trash pile in an effort to understand which object came from which strata.

I see a similar fate for future conservators who struggle to understand historic upholstery methods by looking at a naked frame, covered in nail holes, without any context or relationship to the missing materials.

The next time you wander through a museum looking at the upholstery, take a moment to determine if what you are looking at is authentic or fake.


Wednesday, November 30, 2016

More Upholstery Conservation


Mahogany Armchair 

I want to show another project in the shop which is being restored.  In my normal business operation I work each week on similar projects for maximum efficiency.   One week will be repairs, another will be veneer or marquetry, the next may be surface preparation and then a week of polishing.  At that point the shop is usually clean so I can do some upholstery.

This past week has been upholstery.  Hence the post yesterday.

Today I want to follow up with an armchair made in the Great Lakes region around 1890.  These lather covered chairs were popular with the railroad and land barons of that Gilded Era.  This one is covered in black oil cloth, which is no longer made so it will be restored in leather.

Missing wheels.  Original wood finish.

Looking underneath I found the label of the last person to work on it.


He was trying to repair the springs by replacing the webbing only.  Note my comments in the previous post on why this is not the best approach.  However, his repair got the chair this far, only because it was in storage for most of that time.

Poor effort to sew springs to jute

One problem with just replacing the webbing is that it is difficult to properly sew the springs in place.  This photo shows his effort, which was insufficient to do the job.

Seat springs from top
This shows the springs after the seat foundation is removed.  Springs are not in proper position and cord is broken.  I removed them, cleaned up the area with a vacuum and used tufting twine to properly sew them in place, tying the tops with 8 no† Italian cord.


Starting the removal of upholstery foundation

Here I have already removed the side arm stuffing.  Next is the careful removal of the seat and back, layer by layer, tack by tack.


Jute webbing failure to support springs

One of the great things about traditional upholstery is that you can learn how to do it by careful observation of the process during deconstruction.  Removing layer by layer teaches the worker how to put it back in the same way.  The main goal is to conserve springs and stuffing while replacing jute, burlap, muslin and cotton.

Front of back spring package
On the back the original method was to secure the smaller springs only with twine, cover †hem with burlap and then sew them to the burlap.  This saves time and money.


Chair laying down with new burlap

Seat foundation material


At this point the original stuffing can be cleaned of tacks, vacuumed and carefully positioned in its original location.  New muslin is tacked over this.

Nice and even work


Getting ready for final stages of work.
Now I need to get some leather and begin tacking the cover.  I can also spend some time on cleaning and waxing the wood.


Tuesday, November 29, 2016

Simple Upholstery Conservation Lesson


American Victorian Louis XV Parlor Chair


I am always pleased when the client understands at what point they should stop sitting on upholstered antique furniture and find a good traditional upholsterer who can save the stuffing.  Restoring the quality of the seating comfort on antique furniture depends completely on saving the original stuffing, whether it is horsehair, Spanish moss, shredded wool, straw, excelsior or any other period material.

When I was a young man and wanted to restore cars I got some valued advice from an expert mechanic.  I thought I could just get away with a valve job, and spend my money only on the head.  He informed me that, if I only repaired the top end, considering the miles on the engine, then it would be soon that the rings would fail, burning oil.  If I was to repair the valves, it would be a good idea to replace the rings and have the cylinders done.

He was right.

Traditional spring seats are exactly the same concept.  The springs are held from the bottom by jute webbing and tied at the top with cord.  Under normal use and age the jute sags and eventually the springs fall out the bottom.  However, at the same time the burlap on top of the springs gets old and rots.  The cord stretches and breaks or pulls loose.  Many upholsterers simply add new webbing on the bottom and do not address the top of the springs, since that means a lot more work.  What happens is that very soon the springs break through the top burlap and begin tearing into the stuffing. If the seat continues to be used it will be a short time before the stuffing is ruined.

I have always made an effort to conserve what ever stuffing was original to the object.  Over the years and after too many projects to remember, I have worked out a process that I think is appropriate.  Today I did a simple Victorian side chair, which took only a couple hours, and took the time to photograph the process for my blog.  I hope this documentation helps others to understand what is required for proper conservation of antique upholstery.

To begin with, you need to carefully remove all upholstery, tacks (or staples) and set everything aside.  It is best to wear gloves and a dust mask for this work, as it can be pretty disgusting.  When the wood frame is naked, all wood repairs need to be done.  I like to use liquid Old Brown Glue on areas where the tacks and nails have damaged the wood.


Repair the frame after Removing all Upholstery

To begin with, jute webbing is stretched across the bottom of the frame, using large tacks on each end.  The ends are folded over and a series of 5 tacks is applied in a staggered pattern to avoid splitting the wood.  The webbing is woven over and under and stretched as tight as possible with a webbing stretcher.
Tack webbing with 5 tack pattern


The springs are positioned properly and then sewn to the webbing with a curved needle and tufting twine.  The twine needs to be pulled very tight to keep the springs from moving during use.

New webbing in place, sewn to the springs

On this particular chair the springs were tied using a 4 knot pattern.  This means front to back and side to side.  I prefer to use an 8 knot pattern, since adding the diagonals means more support for the springs and burlap and a longer life for the seat.  Since I determined the original cord was still functional, I added the diagonal strips using Italian spring cord.

Original 4 knot spring cord

Better 8 knot pattern


After the springs are secured, a new layer of burlap is added, tacking to the top of the frame and using a curved needle and tufting twine, sewn to the springs.

New burlap, sewn to springs at top


Now the first layer of original stuffing is carefully examined and all old tacks or staples are removed. Also it is good to use a vacuum to remove any dust or other material which does not belong.  In this case, the original stuffing was straw, which can easily fall apart if you are not careful.

Original Straw Stuffing

Place this layer directly on top of the new burlap.  I use sand bags to hold it down while I tack the edges.  Usually the burlap is fragile and it tears on the edges.  You only need to hold it in place for a short time, since a new layer of burlap is immediately added to secure it in place.

Holding Straw package in place and tacking to frame


Notice the original pattern of stitching which shapes the edge and holds the stuffing in place.  This is what is important to conserve as much as possible.  It gives the shape to the upholstery.

Cutting a "Y" to go around wood frame

Where the burlap needs to be cut for the frame you use a "Y" cut.  This method is used for muslin and final fabric to go around the wood properly.

New burlap stitched in place over old stuffing

This new layer of burlap is stitched in place using a curved needle on the edge and a long straight needle in the center.  This new layer of burlap under and on top of the old stuffing package serves to conserve the original foundation and restore the life of the seat.


Spanish moss second layer of stuffing

The next layer of stuffing in this case was a layer of Spanish moss.  Many people do not know the difference between horsehair and moss, but if you look closely you can see that one is an animal hair and the other is a plant fibre.

50/50 cotton batting


The original cotton batting is discarded, since it is always dirty.  Cotton batting serves to provide a dust filter preventing outside dirt from getting into the seat stuffing as well as inside dirt from escaping.  It also provides a smooth surface for the final fabric.  I always use 50/50 cotton, but many other workers use 85/15.

Burlap tacked on top of frame


It is important to note that the burlap is nailed on top of the edge of the frame.  This allows the muslin and final fabric to be nailed to the face of the frame.

Muslin tacked to front of frame over cotton


On the bottom of the seat a black bottom cambric is nailed to cover the webbing, using small nails.


Black bottom cambric over webbing


After the final fabric is tacked in place an appropriate gimp trim is applied using gimp tacks.  Now you are done and it only took a short time to restore the upholstery professionally.  The seat is ready for another century of comfort.

Thursday, September 8, 2016

Am I Really Obsolete?

Tools of The "Forgotten" Trade


I remember vividly in June of 1969 meeting an old man who was a traditional upholsterer.  It was in a  shop around the corner from where I lived, and, in fact, just a block from where I still work.  He was trained in New York in the ways of making furniture comfortable and stylish.  I can still see his muscular hands, even though he must have been nearly 80 years old, pulling the cord to tie the springs, working the muslin to get it even and stitching the burlap, creating a perfect edge from the horsehair.

I remember being shocked when he casually used his magnetic hammer to pick up a bunch of upholstery tacks and put them in his mouth.  Who would even think of doing that?  As he worked he would rapidly put the hammer in his mouth and put a tack on the end, then driving it in place with amazing precision.

This was the first time I saw a worker "spitting tacks."  I had to try it, and almost immediately discovered that I could make a good living restoring upholstery on antiques.  In fact, the ability to not only work on the wood frame, but to be able to upholster as well, put me in a class by myself.  No longer did the client have to take the frame from the refinisher to the upholsterer to get it done.  One stop shopping.

Of course, during those early years a lot of places were able to supply traditional materials.  I would go shopping on a regular basis in my area and get quality muslin, burlap, spring twine, tufting cord, cambric (not the synthetic stuff...actual black muslin), pounds of 100% horsehair, 50/50 cotton batting, coiled springs in various sizes, and boxes of tacks.

Much of that list is no longer available these days as the trade has completely changed.  Foam and staples have become the standard process and more than a few upholsterers I have met have expressed shock and surprise that I don't even have a staple gun.  (Woodworkers also are surprised to find I don't have a table saw or router, but that is another story.)

I charge extra for projects which have been "converted" by other workers who throw away the original stuffing and staple on their synthetic materials.   I hate staples.  They don't hold well and removing them is a pain.  Usually I bleed from some unseen fragment of a staple which gets me as I work the job.  I think modern upholsters use their staple gun like a 2nd amendment enthusiast who goes to the gun range and fires thousands of rounds.  You cannot believe how many staples I find.

Tacks in Different Sizes, Including Gimp Tacks

The simple fact is that I have spit tacks all my life.  Hundreds, perhaps thousands of pounds of tacks. All sizes: 18, 16, 12, 10, 8, 6, 4, 3, 2, and even 1 1/2.  To be honest, any tack above #10 I don't put in my mouth.  They have a tendency to get stuck in the top of my mouth which hurts, so I just place them on the hammer individually.  However, it is rare to use such large tacks, as a skilled traditional upholsterer will understand to use the smallest tack which will do the job, to minimize the damage to the wood frame.

Spitting tacks is important.  It allows the right hand to work the hammer with precision, as the left hand manipulates the material and holds it in place.  This allows amazing speed and precision.  Most people do not even know how to work the hammer properly.  Notice the head is curved on a radius.  If you hammer from the elbow or upper arm you cannot hit precisely in the same spot each time.  You need to pivot the hammer just from the wrist, holding the upper arm steady against the body.  Since the distance from the wrist to the head of the hammer is fixed you can swing the arc exactly the same each time.

That means you can set the tack and hit it several times without missing.  Also you can work next to the polished wood frame or gold leaf frame of the chair with confidence.  People who watch me work are stunned that I never seem to miss the target and can hammer with a certain force right next to the edge, perfectly and precisely,  all day.

About 20 years ago the local supply house stopped selling tacks.  I bought all the surplus they had, but those are long gone.  I started to shop nationally and even internationally in order to keep my supply of tacks from running out.  One by one the old companies stopped production.  Nobody bought tacks so nobody made them.

As a side note, one day a ballet teacher came into my shop and showed me a #12 upholstery tack.  She wondered if I had any like that.  I showed her several boxes, each weighing a pound.  She was shocked.  "These are special tacks for ballet slippers.  They are sold in Florida and cost $12 for a package of 6!"  I handed her a dozen and said "Have a good day."

I also remember using tacks to attach my cleats to my shoes when I raced bicycles.  That is another application which is no longer done.  Toe straps are gone and you buy a bicycle without pedals!!


A Cobbler's Tray 

In desperation recently, I found a supplier in New York who said they could get me tacks.  I ordered and received 50 pounds of #3, since that is the most common tack I use.  They tasted terrible!  They were crooked and different sizes and I imagined they had been gathered up from the floor and put into a box.

I complained and received this note:

"For years our former supplier of the cut tacks "Crown Nail" of England (no longer in business) made the best cut tacks around the world and went the extra step to insure his quality and sterilized products do to the amount of 'spitters' years ago...We would not recommend doing it 'the old fashion way' i.e.; putting them in your mouth any longer as we do not have the same relationship with the Indian supplier as we had in the past with Crown Nail and we do not know the methods of 'degreasing' the products."

I can work around the lack of materials, like silk or 100% cotton damask, silk or wool mohair, and even good quality horsehair.  I cannot work without tacks.

Am I obsolete?  Is the craft of the traditional upholsterer dead?

I cannot believe I am alone in this trade.  If you read this and know of a supplier of good quality sterilized cut tacks, please let me know.


PS:  You may notice the comments to this post.  I am unable to imbed a link in the comments section so here is the link to the "Tack Spitter" Master Tack Spitter Video

Thursday, July 10, 2014

Shop Tour!

Ring the Bell
The front door at my business used to have a stained glass transom window above it.  It was lovely, as it faced West and the setting sun would shine in through the glass.  My wife, Kristen made it, back in the "hippie" days and it really gave the front room class.

However, two things conspired to change that.  First of all, the transom was held in place with a chain, which allowed us to open it and let the air in.  One day that chain came loose and the window fell completely open, hitting me on the head.  Of course, I fixed it, but the bump left a mark.

The real reason was that KFC built a "restaurant" across the street, some 30 years ago, and connected their sewer line to the main line which runs directly in front of my shop.  Before KFC, my business was the first building on the end of the line, and there were no problems.  As soon as KFC began to operate, I found large quantities of "effluent" bubbling up out of my front toilet.  In fact the front room, which was full of antique furniture, had 6" of standing sewage when I arrived the next day.

Of course, KFC denied any involvement, and the city inspector accused me of putting "something" down the toilet, threatening to shut me down.  My damage claims were denied, and I had to clean up the mess.  The only good news was that KFC quietly relocated their drain to the larger commercial sewer directly in front of their store, instead of the smaller residential line in front of mine.

The city inspector determined that, since the sewer line had a very shallow slope, and that the front toilet was on a slab at ground level, it was easier for overflow to come out the toilet instead of lifting the manhole cover.  That was the news that signaled the end of the stained glass transom.

At that time there was news that a contractor in Los Angeles had laid a new basketball court improperly, and it had buckled severely and needed to be replaced.  This floor was made of 3/4" T/G hard maple, and finished with all the basketball lines and such.  The contractor had taken a saw and simply cut the floor into 12' x 8' chunks and piled them outside.  They were free for the taking.

Several of us guys (the ones with trucks) drove up there in a caravan and loaded up as much flooring as we could lift.  I remember my truck sitting on the axle, as I drove home with my headlights pointing to the sky.

Soon, I had a beautiful new hardwood floor in the front room, which raised the floor (and the toilet) over 6" (more than enough to solve the overflow problem).  The result was that I now hit my head on the transom window, which needed to be removed.  That meant I had to build a new front door, which ended up nearly 8 feet tall.
3815 Utah Street

That was over 35 years ago, and I still miss the light coming through the window.

The rest of the building has been changed and adapted to my uses over the years.  Thanks to Asa, at Fine Woodworking, I can invite you to take a tour.  This link will take you to a short presentation.

3815 Utah Street Shop Tour

I hope you enjoy it, and if you are ever in San Diego, please ring the bell and visit.