Showing posts with label tarsia. Show all posts

Thursday, August 14, 2014

Tarsia a Toppo or Inlay?

The Cube Design "inlay" around the Drawers is Tarsia a Toppo

Charles Montgomery was one of the most important men in my life, even though I only met him once.  Isn't it amazing how someone can have such an impact in such a short time?  Of course, I had followed Mr. Montgomery and his work for nearly a decade before I met him.  During my time at Winterthur, I managed to find a drawer in the back room of the library where his 3x5 index note cards were kept and I read every one more than once.

At that time I was working on my personal research project: "The Regional Characteristics of American Empire Furniture 1815-1845" and wanted to show it to him.  So in August, 1977, I travelled to Yale and walked into his office.  His secretary was very pleasant and told me he was returning from Europe and would be in the following Monday.  I left my name and contact information for where I was staying in Hartford and left, unsure if I could actually get a chance to see him.

To my surprise, early on Monday I received a phone call from the secretary telling me that Mr. Montgomery would be pleased to meet with me the next day.  I hurried down to Yale and was waiting for him when he arrived that morning.  I noticed that his secretary had a desk full of work that I assumed needed Mr. Montgomery's attention after his trip.  Instead, as soon as he walked in, he shook my hand, smiled to his secretary, and said that he would be in conference and not to be disturbed.

He invited me into his office, which was a desk surrounded by books and file cabinets.  He pulled out a yellow legal notepad, picked up a pen, sat down and said:  "Tell me what you have found."  We talked for 4 hours.  At the end of my "presentation" he said that I needed to follow up on some other lines of research, in particular the "Price Books" of that period.

As you can imagine I floated out of that meeting and the rest of the day was a blur, as I continued on my trip.  When I returned home the next week, I found a letter from him.  It was dated August 16, 1977 and said:

"I enjoyed seeing you last week and remembered after you left something that I should have told you about, namely, an article I had on regional characteristics in a wonderful book, American Arts, 1750-1800: Towards Independence.  It dealt with regional characteristics and I enclose a xerox copy for you.
Good luck to you."

The next year I heard that Charles F. Montgomery, Curator of the Garvan and Related Collections of American Art and Professor of Art History, had died at the age of 68.

The reason I am thinking of this episode of my life is that Charles Montgomery wrote one of the most important books on American Furniture I have: American Furniture: The Federal Period, published in 1966.  I asked him to sign my copy when I was there, and he graciously wrote: "For Patrick Edwards, on the occasion of a most interesting discussion about Empire furniture.  Good Luck."

In this book, he began to create the basic structure for "regional characteristics" as a way to understand American furniture, and his work is certainly responsible for the quality of research and analysis that is currently being conducted.  He discussed form and design, including decorative elements, as well as wood species and construction features, and started the classification of these features using documented examples from each region.

One page of the book, in particular is significant, as it is the first time I am aware of that the "inlay" motifs found on furniture are attributed to a region.


Taken from Montgomery's Book

Charles Montgomery referred to this material as "Stringing and Banding" and most woodworkers I know just call it "inlay."  Mr. Montgomery did not explain how it was made or why he considered it to be a regional characteristic beyond the fact that it was found on documented pieces from a certain area.

It was a decade later that Dr. Pierre Ramond published his work, Marquetry,  that I actually began to understand the process of how this "inlay" was made, and why it might be localized to a certain region. In addition, I learned the proper name for this decoration: Tarsia a Toppo.  The real problem with the term "inlay" is that it is both a verb and a noun.  Thus, I can describe "inlaying the inlay" into my furniture, but it is not clear what I mean.

Pierre shows the process of making Toppo in his book.  His chapter on "Procedures" breaks down the historical development of marquetry into 5 methods, each with a uniquely different process.  Tarsia a Toppo is one of these.  The reason it is local to a specific region is that a workshop making Toppo generally only makes Toppo, and not other work.  The design is built up in a block which is quite large, and then strips of "inlay" are cut off and sold.  To survive in the market place, a Toppo maker must have several cabinet shops in the area to purchase his stock.  That is why a Toppo supplier in New York would usually supply New York cabinet shops and a maker in Boston would supply Boston and the surrounding area, and so on.

Pierre illustrated the making of Tarsia a Toppo here:


Taken from Ramond's Book

I am sure that there are an infinite number of possibilities for Toppo design.  That is one of the exciting things about the process.  If you can imagine it, then you can build it.

These days, inlay banding or Toppo is manufactured commercially and sold in supply houses.  Here is an example of "store bought" and "home made" strips:


Commercial Strips on top and Home Made on bottom
Over the years I have made toppo for projects and restoration, generally since I work in thicker material and modern strips are too thin for my use.  Also, I like the subtle irregularity in the design which matches the hand made work I do.

Here are some of my examples:


Home Made from Sawn Veneer
And for lectures, I have made a larger than usual example to pass around:


Sample Toppo
There is a sub-set of Tarsia a Toppo which is unique to England.  It became popular during the 19th century and is called Tunbridge Ware.  I have a book written by Brian Austen and published in 1989 which goes into great detail about how it was made.  I usually compare it to needlepoint, in that the design is made up of small squares of wood in different colors.  Like Tarsia a Toppo the design is made up into a large block and then cut into thin strips which are glued on the project.  Here is a page from Mr. Austen's book:


How Tunbridge Ware is made
Here are two examples of this type of work which are also from his book:


Two examples of Tunbridge Ware


Rosewood Box with Tunbridge Ware 
Another example of this type of work is a method used in Japan.  I first heard about it from Pierre and almost didn't believe it was possible.  However, now that I see it on YouTube, I believe it.  It involves the same method of making a pattern in a block.  The big difference is that the strips are not sawn off the block, but instead a razor sharp plane is used to strip off the surface, which is then glued down on the project.  Simply amazing.  

Here is one example of the Japanese Tarsia a Toppo method: Japanese Work

Like the Tunbridge Ware I would not like to be asked to restore this kind of surface.  I am kinda spoiled by working with 1.5mm thick sawn material.  As to my mentors, Charles Montgomery and Pierre Ramond, I can only express my deep gratitude for the time they spent to answer my questions.

Wednesday, August 13, 2014

Tarsia Geometrica Part II


Italian Commode


To continue the explanation of Tarsia Geometrica and its various forms from the previous post, I would like to return to the term "frisage."  Obviously this term is French and not much used in American woodworking shops.  However, it is really well known under different terms in our language.

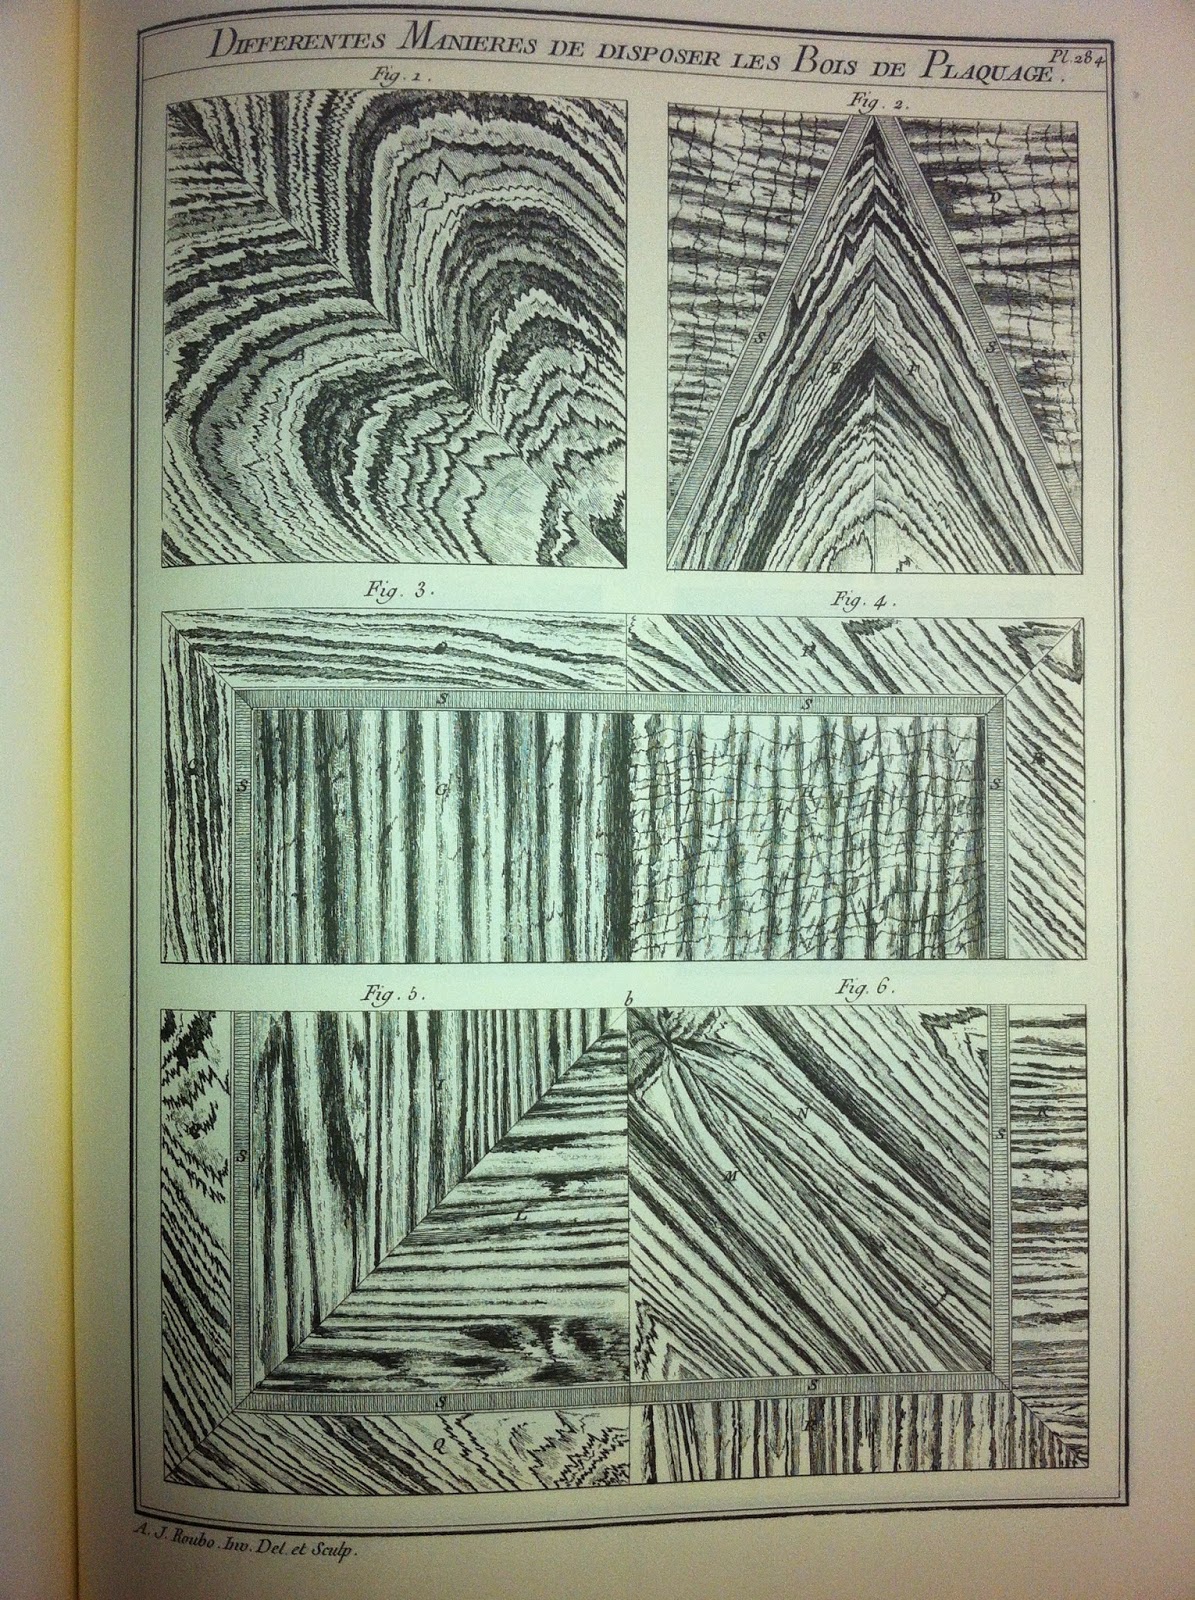
To put it simply, the worker in veneer often takes a flitch of veneer and matches it in some way to make a decorative pattern.  In English these are called "book match" or "slip match" for example.

Roubo, writing in his 18th century treatise, illustrated various frisage patterns as follows:


Roubo Illustration Volume IV


Take this Italian commode, which I recently had the pleasure to restore.  The facade of the drawers have a frisage made of French walnut, and the border is a frisage of lignum vitae.  The border is a good example of using the sap wood and heart wood of a dark species to create a vibrant effect.

Look at the end of the commode:

Italian Commode with Decorative Frisage

This frisage is made by using a pattern to cut the veneer as follows:

Two Common Frisage patterns

The pattern used on the commode is the "diamond" or "square" which is illustrated by the right example. Simply changing the direction of the grain and using the same method creates the "reverse diamond" or "cross" as shown on the left example. You will note the chalk on the left pattern.  I use this to show what can be done by placing the left pattern over the right pattern and cutting through both at the same time with a homemade blade of a certain thickness, like 2mm or 3mm or larger.  This will produce two results:  a diamond center with a reverse diamond border, and a reverse diamond center with a diamond border.  The gap left by the saw blade is then filled with an inlay strip of the appropriate width.

Using another pattern produces the butterfly pattern:

Butterfly Frisage

One of the most fantastic (and rare) examples of frisage is found on a few pieces from the 18th century and starts with sawing the log of wood at an angle.  Logs can be cut perpendicular across the end which produces "oyster" veneers.  However, by sawing at an oblique angle you produce "sausage" veneers.  If you have seen any of my tall case clocks, you will note I use both of these frequently.

Here is a large piece of sausage cut tulip wood veneer which is then assembled to create a wonderful frisage pattern:

Sausage cut Tulip veneer

So, frisage relies on using the same species of wood to create a pattern.  As I pointed out in the previous post, using different species and more complicated patterns creates a different term: jeux de fond.  I mentioned using a simple jig to cut the elements. Here is that set up:

Simple Jig for cutting Cube elements with Material and Saw in place

The saw is controlled to cut exactly 60 degrees.  The stop is set so the the material is exactly the same length on all sides.  The saw has no kerf so the cuts are fine and accurate.  The material packet is composed of three different species, in a long strip, glued on the end and planed to fit exactly between the two wood strips on the jig.  You push the strip (shown in the photo sideways for illustration) in the groove between the wood strips up to the stop.  Then you saw the packet and remove the pieces.  Repeat by sliding the strip again up to the stop and saw.  With this method you can easily and accurately cut hundreds of pieces for the cube.

As I mentioned also in the previous post, you can change the wood species and get dramatic results:

Different Examples of Cube Jeux de Fond

On the left is a cube made of the single species of ash, which creates a modern effect.  Next is a cube made of oak, with a similar result.  Then there is the classic cube with three different species.  On the right is a cube made of tulip which has a gradual change in the wood from heart wood to sap wood, and that effect is quite different.  Obviously there are unlimited choices, using the same jig.

Roubo illustrated the different patterns of jeux de fond as follows:

Roubo Jeux de Fond Volume IV


Creating a different jig produces the "chevron" jeux de fond pattern:

"Chevron" pattern

I should mention that these examples are some of the samples I made over 20 years ago and have managed to drag around from talk to talk.  They have suffered, and at one point, actually got rained on, so they are in rough shape.  I think it's time I made some new samples...

Next post will discuss the "tarsia a toppo" method.

PS:  I was just "reminded" by one of my former students and a rather talented woodworker/craftsman, Aaron Radelow, that he had posted some of this material years ago. Out of respect I provide here a link to his blog post:Radelow does Jeux de fond

Tuesday, August 12, 2014

Tarsia Geometrica Part I

English Jeux de Fond Coffer
I remember clearly the first time I was in France and visiting an atelier where several ebenistes were working.  Looking at their work, I noticed some of the marquetry was very geometric.  In my efforts to impress them, I used the term "parquetry."  They looked at each other with obvious blank expressions, and then looked at me as if I had just fallen off the turnip truck.

"C'est du placage, pas du parquet. Nous ne sommes pas menuisiers, nous sommes ébénistes."

(Translation:  "That's veneer, not flooring.  We are not 'menuisiers', we are 'ebenistes'."  In point of fact the former works in solid wood, and the latter uses veneer.)  It turns out that it is common for English speaking woodworkers to confuse the term for geometric marquetry with the profession of laying solid wood flooring.

They were helping me to understand that using the English/British term "parquetry" is not correct when  discussing a form of marquetry generally known as "frisage" and in particular "tarsia geometrica."  Another term for a version of this type of decoration is "jeux de fond."  Pierre Ramond's book discusses these terms in great detail, but there is general confusion about what they mean exactly.

Simply put, the overall term for the process of making this work is "tarsia geometrica."  This term includes other specific terms for different patterns which all use repetitive patterns in wood to achieve a decorative surface.

"Frisage" is used to describe simple book matching of slip matching of larger veneer surfaces, usually to create a background.  Normally, frisage work involves using the same species of wood in a way that creates a pattern.

"Jeux de fond" is also referred to historically as mosaic work, as it involves much more complicated patterns of shaped elements, usually with different species of woods.  In many cases it creates a 3-D effect.  The most well known pattern is the cube, made up of three different pieces, each a different color density.  This pattern is also found in quilting and tile work.

Recently, I had the opportunity to restore several excellent examples of tarsia geometrica.  One was an Italian commode, made late in the 18th century.  The other was an English coffer, made early in the 19th century.  Each one needed extensive work in re gluing the marquetry and re polishing but in the end they looked magnificent.

I will discuss the commode in the next post, as it included a technique known as "tarsia a toppo" and I want to clarify why that is different, even though the final results are similar.

I want to start with the simple cube design:


Cube Design on Assembly Board

This is a rather common design and forms the basis for what follows in this discussion.  The cube is made of three elements, each one identical to the other in shape and size, but different in species.  By changing the wood species and grain direction of each piece, you can vary the effect.  I use a simple plywood cutting board, with a 60 degree slot for my back saw, which has little or no set to the teeth.

I will explain more about the cutting jig soon, but today I just want to discuss how this motif is used in a complicated jeux de fond pattern.  To illustrate further, consider if the cube elements were cut in one size and then also cut twice as long and combined.  This would be the result:


Large Cubes with Small Cube

Now if you take the same design and turn it 180 degrees it changes:


Large Cubes with missing Small Cube

This effect is an optical illusion that the brain automatically understands.  Since light naturally comes from above, the brain computes the top of some form as being lighter.  When the design is rotated 180 degrees the brain understands it as a completely different image.

I thought I would make a sample panel which incorporated both of these designs with a common joint in the center:

Compare Left side and Right side


Another experiment I tried was to make a three dimensional grid:


Experimental Grid design on Assembly board
There are lots of ways you can develop different designs with this idea.  The English coffer at the top of the post uses the cube in a very imaginative way.  There is a lighter grid floating in front of a darker grid, which in itself forms a cube space.  To add to that, there are three smaller cubes at the intersection.
It is a wonderful pattern:


How Many Cubes?
So, during restoration, I took the time to trace this pattern for future projects:


Tracing with Wood Species and Grain Direction
I began to wonder where this amazing pattern originated, so I picked up my copy of Roubo and started looking at the illustrations.  When in doubt, always start with the source reference material.  To my amazement, I found the direct source in Volume IV.  Here is the original Roubo design and after that my tracing of the pattern, showing it to be simply a repetition of the Roubo motif:


Roubo Volume IV


English Coffer derived directly from Roubl


Here is the top of the coffer with the nautical compass in the center:

Coopered oak top with jeux de fond marquetry

Next post will continue this analysis and compare with similar marquetry decoration.

Friday, July 16, 2010

What is Marquetry?

The history of furniture surface decoration is full of examples where complex designs were created using exotic materials. For thousands of years artisan woodworkers used their creativity to add value and style with simple methods and simple tools. The language of the trade varies from period to period and country to country. That is why, when Americans ask me, "What is marquetry?", I often use the short answer: "inlay". However, that is the short answer.

I was invited to study the craft of marquetry at ecole Boulle, in Paris, by Dr. Pierre Ramond. You may find a copy of his thesis, "Marquetry", by using any book search. I recommend it as the authoritative dissertation on the subject. His book defines the various methods used in history and creates terms which I use to define each process that has been used to date.

The problem with using the English term, "inlay", is that it is both a verb and a noun, and, depending on how it is used, can be confusing. The term "marquetry" can be further subdivided into 5 historic processes, which can be used to clearly define what you are looking at.

TARSIA CERTOSINA: The first method used since ancient times, involves carving a cavity into a solid wood background and inserting a contrasting material. A knife or chisel is usually used and the inlaid elements are glued into place and smoothed down after.

TARSIA GEOMETRICA: This method uses patterns often found in tile work or quilts, and creates repetitive geometric patterns (like the cube) which are combined in an overall surface covering. The tools are usually a knife or veneer saw, with a straight edge or jig. In France, there are subsets of this method, with names like "frisage" and "jeux de fond".

TARSIA A TOPPO: This method produces the decorative inlay banding strips. The worker creates the pattern by gluing together a large block of different elements of wood, which create the desired pattern. Then he simply cuts off strips of this block to create the banding strips. In England, during the 19th century, a specific type of this method was popular, "Tunbridge Ware".

TARSIA A INCASTRO: This is the most popular method used to create marquetry. It was developed during the Renaissance, in Italy, and made possible by the creation of the fret saw blade. In this method, two or more materials are cut at the same time, using a fret saw blade. The result is a positive (premiere partie) and a negative (contre partie). The great cabinetmaker, Boulle, made this method famous, and he is honored by calling this method "Boulle". Another variation of this method is called "Painting in Wood", which is my favorite process. The American bevel cutting method is another variation of this process.

PIECE BY PIECE: During the 18th century the French evolved a new process, which they called "element par element". This new process was made possible by the invention and use of two new tools, the picking machine and the chevalet. The picking machine made it possible to create multiple copies of the design exactly. The chevalet allowed the worker to cut with great precision and make multiple copies of the marquetry with ease. This method was not exported and remained a speciality of the Parsian workshops.