|
| American Victorian Louis XV Parlor Chair |
I am always pleased when the client understands at what point they should stop sitting on upholstered antique furniture and find a good traditional upholsterer who can save the stuffing. Restoring the quality of the seating comfort on antique furniture depends completely on saving the original stuffing, whether it is horsehair, Spanish moss, shredded wool, straw, excelsior or any other period material.
When I was a young man and wanted to restore cars I got some valued advice from an expert mechanic. I thought I could just get away with a valve job, and spend my money only on the head. He informed me that, if I only repaired the top end, considering the miles on the engine, then it would be soon that the rings would fail, burning oil. If I was to repair the valves, it would be a good idea to replace the rings and have the cylinders done.
He was right.
Traditional spring seats are exactly the same concept. The springs are held from the bottom by jute webbing and tied at the top with cord. Under normal use and age the jute sags and eventually the springs fall out the bottom. However, at the same time the burlap on top of the springs gets old and rots. The cord stretches and breaks or pulls loose. Many upholsterers simply add new webbing on the bottom and do not address the top of the springs, since that means a lot more work. What happens is that very soon the springs break through the top burlap and begin tearing into the stuffing. If the seat continues to be used it will be a short time before the stuffing is ruined.
I have always made an effort to conserve what ever stuffing was original to the object. Over the years and after too many projects to remember, I have worked out a process that I think is appropriate. Today I did a simple Victorian side chair, which took only a couple hours, and took the time to photograph the process for my blog. I hope this documentation helps others to understand what is required for proper conservation of antique upholstery.
To begin with, you need to carefully remove all upholstery, tacks (or staples) and set everything aside. It is best to wear gloves and a dust mask for this work, as it can be pretty disgusting. When the wood frame is naked, all wood repairs need to be done. I like to use liquid Old Brown Glue on areas where the tacks and nails have damaged the wood.
 |
| Repair the frame after Removing all Upholstery |
To begin with, jute webbing is stretched across the bottom of the frame, using large tacks on each end. The ends are folded over and a series of 5 tacks is applied in a staggered pattern to avoid splitting the wood. The webbing is woven over and under and stretched as tight as possible with a webbing stretcher.
 |
| Tack webbing with 5 tack pattern |
The springs are positioned properly and then sewn to the webbing with a curved needle and tufting twine. The twine needs to be pulled very tight to keep the springs from moving during use.
 |
| New webbing in place, sewn to the springs |
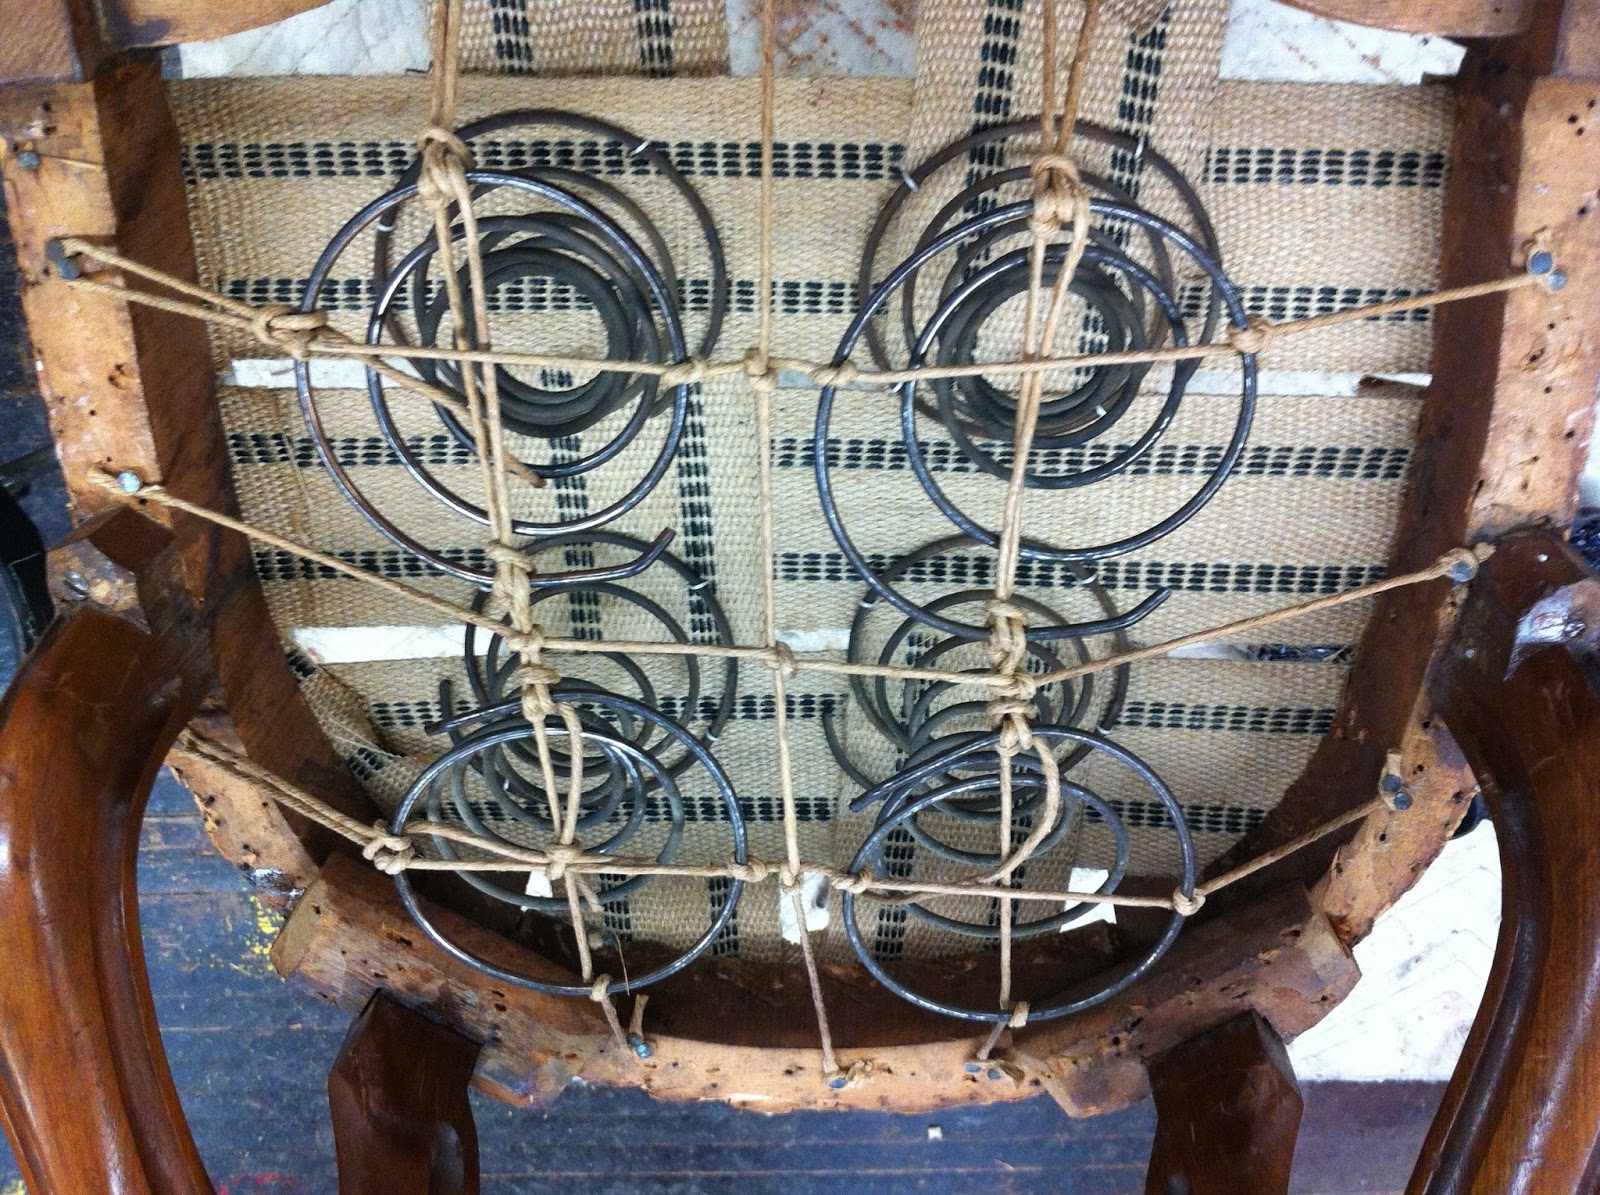
On this particular chair the springs were tied using a 4 knot pattern. This means front to back and side to side. I prefer to use an 8 knot pattern, since adding the diagonals means more support for the springs and burlap and a longer life for the seat. Since I determined the original cord was still functional, I added the diagonal strips using Italian spring cord.
 |
| Original 4 knot spring cord |
 |
| Better 8 knot pattern |
After the springs are secured, a new layer of burlap is added, tacking to the top of the frame and using a curved needle and tufting twine, sewn to the springs.
 |
| New burlap, sewn to springs at top |
Now the first layer of original stuffing is carefully examined and all old tacks or staples are removed. Also it is good to use a vacuum to remove any dust or other material which does not belong. In this case, the original stuffing was straw, which can easily fall apart if you are not careful.
 |
| Original Straw Stuffing |
Place this layer directly on top of the new burlap. I use sand bags to hold it down while I tack the edges. Usually the burlap is fragile and it tears on the edges. You only need to hold it in place for a short time, since a new layer of burlap is immediately added to secure it in place.
 |
| Holding Straw package in place and tacking to frame |
Notice the original pattern of stitching which shapes the edge and holds the stuffing in place. This is what is important to conserve as much as possible. It gives the shape to the upholstery.
 |
| Cutting a "Y" to go around wood frame |
Where the burlap needs to be cut for the frame you use a "Y" cut. This method is used for muslin and final fabric to go around the wood properly.
 |
| New burlap stitched in place over old stuffing |
This new layer of burlap is stitched in place using a curved needle on the edge and a long straight needle in the center. This new layer of burlap under and on top of the old stuffing package serves to conserve the original foundation and restore the life of the seat.
 |
| Spanish moss second layer of stuffing |
The next layer of stuffing in this case was a layer of Spanish moss. Many people do not know the difference between horsehair and moss, but if you look closely you can see that one is an animal hair and the other is a plant fibre.
 |
| 50/50 cotton batting |
The original cotton batting is discarded, since it is always dirty. Cotton batting serves to provide a dust filter preventing outside dirt from getting into the seat stuffing as well as inside dirt from escaping. It also provides a smooth surface for the final fabric. I always use 50/50 cotton, but many other workers use 85/15.
 |
| Burlap tacked on top of frame |
It is important to note that the burlap is nailed on top of the edge of the frame. This allows the muslin and final fabric to be nailed to the face of the frame.
 |
| Muslin tacked to front of frame over cotton |
On the bottom of the seat a black bottom cambric is nailed to cover the webbing, using small nails.
 |
| Black bottom cambric over webbing |
After the final fabric is tacked in place an appropriate gimp trim is applied using gimp tacks. Now you are done and it only took a short time to restore the upholstery professionally. The seat is ready for another century of comfort.