Showing posts with label clocks. Show all posts

Saturday, December 31, 2016

Time is of the Essence


Always Time to Work


It is normal at this time of the year to reflect on the past and look forward to the future.  I find this very strange.  I enjoy my life and craft and find myself in my shop at the bench working on something every day.  I do not see any difference between week days and week ends, holidays and non holidays.  What changes is the trash pick up schedule, whether the school across the street is open or not and if there is any mail in the box.  Other than that, no difference.

Since I work and live in North Park, an older historic commercial district in San Diego, this day to day normalcy is compounded by the fact that the weather rarely changes.  Except for a few weeks of the year when it rains a bit and other weeks when the temperature drops to 60, there is no indication of the seasons.

I have enjoyed this lifestyle, earning my keep by restoring antiques for 47 years now, with all but a few the early years in the same location.  I walk to work and open the door at 7am, read my emails and turn on the glue pot, remove the clamps from the day before and then, promptly at 8am turn the "open" sign around in the window.  When I feel like it, somewhere between 6pm and 7pm, I turn the sign to "closed" and walk home.  It's a nice routine.  On some days I ride my bike instead of walking.

In any event, I cannot fail to notice the news and talk that another year has ended.  As Pink Floyd
sang on The Dark Side of the Moon ("Time") "The sun is the same in a relative way but you're older, shorter of breath and one day closer to death."  I turned 68 two weeks ago and I now have approximately 32 years left to finish all the projects I started in my life.  I am not sure that I have enough time...

So, this post is about "time."  Something that we can measure but cannot see.  Of course, we can see the effects of time.  Things get old and die.  But we cannot hold time in our hands or feel it with our fingers.  Time is ephemeral, as the wise men would say.  We are aware it exists and cannot ignore it.  It rules our lives.  We are subject to its rule.  Time is our master.  It will exist long after we all are gone.

Jim Croce sang "If I could save time in a bottle."  For me the solution is to put time in a box.  I make clocks.  Mechanical, old fashioned pendulum clocks, the kind which were first invented around 1650.  Using lead weights to convert potential energy to kinetic energy, driving a precise set of gears with a constant escapement to turn the hands of time.  Using gravity instead of electricity as a power source.  Using human power to raise the weights every week and letting the earth pull them down.

I have made 5 clocks in the past 15 years.  Each one found a home before it was completed.  I did not advertise any of them.  Over the year it takes to complete a good clock, some person would discover it and meet my terms for adoption.  Each clock is different, but I tend to make clocks that stylistic date from 1690 and have square brass dials.  I like olive wood and it produces a dramatic surface with a nice polish.  It is getting harder to find, as is most of the old stock exotic woods.

Clock #6, Completed and Standing Tall


I have just completed clock #6, which has been a project for the past year.  The origin of this clock is a clock I was asked to restore some 20 years ago.  It was the property of a famous actress in Hollywood, and she had owned it all her life.  It was from a world famous clock collection, the Wetherfield Collection, and had been sold by Arthur S. Vernay in New York, when that collection was broken up in 1928.  At one point, after I had restored it for her, I managed to secure a cash offer of $175k from an English clock dealer, which she refused.  Even though I encouraged her to take the offer, she just said, "I would rather have the clock."

I understood exactly what she meant.  When you entered her home, the first thing you saw was this clock.  It spoke immediately of class, culture, education, maturity, and stability.  It had a heart beat, which quietly permeated the home, and would announce the hours with a charming bell.  It had a face, and hands, feet and a waist, and the face was surrounded by a bonnet.  In every aspect it was a person.  A physical presence and reminder that we are all humans, measuring time's passing.

Waiting under the Plastic is Clock #7


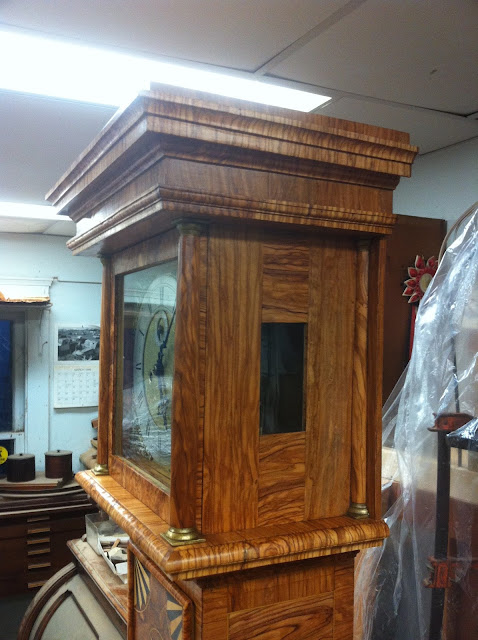
This clock had a dramatic surface, decorated with boxwood and ebony pinwheels of all sizes and covered in figured sawn olive wood veneers.  All the moldings were carved across the grain, giving it a vertical thrust, forcing your eye to travel from the feet to the top, relishing every detail of the construction.  It was made by Joseph Windmills, in London, around 1690.  In the book, "The Wetherfield Collection of English Clocks" it is illustrated on page 22 as figure #14.

Joseph Windmills, London 1690


I started this project by finding online a period set of clock works in good working condition.  I then had David Lindow, in Gravity Pennsylvania, fabricate a new brass face, which was then engraved by Valdemar Skov, in Maine.  David also made a fine set of hands to complete the works.  I had the works cleaned and adjusted by Paul Smith, who has been in business here in San Diego nearly as long as I have.

I always start building my clocks with the back board.  In this case, all the secondary wood is tulip poplar.  Historically, English clocks are made of oak, but I cannot find the proper old growth white oak here in California, so I use poplar or beech.  There can be no confusion in the future as to the possibility that my clocks could be sold as period clocks, even if some dealer were to remove my name.

It takes many weeks of work to apply the skin.  All my clocks are covered in sawn veneers which are quite thick, 1.5mm.  All elements are glued using animal protein glues.  All the molding is hand carved across the grain, which takes some time.  I cannot use simple molding planes, since the grain is going sideways.  It must be carved and then scraped and sanded to shape.  The profiles were taken from the original clock, when it was in the shop for conservation.
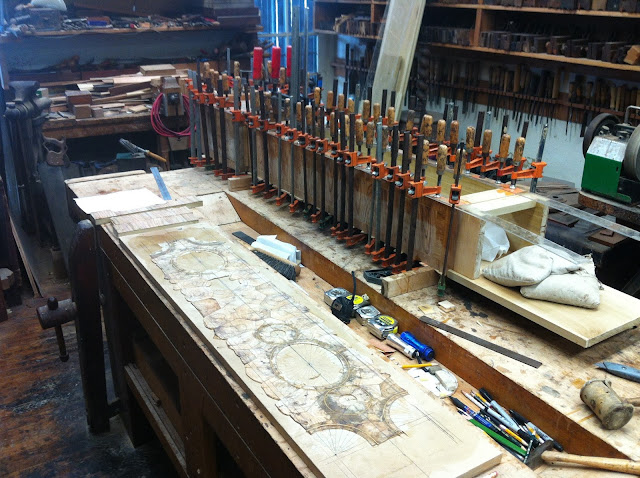

Progress around July 2016

On the sides I use sausage sawn veneers and oyster sawn veneers.  On the front I use oyster sawn veneers, with highly figured cross banding.  In the pinwheels I used Gabon ebony and English boxwood, with each triangle trimmed to fit by hand with a hand plane.  The nice thing about using sawn veneers is that you can work the edges like real wood.


Clamps on...Clamps off

It takes a lot of clamps...Fortunately, I have a lot of clamps.

This clock has a very special owner, now that it's completed.  She is 101 years old.  I have worked for her and her family since she was my age, nearly 4 decades.  I have carefully moved her from one residence to another, as necessary, transporting all her precious antiques personally.  She has kept together a great collection of art and antiques from her ancestors, and lives surrounded by beauty.

Her daughter purchased one of the Treasure Boxes, first series, and it sits in the main room in a place of honor.  They both desired a tall case clock made by me and I thought that this would be the year to fulfill their wishes.  I am pleased that I was able to complete the task by the end of the year.

They have recently purchased a nice condo in the older part of San Diego, where this clock will be delivered.  I expect to have it in place, beating away the seconds, in the next few weeks.

The photos that follow detail the surface decoration:


Today I stand at my bench, working on wonderful projects, at the end of another year.  I know that next year will start tomorrow and I will be faced with more wonderful projects to complete.  There is always a good reason to come to work and a genuine satisfaction every day when I decide to go home.  The one inescapable truth is that, regardless of how much more time I have left, it is time itself that will survive.  I hope and believe that my clocks will also survive me, beating away the seconds for centuries yet to come.  I know Joseph Windmills had similar thoughts back in 1690.

Life is good.
Tuesday, July 5, 2016

Time Is The Only Real Commodity

Clock #7 (Left) and Clock #6 (Right) 

This past month I have not posted, as you may have noticed.  Business has returned to pre 2008 levels and I have been occupied with a lot of interesting work, arriving and departing.  Since the antiques market has hit rock bottom, I have noticed a renewed interest in clients finding and restoring old furniture.

At the same time I have been celebrating the completion of 47 years working at the bench, restoring wonderful high quality antiques.  Since I work every day of the week, every week of the year and only take time off to travel I calculate that I have been standing at that bench working with traditional hand tools and exotic materials for something like 16,000 work days.

I have been fortunate to have been healthy almost the entire time, and I have even come to work when I was sick, since I am a little obsessive/compulsive about my routine.  With any luck I still have about 10,000 more days left in this body to be able to finish all the projects I have started for myself and which wait patiently in the back of the shop.

As Hector Berlioz noted: "Le temps est un grand maitre, dit-on: le malheur est qu'il soit un maitre inhuman qui tue ses élèves."  Loosely translated: Time is a great teacher, we say: unfortunately it is not human and kills its students.

As a devote historian and builder of clocks, I have been a student of time all my life.  I know how it ends.

Speaking of clocks, I have finally started building two clocks, which have been on my "to do" list for a year.  These will be my 6th and 7th examples, and all the previous clocks have been sold.  One of these (#6) is already sold and I expect #7 to find an owner before it is finished, if the past is any indicator of what to expect.


Joseph Windmills Resting Quietly

Clock #6 is the smallest body clock I have ever made, designed after a famous clock I had the pleasure to restore years ago for a famous actress living in Los Angeles.  That clock was from the Wethersfield Collection of English Clocks and was made by Joseph Windmills, in London in 1690.
At that time I found a clock dealer in London who made her an offer of $150k to purchase it, but she turned him down.  She would rather have the clock than the money.


Wethersfield Collection Page 22

This Windmills clock is interesting and has some dramatic marquetry, using olive oyster frisage decorated with ebony and boxwood pinwheels and fans.  Very modern for the time.  It also has a very narrow body, where most clocks need a 10" swing for the pendulum, this clock only needs 9".  I searched for many months online until I found a period clock works which had the required dimensions.  I am having David Lindow make a new period engraved brass face for these works, with my name of course.

Unlike the original case, I do not have access to good aged English oak for the carcase, so I am building it out of tulip poplar, which is the best I can get locally.  After all, I choose to live in Southern California, so I need to compromise with my wood selection.  I used to use Honduras mahogany for all my secondary wood carcase construction, but those days are long past.  The only real choices I have are beech, oak and poplar.  Pine is out of the question due to cost and poor quality.


Did I hear Jorgensen Clamps Were Out of Business?

My normal method for making a tall case clock case is to dry fit the pieces together, getting all the joinery right.  Then I take it apart and press the veneer surfaces on each board, leaving the edge banding off.  After the sides and front are glued together I can add the edge banding, covering the corners and edges.  Since I am using all sawn material (1.5mm thick) there is plenty of thickness in the veneers to work with.

The oysters are purchased from Patrick George, in Paris, and sawn specifically for me.  I always get the first choice of his material, and just last month ordered another $3k worth of olive to replace material I have used.  I am designing a William and Mary chest of drawers with olive oyster marquetry for a good client in Dallas and need the best material for that project.  I am proud to say that this same client owns my first clock, a copy of the Tompion clock at the Met in New York.


Adding The Ebony and Boxwood Sawn Veneers

To produce the decoration for the door, I use a standard assembly board process.  Stretching Kraft paper over a board and building face down with hot glue lets me put together very complicated patterns with ease.


Mastic Filler Added to Back Surface of Design

After I put all the oyster pieces down, I added the ebony and boxwood pieces one at a time, carefully trimming each piece to fit with a rabbet plane.  As each element was fitted into its respective cavity on the assembly board, it was held with masking tape.  After all the ebony and boxwood pieces were set in place the masking tape was carefully removed, leaving the elements in their position.  I then used clear packing tape to hold all the pieces together, trimming around the outside for each design.  This method allowed me to lift out the entire assembly, add some hot glue and then quickly place it back in place, clamping briefly.  Removing the clear tape is the last step.


Face Side After Removal of Kraft Paper

Once all the pieces were put together on the Kraft paper, I applied mastic, as usual, making a paste of hot water, thin glue and Cuban mahogany filtered sawdust.  After this was dry, I lightly sanded the surface, cut away the Kraft paper and used Old Brown Glue to apply the entire panel to the substrate.


Door Ready to Trim to Fit Case

The next day I removed it from the press and used cold water to scrape off the paper and glue from the face.  This exposed the final pattern for the first time.

Clock Before Sanding and Finish 

The next stage of this project is to build the bonnet and get the face from David Lindow.


Wednesday, October 2, 2013

Mr. Lecount Ready For Adoption.

Meet Mr. Lecount

Over the years I have lectured to groups, large and small, thousands of time.  Public speaking is easy for me.  Just tell me how long you want me to talk, pick a subject, and let me go.  I never talk over the time allowed.  I can easily tell a story which is adapted to the audience with facts and anecdotes, letting the questions from the audience direct the presentation.  If you were to ask me how I do it, I would tell you a few basic rules:  have the confidence in your material, speak clearly and vary the delivery to "sell" the story with enthusiasm, and, most importantly, maintain eye contact with everyone in the audience.  As you speak, there will be those who nod in approval.  That means continue on that topic.  Also there will be those who nod off in sleep.  That means change the topic.

Original Works from 1690
It is important to use humor at times to put the audience at ease.  Knowing what kind of humor is the secret to success.  Having a joke fall flat is perhaps the worst type of mistake a speaker can make.  I have a good selection of humorous remarks that fit nicely into my presentation, and I am never afraid to use them when it feels right.  For example, when I am talking about making furniture and the amount of time it takes to do it by hand, they always have a question like "That must take a lot of patience!"

I then quote from Toshio Odate, a wonderful woodworker who says, "Why would I do something in 10 minutes that I could do all day?"  In other words, it is not "patience" but "passion" that drives me to work the way I do.  When you are passionate about your activity, it is not "work" but a "lifestyle."

As I remember from Be Here Now, the bible of the 60's, life is a journey, you better enjoy the trip.

Olive, Yew Wood Oysters, Marquetry
At times I am speaking to a small private group of mature individuals and I can use a  metaphor which exactly explains how I feel when making a piece of furniture.  I tell them that I enjoy being pregnant, what I don't like is kids.  In a crude way that illustrates that I enjoy the creating process, giving birth to a new form, but I don't want to take care of it when it's done.  I just put it up for adoption and then start over.

This is where I am with Mr. Lecount.  I have labored over it for over a year to get it to stand up on its own and be ready to face the world.  Now that he is finished, I hope he finds a good home.

When I returned from my vacation, I finished applying the shellac finish, installed the glass and gold mounts.  Then I fixed the hinges for the upper door and installed the latch which keeps the glass door closed.  I rubbed out the shellac and applied a coat of Kiwi paste wax, which gave a nice patina.

Bullseye Bellybutton
The last thing I did was install the hand blown glass bullseye in the lenticle.  The lenticle is an oval window in the door which allows the owner to see if the pendulum is moving or the weights are down a certain length.  When clocks evolved from the marquetry period to the Georgian period, for some reason the lenticle was no longer popular.  I like it and think it is an attractive feature.  With the bullseye glass, in my mind, the lenticle becomes the belly button of the clock.

It seems appropriate that, as a parent giving birth, the belly button would be the last thing to do, since cutting the umbilical cord is the actual last act of separating the child from the parent.

Now all I need to deal with is the postpartum depression.


Blue Birds of Happiness


Tuesday, September 3, 2013

Mr. Lecount Gets First Coat

First Coat of Shellac
As I work to create tall case clocks, I am constantly reminded of the human characteristics that we share with this form of woodwork.  It is not just a coincidence that the clock stopped, never to run again, when the old man died.

I am also deeply in love with the first generation of time pieces, from 1650-1700.  During this period, I imagine it was like when Jobs introduced the iphone.  Before we had one, we didn't need it.  Once we got one, we wondered how we lived without it.  That is what it must have been like back then.

Before 1650 there was no real accurate way to measure time.  Knowing what time it was meant that you were within an hour or so of the real time, and that was fine.  However, once the pendulum clock was perfected, by adjusting the length of the bob by a slight amount, you could accurately determine the time to the minute.  Where would we be today without that invention?

These "new" clocks were so important that the clockmakers searched out cabinetmakers to make cases which justified the expense and verified the importance of their work.  The last two decades of the 17th century saw the most highly decorated clock cases ever made, and I am sure they commanded a place of importance in the rich man's home, announcing to the world that he was a "modern" man, who knew what time it was.

Only Missing Glass and Mounts
So, with this in mind, it is curious to think about how human characteristics were transferred to this type of woodwork, unlike any other piece of cabinetry.  For example, the clock case has "feet" which is not in itself unusual, since most furniture has feet.  However, it also has a "face" which "tells" the time, in a kinetic way, whether you want to know or not, since the bell strikes on a regular basis.  The case also has a "waist" which might make it more attractive, and perhaps more feminine.

It has "hands" which are strangely attached to the "face" (strange).  The works rest on the "cheeks" of the side boards.  The average height of the "face" is at eye level with the average person.  The top case is a "bonnet" which of course represents the hat covering the face and protecting the works.  The "backboard" is similar to the spine, in that it holds the clock upright and straight.

To regulate the clock, you set the "beat" which is analogous to a heartbeat.

A tall case clock requires regular attention to operate fully.  Without human support it stops.  That means that every week or month the owner needs to adjust it and reset the weights.  No other piece of furniture requires regular attention to survive.  It is like owning a pet; you need to feed it often to keep it alive.

I am comforted by the sound of the ticking and reminded every hour of the passing of time, when I am near one of these wonderful objects.  It reminds me that I, too, am human, and my time is measured and finite.  I should make the best of it while I am able.

That is why I am leaving tomorrow for a well deserved vacation at my cabin on the Madison River in Montana.  Leaving time behind and following the stars.


Blue Birds of Happiness

Friday, August 16, 2013

Mr. Lecount Gets Fitted For A Bonnet

Le Count Ready For Fitting
I have spent several days this week fitting the Lecount works to the case, which is assembled without the bonnet.  I prefer to make the bonnet last, as I don't work from plans, and need to see where the works end up to actually put the top together.  It is important the bonnet fits exactly right, since its primary purpose is to keep the dust away from the works, and it needs to be a relatively airtight fit.

As I said in earlier posts, my method for making tall case clocks is to start with the back board. This becomes the spine of the clock and all measurements are taken from its center line.  Then I build a lower case (just a box) and fit it onto the back board.  That allows me to cut and fit the sides and front frame, which makes it easy to fit the large door properly.

The door itself has a wide overhanging molding around it, which needs to be carefully measured so the the edge of the molding clears the case when it opens.  That is why these doors have a unique type of hinge that has an offset pivot.  Also the door has an opening, the "lentical" which allows the owner to see the weights and pendulum from a distance.  In my case I am having a glass blower make a bullseye glass oval to fit in this space.

The last job for the lower case is to make and fit all the molding.  In these early cases the molding is short grain, so it is usual to cut and glue sections of short grain wood (olive) onto strips of beech or oak and make the molding lengths this way.  I am also using cherry molding which is ebonized to provide contrast, like the original clock.
Initial Fit 

Now that the case is assembled, I set up a thick piece of wood on the floor and make it absolutely level.  Standing the case on this floor allows me to properly fit the works.  I have lots of lead weights on the floor to keep it stable.  Placing the works on the cheeks of the case, I can then adjust the fit and set the crutch to make the beat even.  That means that it works perfectly in an ideal flat and level location.

However, not all homes have that ideal flat and level place for a clock.  I have made a special modification for this clock, which is not original to the 17th century.  The works are old and some of the gears are worn slightly uneven, so the beat is not always regular.   Also, the works are designed to run for 30 days, so when the weights are low enough to reach the pendulum bob, it sets up sympathetic vibrations which can act to stop the clock.  That took about 2 weeks to happen when the works were running on my test stand, which is not that stable.

I solved this problem and also the problem of making sure the case is level with a modern solution.  The round feet are turned from cherry around a large bolt.  This bolt is set into the bottom of the clock with standard "T" nuts, so the feet can be screwed up or down slightly to fit the floor.  At the same time, I made a large hollow space above the bottom board and covered it with a second "false" bottom board.  Inside this hollow space I added a fair amount of lead shot.  When you look inside the case at the "false" bottom, it looks fine.  You cannot judge the distance easily so it just looks like a standard case.  However, the addition of lead shot provides stability for the case and the loose shot absorbs any vibrations which may affect the operation of the clock.

As soon as I put the works into this case, standing on the level floor, they ran perfectly, even though the weights were all the way down into the case.  Problem solved.

Today I was able to glue together the basic bonnet, which fits nicely to the works.  During the next week, my attention will be to add all the veneer and molding which will dress it up.  I expect that the clock itself will be ready for the finishing process in a couple of weeks at most.

I cannot wait.  Either can Mr. Lecount.


The Bonnet Assembled

Saturday, July 20, 2013

Lecount Clock Door


Edwards Clock #2 Private Collection
I have written before about my business plan.  To clarify, it is not so much a "plan" as a "philosophy."  You see, when I decided to work every day of the week, and not take weekends off like the "normal" people in the world, I quickly realized that I would eventually need a break.  That is why, for the majority of my career, I have worked daily for 3 months and then taken a month away from the bench for a "business" trip.

Sometimes my business trip is to Europe or the East Cast to buy stuff, meet new and old mentors and just enjoy the world of museums, historic houses and antique shops.  Sometimes my "business" trip it to the cabins I own on the Madison river in Montana to enjoy the world of the brook trout, eagles and elk.

That said, I also realized early on that there would be no "retirement" for me.  No "pension" or other means of support, except Social Security, which I now am receiving in very small amounts.  Therefore, I needed a plan to resolve the fact that I would work at the bench until they pried the chisel from my cold dead hands.

What I decided to do was calculate the exact amount of income I would need to survive a day of life, and then make that amount every day.  If I missed a day of work, then the next day would require a double amount to keep even.  In general, I need to work for paying clients at least 4 hours a day, every day for life.  Assuming that I arrive at work at 7 am and close up the shop at 7 pm normally, that gives me 8 hours of "retirement" in my workshop, which is fully equipped to provide me with tools and materials for anything I want to do.

This method of budgeting my time has allowed me over the years to create some large projects which involve hundreds or even thousands of hours of unpaid time.  Essentially, I work for a living and, in my retirement, create amazing objects of marquetry covered furniture.

Last week I visited two of my favorite clients, who have generously supported my efforts to keep alive the traditions of this craft.  Together, they own several of my best pieces, including the jewel cabinet I made some years ago, covered with ebony and 32 different marquetry panels.  They also have the second clock I made, with works by David Lindow, and I took some photos since it is very similar to the case I am currently making for Lecount.

The bonnet has pierced work, backed by silk, which allows the tone of the bell to escape and keeps dust out.  I cut the fretwork on my chevalet, and it went very fast.  Here is a photo of the top:


Bonnet with Fretwork and Rope Carved Columns
Note the marquetry in the upper door.  I guess I like birds, as I seem to always include them.


Upper Door of Clock #2

Here is the marquetry on the base.  More birds.  I really like the end grain molding, even though it is a pain to carve.


Base of Clock #2
Now I am making the case for my 5th clock, which will contain the Lecount works from 1690.  I always start my clocks with the backboard.  You can review my earlier posts about this process. Making the clock from the bottom up allows me to enjoy it standing next to the bench (as encouragement) and provides me with actual measurements for the bonnet when it becomes time to make that part.

The bonnet is the most complicated part of a tall case clock.  It has a mask, which fits closely to the face.  It has side windows which allow the viewer to see the works.  It has a glass door, which pivots with the carved columns as the offset pivot point.  It needs to slide onto the case molding and be held by guides so it doesn't fall forward.  It needs to be closed from dust, and it needs to allow the bell to be heard.

But I am not there yet.  Today I was able to rough sand the door itself.  Over the past week I took some time to cut in more yew wood oyster veneers and glue them to the oak door.  After that, I laid the marquetry panels over the oysters and marked the outline, so I could cut away the yew and place the panels.  When that was dry, I carefully cut in 2mm boxwood string inlay banding around all the parts.  Then I glued in the olive cross band edges.  I still need to make the ovolo molding which will be glued to the edges and cover much of the cross band trim.

Here is the door on the bench during sanding:

Lecount Door On The Bench

So, I placed the door on the case and took this picture this morning.  It allows me to see what this clock will look like when it is assembled.  My next job is to start cutting and attaching all the molding on the case, both lower and upper, as well as the molding around the door.  That will allow me to install the hinges and lock to be sure everything fits properly.

Lecount Standing Proud!

After that, I can start making the bonnet.


Tuesday, April 23, 2013

Cross Grain Molding

A Good Day's Work
©Antique Refinishers, Inc.


When I was a young cabinetmaker, I did not have a lot of money.  Actually, I still don't have a lot of money.  However, I do have a lot of clamps.  I was joking with my wife today and said that if I just sold all my clamps for a dollar each, we could pay off the mortgage.  Almost.

I was fairly smart back in the 1970's to invest in tools and clamps.  There was a store, which was way before WalMart, Costco, or any of those "big box" stores which cover the landscape these days.  It was called "Fedco" and you needed to be a member to shop there.  The prices were great, and since I was employed part time as a teacher at the local colleges, I was eligible to join.  Something like $25 or so, as I recall.

We bought everything there, from kitchen sinks and paint to cameras and film.  One of the most important acquisitions I was able to find there was a beautiful woman in the Kitchen section, who was kind enough to become my wife.  But I digress...

Each time I went there to get something, I budgeted $25 dollars on clamps.  They had a neat hardware section, and the large iron "C" clamps were $3.99 each and the Jorgensen Pony clamps were not much more, depending on the size.  So I always returned with 5 or 6 clamps, no matter what.

Over the years, I eventually got hundreds of clamps.  One of the nice things about clamps is that they don't need sharpening, hardly ever break, and make money.  I used to tell my clients that they could pay me $75 to glue their broken chair or $5 per clamp, which would actually cost more.

From time to time, other cabinet shops in my city would go out of business, due to the economy.  I would show up at the sale of tools and watch as all the other woodworkers rushed to buy table saws, routers, sanders, drills, and diverse power tools.  I went straight to the clamp pile and immediately staked my claim.  Often they were sold as a lot for $1 each.  Gee, I wonder if I could pay off my mortgage?  But I digress...

The past few days I have spent some time preparing the molding for the Lecount clock.  Since the grain of the molding is usually cross grain on clocks from this period, it is usual to cut the stock and glue it onto some long grain backing.  I know what you are thinking.  Cross grain and long grain will eventually come apart.  Exactly.  Take a look at any late 17th century clock or cabinet in any museum.  If it hasn't been restored, there is always a gap between the edges of the short grain molding elements.  That's authentic work.

The reason they used cross grain was so that the wood grain would be vertical and add a visual height to the design.  It was also because they were a little crazy about doing things the most complicated way possible.  Note that with a complex molding profile, and cross grain wood, you cannot use standard molding planes to make the molding.  You must carve it by hand and finish off with a shaped scraper.  Take a look at the first clock I made, a copy of the Tompion clock at the Metropolitan Museum.  All the molding was hand carved.  I earned my stripes on that job.

This clock has much more simple profiles, and the olive is contrasted with ebony molding, which will naturally be done long grain.  There is no reason to use ebony short grain, since it is absolute black and you cannot see the difference.  With the olive, the figure is so strong, it becomes a very decorative element.

So I cut a lot of olive into short grain elements, and used Old Brown Glue to press these onto oak sticks the proper size for each of the molding lengths.  Each stick had a single clamp to pull the pieces together and individual clamps for each piece to hold them in place. Using the OBG allowed me the longer open time I needed to get everything properly positioned.


Rolling Work Table with Clamps
©Antique Refinishers, Inc.

The next day I removed all the clamps and put them on my rolling work table.  Just a note here about the table.  I have used this table during my entire career.  It is just one of the most practical "tools" in the shop.  It is low and on wheels.  The top is covered with a rubber linoleum which has survived 40 years of abuse, glue and chemicals.  I use it to hold work while I upholster, sand, glue, finish, or clamp.  Then I use it to hold all the clamps, so I can push it around as I place the clamps back on the wall.  You need one of these.

Cross Grain Molding Blanks
©Antique Refinishers, Inc.
Here is a shot of the molding elements, roughly cleaned up.  They will now be shaped to the final profile and cut to fit the case.  There are three of each profile.  The long one is for the front and the two shorter ones are for the sides.

It is a good day at work when you run out of clamps.

Thursday, April 18, 2013

Lecount Project


Just Enough Clamps and Old Brown Glue
I was able to clean up the marquetry and oysters on the base and sides by using water and scraping away the Kraft paper.  Then I cut some boxwood strips a few mm wide from some sawn boxwood veneer I had.  I selected a few pieces of sawn olive wood veneer to cut into crossbanding and applied them around the panels.

I placed the boxwood inlay strips in their position and held them with veneer tape to the center panels.  Then I squared off the edges of the rather short strips of olive wood crossbanding so they would nicely fit side to side along the edge.  I taped them together with veneer tape, so that I had the entire frame of crossbanding and boxwood inlay assembled in one piece.

Then I carefully cut away this veneer "frame" from the center panels, which were already glued down in place.  I warmed up some Old Brown Glue, and heated up an aluminum panel for the manual press.  By brushing the OBG onto the edge of the panel, all the way around the center oysters or marquetry, depending on which part I was gluing at the time, I could then simply replace the taped "frame" of crossbanding in place and put the panel into the press, face down on newsprint.  The heated aluminum caul would allow the glue to liquify and flow evenly under the veneer.

Removing the panels from the press the next day, I moistened the veneer tape and scraped it off.  That exposed the nice crossbanding, inlay and oysters, which are similar to the original Lecount clock case that I saw on the internet.

Now I could add OBG to all the joints and clamp up the case on the bench.  The lower box has full blind dovetails on the corners, and a dado joint on the back board edge.  The side panels are also joined to the back board with a dado, and the face frame is loosely clamped in place to keep it square.

This morning I removed the clamps and, for the first time, sat the Lecount works in place, in a case which is a copy of the original long lost marquetry case, from about 1690.


Lecount Stands Again

It's about time...(pun intended).

Monday, April 15, 2013

Lecount Project


The Design Department of ASFM

I received an interesting email recently from another furniture maker who asked me where I got the designs for my work.  He said that he was an amateur and had made some pieces "in the style" of a current studio artist.  That artist had threatened him with legal action and he had to take down pictures of his work from his website to avoid trouble.

That reminded me of another incident which happened a few years ago.  One of the students who had taken classes from me at ASFM had gone on to produce some amazing work.  His favorite style was Ruhlman, and he made a magnificent sideboard, which was influenced by that great French artist.  This student was impressed with some photos I had taken of myself standing next to my work, and decided to do the same, but dressed in a tuxedo.  He printed up some postcards and was immediately  served with a legal "cease and desist" letter from some attorney in New Jersey.  This student lives in Southern California.  The attorney was representing a well known marquetry artist who has made his living with Ruhlman copies, and, in this letter, claimed to have "trademarked" the image of an artist in a tuxedo standing next to his work.  Wow.

When I searched his website, I found that he preferred jeans and shirts, like all of us guys, and no photo of him in a tuxedo could be seen.  In any event, be careful not to dress too fancy when you get your photo taken.

All of this leads me to try to bring some perspective to the issue of design.  We all know Sam Maloof made an iconic rocking chair.  Honestly, how many hundreds of furniture makers have copied his rocker?  There are several issues to consider.  Sam was a professional, and master of promotion.  Most of the copies are by amateurs, who just aspire to create something "Maloofian."  No one seriously would value a copy of a Maloof rocker as much as the original.

The irate artist in New Jersey who made his living with Ruhlman copies has no reason to be concerned with another artist in California who also was inspired to do the same.  What is that about "imitation is the sincerest form of flattery?"

As to my career, I can say that I have made exactly one original design in my life.  That was the RockeTable,  which I have never sold and have only made the single prototype.  All the other pieces in my portfolio are either exact copies or strongly inspired by "dead" cabinetmakers who lived in other countries centuries ago.  So far, their attorneys have not contacted me, thank goodness.

As to the marquetry designs for the late 17th century clocks, I have two sources to access, which are "public domain."  The first is the excellent three volume set by Pierre Ramond, "Masterpieces of Marquetry," which has dozens of precise drawings of antique furniture.  I have made lots of copies of these designs in a range of proportions of enlargement.  I can select an element, like a flower or leaf, from this stack of drawings and place it in exactly the position I want to create a new design.  The design is new, but the elements are old.  I suspect period designers did the same, as many of the elements have a similar form, from one piece to another.

The second source of design is from the many pieces of period marquetry I have restored and conserved.  I take thermal fax paper and make rubbings of the marquetry, which works really well, and also use tracing paper to copy elements for my archive.  Some of the flowers are simply amazing, and may contain as many as 50 pieces of wood, just for one flower.

So, nothing I do is original except that I sign my work and brand it.  Go ahead and feel free to copy any thing I have made.  Fine with me, as long as you don't sign my name on it.


Toothing The Groundwork

Over the weekend I took a toothing plane and surfaced all the oak material for the clock.  Then I selected some nice yew wood oyster sawn veneers, which I purchased in 1994 from Patrick George, to decorate the sides of the case.  I prepared them, glued them to Kraft paper and cut the joints for them to fit together.

Back of Panel with Mastic

I also took some hot water and diluted the hot protein glue, then added some very fine hand sanded Cuban mahogany wood dust to make a mastic.  I prefer mahogany for the mastic, as it is a fine powder and doesn't swell up in the wet glue, like some woods.  It also has a very nice dark brown color.

Finally, I have all the panels ready to glue down, which I did in the press today.


Panels Ready for Glue

As to the copying of designs, even Chippendale stole from others!

Friday, April 12, 2013

Lecount Clock Project


Not your typical "Cut List"

I'm not very good at keeping records of my work.  I guess that is because I enjoy so much the actual process of working by hand at the bench that I just don't think of taking time to photograph or record what I am doing.  I go to sleep thinking about what the next steps are.  I get up and walk to work visualizing my job.  I start the glue pot, walk over to the bench and start working.  At the end of the day, I go home and start over.  I guess I still have an abundance of enthusiasm for my job, even after doing it for over 40 years.

In any rate, I have decided to try to post some photos of this project, as I think it is interesting on several levels.  It is the fifth tall case clock I have made in the past decade.  As usual, I start building these clocks for my own house, and as usual, they get sold before I can get them home.

To start with, I gather some wood and make some notes about overall dimensions, using metric measurements.  I never took wood shop in school and never learned about a "cut list" or "plans."  I am an analog thinker, so I just imagine the job, select some nice wood from the wood pile, and start cutting.  With the clock I just build the case directly from the back board.  Starting with the lower box, which I posted earlier showing the full blind dovetails, then clamping together the middle section after that.

Everything so far is dry fit and held with clamps.  The reason is that I now need to take it all apart and glue on the marquetry surface, using the press.  Once the marquetry is in place, I can then glue together the case and cut the moldings.  Once the lower case is assembled and the works are set on the cheeks, I can take some final measurements for the bonnet, and start building that.

Lecount born again on the bench

Last week I got the oak case clamped up fine.  This week I spent drawing the marquetry panel for the lower front box, and building the packet, cutting it out and putting it together.

I like to capture the style and use the process that was used during the last decades of the 17th century for these clocks.  Typically, the design has large flowers placed all over the panel, with leaves and branches connecting them.  No attention was paid as to whether the same branch had different flowers or not, and it was not supposed to be a realistic picture of nature, as was done much later in the 18th century.

The Painting in Wood process requires that all the different species of wood are placed in their proper position in the packet, in different layers, and cut at the same time as the background.  The blade is at 90 degrees and leaves a gap.  Inside the leaves and flowers the gap is decorative and filled with a mastic.  On the outside of the elements, the gap is generally not visible, as the background is usually ebony during this period.

Working with scraps to determine the color placement

This process is somewhat wasteful of material, so the pieces of veneers are cut only slightly larger than the design element requires.  The area between the veneers is filled with a cheap species of veneer so the layer remains flat with no voids.  Usually a design with 10-20 different species can be assembled with a packet using less than 8 layers.

Typical layers with different species in place

Note I am using sawn veneers, as usual.  These veneers are 1.5mm thick, and including the 3mm back board and 1.5mm front board, the total thickness of this packet is 13.5mm.  The packet includes (from back to front): 3mm back board, grease paper, full layers of ebony (background), green dyed veneer (leaves), mahogany (branches), three layers of multi species veneers, and 1.5mm front board with the design.  All these layers are taped together to make a solid packet.  No nails are used; only veneer tape.

Using the chevalet, I cut out all the elements and keep only the wood species I need for the design.  The ebony background is then placed on a board covered with blue masking tape, face side up.  Note: this is a "modern" idea that I got from Paul Schurch, a good friend and very talented artisan in this field.


Burning the elements in hot sand, with coffee

The individual elements are carefully burned in hot sand to create a shadow according to a drawing I made.  This is the boring part, but without it the picture looks flat and lifeless.  Sawn veneers take more heat and much longer in the sand to properly shadow.  I use a very fine sand I purchased in France and an industrial hot plate made in Germany.  You need at least 1500 watts or more, and the sand needs at least an hour to reach proper heat.


Ebony background ready to place on blue tape

By using the blue tape to temporarily hold the background in place, I can assemble the picture face up, so it is much easier to follow the design.  This also allows me to exchange any pieces which I think are not the best choice of material before everything is glued down.  As most of the flowers and other elements have at least two different colors, I can change the composition of woods as I want.


Front of Panel held on blue tape

Then I make an assembly board using Kraft paper.  I put hot glue on this assembly board paper and place it down on the face of the marquetry in one motion.  I then put the entire panel into the press, using a layer of 10mil plastic and a 1/2" piece of wallboard (Homosote or Celutex material at Home Depot) and a plywood board to distribute the pressure.

What this does is that, since I am using sawn veneers of slightly different thicknesses, my goal is to push all the material forward into the hot glue on the Kraft paper.  By pushing from the back (where the blue tape is temporarily holding everything in place,  the relative softness of the wallboard reaches into all the different pieces and pushes everything forward properly.

The nice thing about the blue tape is that it comes off even after being in the press.


Back of Panel on Kraft paper ready for mastic

Now the panel is ready for mastic.  That is the job for today.