Today I reach exactly 2/3 of a life in good health and content with my life. I have a productive routine and have been recognized both for my professional work and public contributions. It is comforting to reflect on past events and contemplate future potentials.
I just finished breakfast and, as I was washing the dishes, looking out the kitchen window, and drinking the last of the coffee, my attention was focused on the old apple tree that Kristen and I planted so many years ago, with the help of our sons. Now our sons are grown men and the apple tree is hanging on, each year struggling to survive.
We had to amputate a large portion of the tree this year as it just died unexpectedly. One of the remaining branches then started leaking a clear fluid which ran down the trunk for months. Each day the finches would fly by and drink this fluid, right in front of the kitchen window. One day, as we watched them feast, Kristen asked me, "what do you think that fluid is?"
"Apple juice" was my instant reply, without really thinking.
Now the fluid has stopped, and the branch has seemed to heal itself. The leaves are nearly gone and the tree is resting, waiting, and probably thinking to itself, "what season is this?" After all, next week is predicted to be nearly 80 degrees and clear. Perfect beach weather.
Then it hit me. Today I expect a lot of "happy birthday" comments (thanks to Facebook). Instead, I came up with this "happy haiku" which expresses more perfectly my emotions. I hope you find some meaning in it, too.
Apple tree in snow:
waiting for Spring to reveal
its fruit of knowledge.
Friday, December 19, 2014
Saturday, December 13, 2014
Treasure Box Series II Progress Report
 |
| Patrice Lejeune shows the inside of the top |
As I work my way to the end of each year, I tend to reflect on the past. I started my business in June of 1969 so each summer I pass that milestone, marking another year of self employment. However, the end of each year means I am another year older, and that is a more sobering thought.
At this stage in my life, many of my friends have retired. They often ask me "if" and "when" I expect to do the same. That thought never crosses my mind. My usual response is something like "When they pry the chisel from my cold dead hands." or something equally dramatic.
Why should I retire? I have a 5000 square foot "playground" which contains all the materials and tools I need to create anything I can dream up. All I need to do is find a photo or see an object and I can have it. I used to lecture a lot on antiques and fakes and one of points I would always make about fakes is that "if someone made it in the past, then it is possible for someone to make it again." Kind of like counterfeit money. No matter how clever they try to be, someone will be able to copy it.
Most professional woodworkers struggle to create original designs. I find that goal very difficult. I really don't think I have an original idea in my head about design. The problem with me is that I have worked on tens of thousands of antiques, visited hundreds of museums and read countless books, and my mind is packed with images. No matter how hard I try to create something, there is always an element of historical precedent which begins to appear.
I have the same problem trying to imagine creating an original piece of music. I mean, after all, there are only so many notes, chords and key signatures that exist. How in the world can you sit down and write something completely new without including some rhythm or sound that you heard before? I have the deepest respect for those who can do this. I spent many years of my life playing chamber music and sitting in orchestras, performing classical music. The best I could do was to play the notes well, and try to make some kind of music.
That is the same for me with my woodworking. The best I can do is to perform the piece well, and pay respect to the masters of the craft from the past centuries. I must admit that, after 45 years of practice, I have been able to achieve a modicum of success in that goal.
One aspect of my professional life which has been very helpful has been my relationship with ecole Boulle and Dr. Pierre Ramond, among others in Europe. Leaving San Diego and spending time and money in Paris really paid off, giving me the experience and confidence to take my work to the next level.
It also provided me with an opportunity to partner with Patrice Lejeune, who has worked with me for over 7 years now. We have a good working relationship, and each day we share the load, dividing up the activities according to each person's schedule. I am fortunate to have a business partner who completely understands both the operation of the business and the school and can contribute in areas which I am not as strong. Not to mention giving me a hand when the furniture needs to be put on the bench or in the truck.
The success of the Treasure Box series is a direct result of this partnership. The work we put into these boxes is as good as it gets and I am sure they will be regarded with deep appreciation and respect for many years to come.
As I have rather busy lately with other projects and not able to post on my blog much, I would like to direct you to visit the recent post by Patrice on his blog. His posts, which detail the actual work on the boxes, is more complete and includes photos of each stage of the work.
You can see that post here: Patrice Lejeune's Blog
Note, in particular, the photo of the tulip veneer with the words "This veneer has been saw cut at the end of the 19th century." How wonderful it is to be able to use historic materials as well as historic methods! Thank you Patrick George.
We expect to be able to finish and deliver all 4 of these boxes early next year. At that time our cat, Gigi, will need to find another place to rest. She always seems to appreciate our work as well.
 |
| Really? |
Tuesday, December 9, 2014
SAPFM JOURNAL VOLUME XIV

Then I was invited to speak at the Woodworking in America Show in Winston Salem and had a great time with all those woodworking professionals and enthusiasts. I am always excited to spend any time with Roy Underhill, who is a hero to all of us.
Business has picked up quite a bit here and some really nice pieces are showing up in the shop for work. I look back on my career and realize that I have been fortunate indeed to have touched so many great objects and satisfied the needs and expectations of so many clients. Work is rewarding when it is so satisfying.
I look forward to my birthday next week, and turning 66. It seems like such a nice round number. I wonder what next year will bring? Always the optimist. I am excited to return to Marc Adam's School next year, and look forward to making another clock among other things.
In any event, last night I received the pdf files for the 2014 SAPFM Journal, which is now in the mail, and I would like to thank Carl Voss and others for their professional assistance. I realize not all the people who read this blog are members of SAPFM or perhaps even know about the group. It is a fantastic group of dedicated and highly skillful woodworkers, which was created in 2000. I joined immediately and have participated in past events with pleasure, contributing articles to the first three Journals. If you want more information or wish to join or purchase a copy of the Journal, here is the link: Society of American Period Furniture Makers
In the past decade the Journal has become one of the most important publications in the field of American furniture. However, there have also been some articles which included European furniture influences and these are important. That is why I wrote an article for this issue focusing on the diversity and importance of European furniture designs, "European Influences on American and Colonial Designs."
My goal with this article was to encourage more research into the wonderful ethnic contributions to style and construction which evolved into the American form of furniture. With all the news today about immigration we tend to forget that we are all immigrants and that is what is great about this country.
I am deeply honored to be recognized by this group and want to thank them for their tribute.
Saturday, November 22, 2014
Talent, Ability, Skill, Determination or Luck?
What happens tomorrow morning before dawn will determine the world champion in two of my favorite sports: chess and F1 racing.
I cannot imagine two sports more different than playing chess and racing the most complex automobiles on the planet. In chess two men sit a few feet apart in absolute silence, sometimes for minutes and sometimes for a half hour, without moving a muscle. Thinking. Pure thought. Anticipating future moves and working out in your head all the options for victory. The two who are playing what will be probably their last match tomorrow are two of the most talented individuals in their sport the world has ever seen.
At the same time that they are playing chess, two other men will be racing the last race of the season in F1. They are nearly equal in points after 18 races, and whoever crosses the line first will be champion. Their sport involves split second decisions, the highest degree of technology, a large team of skilled helpers and tons of money. They sit in the cockpit of a machine which is moving at 200 miles an hour, sweating in 140 degree heat, with an engine a few inches behind their head screaming at many thousands of revolutions per minute. For two hours they must focus on the race, where a second gained or lost will determine if they finish first, or perhaps last.
I will be watching the chess match on my computer and the race on the television. I can tell you that it will take more than a little bit of concentration on my part to keep up.
I have been thinking lately about what makes a "master" of any craft, whether it's playing chess, racing a car, or just restoring a valuable object from centuries ago. Of course, while I do play chess often, and like to drive my car fast, I am not a "master" of either of these skills. That doesn't mean I can not appreciate the subtleties of those professions. In the same way, I regard the methods I use in my profession with my full attention and experience to guarantee a professional result.
I enjoy working on early furniture since all the experience you need to do the job properly is right in front of you. All you need is a keen sense of observation. Basically it is a question of simple forensics. Look for the clues and you will understand what you need to do. Traditional construction methods, hand tool marks, layout lines, hardware decisions and everything else is important and must be analyzed. In the same way traditional upholstery is predictable and you can learn this skill by carefully taking apart the work and putting it back together using the same process.
I recently completed a large amount of traditional upholstery projects and was thinking about what makes a good upholsterer. One word came to mind: tension. When stretching the webbing, or tying the springs, or stitching the horsehair or tacking the silk cover, the single constant was understand the proper tension. This is why it helps to have large "meathook" hands, like I have. (They also are "handy" for sanding!)
In applying a "period" finish or making repairs, there is another rule I follow: natural wood is not one color. Many refinishers make the mistake of using only one color for wood. The only way I have found to fool the eye into thinking that the finish was original is to use several colors, carefully layered or in different areas on the object. Natural sunlight fades wood, and the surfaces fade differently. Nothing makes a piece look "new" more than having a uniform finish on all surfaces. I know this sounds counter intuitive, but trust me, it really makes a difference.
The same concept works with making hand made furniture. I do not think that there is anything sacred about 90 degrees or straight lines. If the door opens and closes, or the drawer slides in and out, fine. I am not saying I am careless. I am saying that there is a priority to decision making when putting a piece of furniture together. It needs to function and be sturdy and attractive. It does not need to be perfect. A drawer is not a piston in a cylinder. It does not need to hold compression during an explosion. It just needs to open and close.
Look at the Parthenon in Greece. The columns are not exactly vertical. If they were, they would be predictable and boring. Would we be as interested in the tower in Pisa if it wasn't leaning? (Perhaps not the best example, but I couldn't resist.)
I guess what I am trying to get at is that you spend your life observing phenomena, and if you are intelligent, constantly learning from that experience, gaining a proficiency in some form of activity. By learning what is important and what is not critical, you can do a job quickly and effectively and with a high degree of satisfaction. In fact, others will pay you to do that job, once you have proven your talents in that field. Satisfied customers are the best publicity.
I have been fortunate to have had people pay me to restore furniture for over 45 years. Now if I could only get Mercedes to sponsor me.......
Wednesday, October 15, 2014
Big Sky Rejuvenation
 |
| Looking South on Ennis Lake from my neighbor's land |
My father's family arrived from Germany around 1908 and settled with the rest of the Germans in Wisconsin. My great grandfather was a simple carpenter, and worked with his hands all his life. Not finding the jobs in Wisconsin, he left the family behind and hopped the train West.
When the train stopped in Whitehall, Montana, he looked out the window and saw the smoldering remains of what had been the main block of businesses in town. The entire block had burned down the night before, and he understood that there might be work soon to rebuild it, so he set up shop.
For the next 20 years he operated a mill and sash shop, and sold construction lumber as the Interstate Lumber Company. His shop had a large painted sign on the front, which reflected the philosophy of the day, "A Square Deal." In the center of the shop stood the prize piece of woodworking machinery, the Crescent Universal Woodworking Tool. This belt driven tool was a large single chunk of cast iron, weighing over a ton. It included a 36" band saw, 16" jointer, 12" table saw, spindle shaper, and a hand operated mortising chisel, all driven by a leather belt running under the floor. My job, when I was very small, was crawling under the floor and lubricating the bearings of the belt.
 |
| 2,300 lbs of American Cast Iron and Ingenuity |
You can imagine why I am not that interested in using power woodworking tools after that. When I finally sold the workshop, I managed to move the tool across the street to the Jefferson Valley Historical Society, along with the sign from the front of the shop, "A Square Deal."
In any event, as I was born in Southern California, the visits to Montana were annual and rather short, depending on the weather. I am not interested in snow. However, I love the smell of the mountains, and the open sky and fishing. I also love finding deer, moose, mink, sandhill cranes, rabbits, owls and other wildlife wandering around the property. Not so much the beavers...who think my creek is their swimming pool.
 |
| The Miller Cabin, after 90 years |
Fortunately, my family had the good sense to purchase a couple acres on a lake, 60 miles from Whitehall, to set up a vacation cabin or two. Actually, there are three cabins, all from the 1930's and still furnished with all the furniture, dishes, wood stoves, guns and fishing rods, and vehicles from that time. Really a simple "turn key" operation. The first cabin was a simple building, which was built inside the workshop in Whitehall. Then it was taken apart, placed on a Model T flatbed truck and driven over the dirt road to Ennis, where it was put back together. It is a wonderful cabin, completely wood inside, with all the conveniences of "modern" life, except plumbing, and insulation. I helped install electricity in the 1960's so we could have a refrigerator and lights.
I have enjoyed these cabins with my family and friends for the past 60 years, and find it essential to return there for a different "perspective" on life. Like Thoreau before me, I find solace in the simplicity of life, when you live off the land. Chopping wood, getting water from the artesian well, catching fish, and just watching the environment as it changes over time is a full time activity.
Each year there is a lot of timber which needs clearing, as the weather is fierce and the trees are old. Last year and this year I lost two of my largest willow trees, and it took a fair amount of time to clear out the wood. I must admit, I am rather good with a double axe. I really enjoy using it to cut wood. It is such a different aspect of woodworking from the usual job I have, cutting minuscule pieces of exotic hardwoods with a 2/0 jeweler's blade.
 |
| Nice Chain! Need a Pull? |
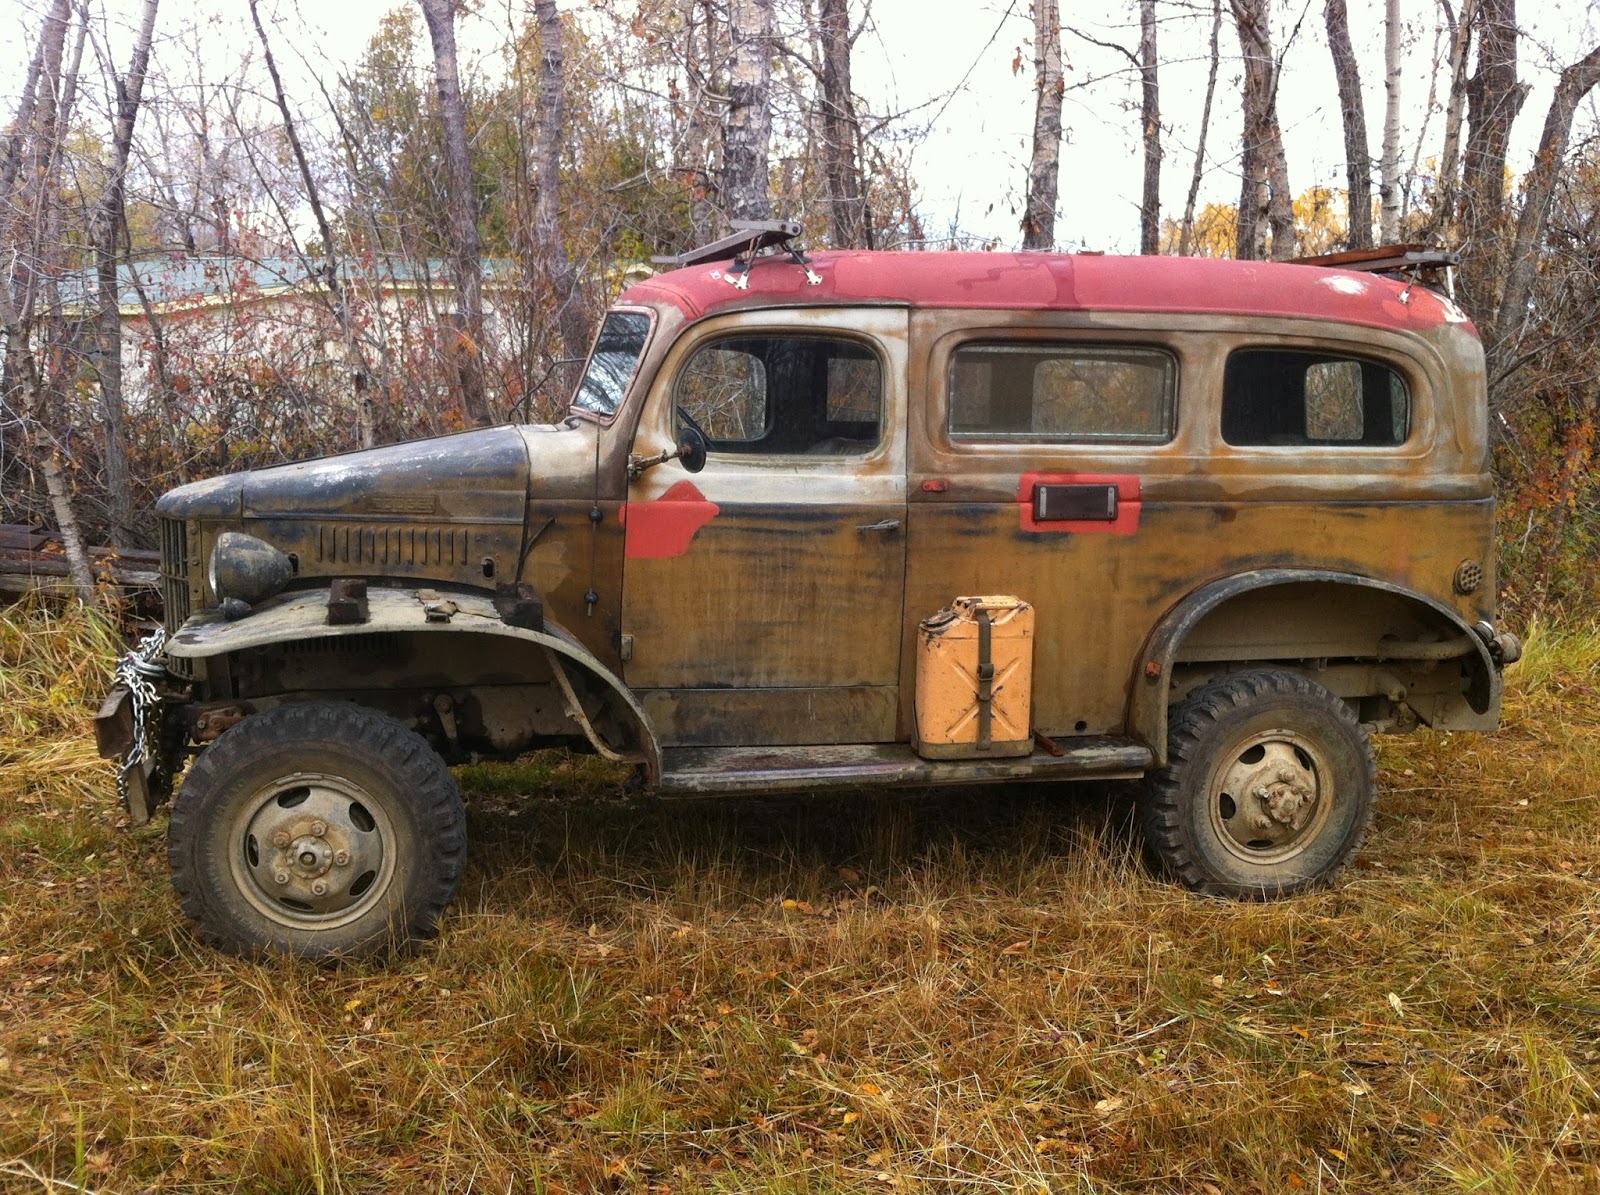 |
| Reliable Transportation since 1946 |
There are also several vehicles which are waiting for us and ready to go when we arrive. The best one is a 1941 Dodge Power Wagon, which was built for the medical corps during the second War. This truck was purchased by my great uncle in 1946 and refitted for mountain camping purposes. I learned to double clutch on this truck and it is a wonderful thing to drive...anywhere you want. It has been on top of all these mountains around the cabin many, many times. By the way, the paint job is perfect camouflage. In fact, rust is a color!
There is always a bit of culture shock when I return to my workshop. It soon wears off, as I begin to get back in the "groove" of work. The good news is that I am constantly reminded of where I came from and it keeps me humble as I work on the wonderful things which compose my life's work.
I like to think that I remain true to the family business, "A Square Deal."
 |
| Cooked on a Wood Stove |
POSTSCRIPT: Those of you who live in the Northern States know about the cold front which just moved down from Canada. I heard that the temperature in Denver dropped 40 degrees in 2 hours. Ennis Lake is at 5,000 feet altitude in a narrow valley which runs North and South. Let's just say that it can get cold fast at the cabin. Today I received a photo of the lake from Tony Forsythe, who lives just down the road from my cabin, and found my photo of the Army truck on my blog. Since he recognized the old truck, he was able to contact me through the web. So, here's a photo of the same lake from essentially the same spot only a month after I took the shot above.
 |
| Looking South on Lake Ennis after a "light" snowfall |
Here's a photo of the front of my cabin taken by Mike, my next door neighbor, last year at about this time. Snow is very beautiful in a photograph. Not so much when you have to live in it.
 |
| This is a "medium" snow fall |
Sunday, September 21, 2014
Treasure Box Series II Progress
 |
| Treasure Box Series II Nearly Complete |
The day Kristen and I left to fly to Winston Salem, Patrice finished cutting out the ebony background packet and was ready to start putting it together.
This Treasure Box is twice as difficult as the first series Treasure Box, and it includes subtle complexities that makes it even more challenging. Patrice and I have worked together on this project for an entire year to get it to this point, and we hope to complete the project, with four identical boxes by the end of this year. Or sooner, if possible...
After the success in selling all four of the first series, we were encouraged to start working on the next series. I selected the original box from a web search and began working on the box construction. You can search back in this blog to see how long ago it was that I was cutting the full blind dovetails for the corners.
We decided to do the interior in bloodwood veneer and we found a nice large and colorful bloodwood board in Oregon to cut down for the solid partitions to match. The design includes three birds, each different. Two are sitting in trees inside the box itself. One is on the top outside center, surrounded by bone inlay.
Patrice refined the overall design using illustrator, which produces a line composed of very small dots. It is essential to use a dotted line to cut the pieces properly. That is because we are using the Classic Method to produce these boxes, and, if you have been following this blog, you realize we are "cheating." What I mean by this is that the original box, made in the late 17th century, was made using the Painting in Wood process. With this process, you only are able to generate one copy of the design at a time. In order to made these boxes "affordable" we are using the Classic Method, which the French perfected in the mid 18th century, and with that process we can make multiple copies all identical.
They look like Painting in Wood, but the fit is perfect since the saw kerf is eliminated, so an expert would be able to determine that they are not "of the period."
To cut out the background for the top, Patrice had to first cut out the elliptical bone cavity around the center bird. Then he had to take apart the package and install the bone strips in each background. Since the four backgrounds then had to be put back into a packet absolutely perfectly, with a new design placed on the front of the packet, there had to be some way to keep the alignment of each layer without any error. I suggested using pins which would be placed in holes that were first drilled through the first packet. Then Patrice was able to keep the second design in the right position by locating these pins. It worked perfectly. Absolutely zero error.
For more about this part of the job visit Patrice's blog here:Patrice's Lumberjocks Post
So, after cutting the packet for over three days, full time, he was ready to start putting the pieces together. We flew to Winston Salem on a Wednesday. On Thursday night we were looking for a place to eat and walked into a crab shack around the corner from the hotel. As we looked at the menu, we were dismayed to find everything was fried. When the waiter arrived and asked us what we wanted, we said "anything organic and anything not fried." He kindly said, "You are in the wrong place. You need to go down Liberty Street on the other side of the interstate and eat at Willows."
Boy, was he right! We ended up eating there four nights in a row and enjoyed every bite. For example, here is the "Grilled vegetable Napoleon -layered puff pastry, with grilled asparagus, grilled portabella mushrooms, grilled artichokes and fontina cheese, finished with roasted red peppers." I had it twice!
 |
| Excellent Food Properly Presented |
To quickly review how we got to this point, I will briefly summarize the process we used. After Patrice had completed the drawing, I laid out 32 different packets of sawn veneers and coded each part of the design with the appropriate wood. The top has nearly a thousand separate pieces, and each had to have a color, keeping in mind the overall goal of making it look authentic. I then glued each piece of the paper to the packets and fed them to Patrice, who was kept busy cutting 4 layers of each element over nearly a month of work.
He is responsible for placing each piece in hot sand to create the artistic shadow, as I no longer have the patience to do that part of the work. It is an essential part of the process, but very tedious. Patrice has the eye and understands exactly how the final result will look. He did a great job.
At this point all the sides for the four boxes are assembled and all the tops are nearly ready. The inside marquetry is done and glued down. There is one last issue to resolve: green bone.
If you look closely at the marquetry you will see that a lot of the places where leaves should be are empty. These spots will be filled with green bone leaves. Also, in these places you can see small strips of ebony crossing the empty space. These strips are "bridges" which are a feature of the Classic Method. By leaving "bridges" in the design, the various elements of the background can remain exactly in the proper place until the worker is ready to install the proper element. The worker just cuts out the bridge and installs the leaf, in this case. We will do that as soon as we complete the process of dying the white bone a proper green. Green bone elements were a very popular feature in late 17th century work.
I am so proud of this recent work that I want to show you some closeups, even though the work is not completely done. Note you are looking at the back side of the marquetry, which is being assembled with hot glue on an assembly board which is covered in stretched Kraft paper. When all the parts are in place, any gaps which remain will be filled with mastic. Then we can remove the panels and finally glue them in place on the outside of our boxes.


We are very fortunate that three of these boxes have been sold and paid for. That means that there is only one Treasure Box Series II which remains available. It is our hope that we will find a patron who is able to purchase the last box and perhaps donate it to a museum. We believe that this work is worthy of being in a museum where it can be enjoyed by the general public. I think it is very important in this modern disposable world that the public has the chance to view objects which will stand the test of time. This work is equal to that produced centuries ago, as we have been very faithful to the craft.
Saturday, September 20, 2014
Exciting WIA Week in Winston Salem

Fortunately, I had decided to arrive several days in advance of the WIA conference and stay a few days after, so Kristen and I were able to spend some quality time in old Winston Salem. In fact, the last time I visited Winston Salem and MESDA was in 1978, during one of my several trips to visit East coast museums and historic settlements. I am sorry it took so long for me to return.
The weather was great, in fact, with only a slight spot of rain and moderate heat. While I was away, on the other hand, San Diego had a heat wave, with several days above 100 degrees. Poor Patrice had to work at the bench, building the top of our Treasure Box (Series 2) while I got to wander around from place to place, thinking perhaps I should have packed a sweater.
Last year, during this time, I was teaching at Marc Adams school, and only had a short time late on Saturday to get away. I broke several speed limits driving from the school to Cincinnati to see the WIA event. I got there about 30 minutes before it closed, with just enough time to get my signed copies of Roubo from Chris. As it turned out, I also had to sign a few copies, since I wrote the Forward. The best part was that I got to have a nice dinner with Roy later that evening.
This year, I was a speaker, and presented two lectures to a rather enthusiastic and supportive audience. The first was a talk on "Historic Marquetry Procedures,"and went through basically 500 years of the traditional methods used to create this art form. The second was "Building and Using a Chevalet." At the start of this lecture, I mentioned that I have been working for nearly 20 years to introduce this unique tool to woodworkers in North America. Then I foolishly asked if anyone in the audience knew about this tool. When nobody raised their hand, a person in the back shouted, "You haven't been very successful!" As they always say in law school, "Never ask a question if you don't already know the answer."
I shared the lecture room with Roy Underhill, which is always an experience. As I was setting up my talk, he was putting his things away. They had scheduled a half hour break between speakers. Just about the time I was ready to start, Roy had the brilliant idea to "introduce" me. You probably already know he can be theatrical, to say the least.
He said the first time we met was at the Great Salt Lake, and there was a stampede of brine shrimp. Tim Webster was sitting in the audience, and had the quick thinking to pull out his camera and video it, posting it on YouTube soon after. I was speechless and had to hold my tongue, while he went on and on, creating a story that was more and more amazing. My mike was turned up to the max and when I did comment it was way too loud. Near the end I asked him to turn down the mike, and he crawled under the screen to adjust the volume. I thought I had a quick wit, but there is no way I can keep up with Roy when he is "on."
Here is the video: Underhill introducing Edwards
While I was having fun in the lecture hall, Kristen was in the Trade Show, where we had a booth for both the ASFM school and OBG. She is a master of working these shows, and I am very grateful for her talent, as I usually lose my voice and patience trying to compete with the noise.
Of course, Roy had to stop by and pick up some glue...

At the end of the show, they gave away a rather expensive band saw. I wondered if it would fit in the overhead compartment on the plane, but fortunately I was not in the contest to win it. However, they asked all the speakers at the show to sign it. I asked, rather incredulously, if they really want me to sign a power tool? They insisted, so I did. You can see my name, with the comment added
"Use hand tools."

After the show Kristen and I went to MESDA where we had a nice tour with Daniel Ackerman. We also enjoyed a private home tour by Tom Sears, both of which are members of SAPFM. We had dinner with Jerome Bias, who is the joiner at Old Salem, and then visited him at work, where he demonstrated his Roubo veneer saw.

Across the hall Brian Coe was using the foot power lathe to make some turnings. That is a rather impressive tool, made from massive pieces of oak.

All of this activity was in the Brothers House, and it was full of woodworkers from the show, having a great time sharing stories. There was a warm sense of camaraderie and mutual friendship.

I made a promise to myself not to wait another 30 years before returning to Winston Salem. Thanks to Megan, Don, Roy, Jerome, Daniel, Phil, Freddy, Martin, Tom, Brian, Will, and too many others to name. You know who you are!
Tuesday, September 9, 2014
Woodworking in America Calls
I am really looking forward to meeting all my good friends and woodworking peers this weekend. I have been asked to teach a couple of classes, and my wife Kristen and I will also have a booth in the Trade Show area of the conference.
To see a list of classes click here:WIA Lectures
Our booth will be representing the American School of French Marquetry, and I hope to attract new students both to my school in San Diego, and also to Marc Adams School of Woodworking, where I will return to teach next fall.
Marc has graciously sent to the conference one of the chevalets he built for my class. Unfortunately, the classic chevalet doesn't fit into the typical baggage requirements, so having one of his on loan is a great help. Thank you Marc.
We are also selling bottles of Old Brown Glue at our booth. That is assuming the TSA doesn't look at a 49 lb bag of gelled organic glue as a threat. We included in the package the MSDS just in case.
I used to wonder at Don Weber, the "bodger of paint Lick, Kentucky," when he would stay with us. His baggage contained a dozen razor sharp turning tools. I guess if you look authentic, they don't mess with you.
I have had my share of interesting stops by TSA. One I am thinking of was the time I transported 2 kilos of sand, which I paid a good price for in Paris. This particular sand comes from Fontainebleau and is used for burning wood in marquetry. As they ran their hands through the sand, looking for something, they finally asked me, "What is this?" All I could say was "Sand."
But the most memorable and dramatic event was when I arrived from Paris to clear customs in Philadelphia. I had a bag which was 50 pounds. I had purchased a variety of traditional stains, in powder form, as well as kilos of pumice and "soie" which is a silk filtered mineral for French polishing. At the same time, since American pewter is different than traditional French pewter, I had several sheets of 1mm thick pewter lining the sides of the bag.
So, when I was asked to open my bag for inspection, the inspector looked into a bag, lined with lead sheeting and filled with hand made brown paper kilos of different powders. He asked me to empty the bag, and as I lifted each kilo out to place it on the table, different colored powders would leak out. I tried as best as I could to explain why I had placed pewter on the sides of the bag, but he wasn't impressed with my knowledge of traditional marquetry and special materials.
As he reached for the telephone to call a superior my heat sank, thinking my stop over in Philadelphia was going to take longer than I had expected. However at that same instant a 777 had just arrived and there were about 300 people rushing the gate. He just gave up, looked at me sternly, and said, "Pack your bag and go."
I guess it does matter if you look authentic. Hope to see you in Winston Salem!
Sunday, August 31, 2014
A Simple Painting In Wood Etude
 |
| Always Start With The Basics |
When I decided to open up my marquetry workshop to students, I had to decide what kind of curriculum to follow, knowing that I would have a wide range of students with a wide range of abilities and experience.
Therefore, I followed the musical format which I learned during the decades I was involved with classical music. At the age of 12, I saw a kid playing the violin on the Ed Sullivan show on TV. I immediately told my parents that I wanted to learn the violin. Fortunately, they were able to buy me a moderately good quality instrument and find someone to teach me. I went every week to get a lesson and made a good effort to practice daily. I was not always successful, and my teacher would always know when I had practiced or not.
There were fingering exercises, bowing exercises, scales in every key, and very simple practice etudes. It was all about technique. My teacher was a very old man, and had learned himself from a Russian teacher. He insisted that I learn the basics before I even thought about playing anything by some composer. He was right. I was soon able to join the Civic Youth orchestra, where I sat first chair, second violin section. (I never had any aspirations to play first violin. That takes a certain ego.)
In college, I naturally took music and had the good fortune to study with Bert Turetzky, a famous double bass player. He listened to me play my violin and immediately said, "Forget it. I need a viola player. Can you learn to play the viola?"
I went back to my teacher, who was in his 90's and retired and asked him if he could help me. He was generous enough to show me what I needed and I spent my college years playing the viola in the UCSD quartet. Some of the most rewarding days of my life.
My point is that, if I had not been shown how to hold the instrument, how to tune the instrument and how to execute the most basic technical aspects of it, I would never have been able to perform Schubert's string quintet in C major successfully.
Thus, since I only teach two weeks of classes every quarter, it is essential that I teach the basics. How to fit the chevalet to the worker. How to hold the saw frame and set the tension. How to make a packet and cut it. How to execute simple etudes over and over.
The first week is the Boulle method, where it doesn't matter much if you can follow the line. Most students are able to learn fast enough and have enough control to stay on the line by the end of the week. The second week is the Classic Method (Piece by Piece) where it is essential that you not only follow the line exactly, but are able to cut away exactly half the line consistently. That takes good eye/hand coordination, and that takes much more practice to master.
There is an etude which is in between these two methods: Painting in Wood. With this method, you do not have to follow the line exactly. The pieces always fit, since you are basically using the Boulle method of cutting the layers of the packet in super position. That means the elements of the design are cut at the same time as the cavities of the background, which is in the same packet.
With the Classic Method, the elements of the design are cut in a separate packet and the back ground is cut in a separate packet, so if you are not careful, they will not fit. The French developed the Classic Method and were able to keep most of the secrets of this process in Paris.
At the end of the 17th century, the rest of Europe began to evolve the Boulle Method into the Painting in Wood method, as the desire to create more naturalistic marquetry designs became the fashion. With Boulle, the packets were usually layers of ebony, pewter, brass or tortoise shell, and the overall design was either a positive or negative form of the design ("premiere-partye" or "contre-partye").
 |
| Boulle Marquetry Project for Art Institute of Chicago |
I wrote an article explaining this process in detail in Woodwork, February 2008, where I show how I made one of my tall case clocks.
The success of this method depends on making sure the elements of the wood you need for the design are exactly in place inside the packet, and that you are able to include as many different species of woods as possible in the fewest number of layers. Generally, using 1.5mm sawn veneers, I limit my packets to 8 layers of veneer, plus the 3mm back board and the 1.5mm front board. When using 0.9 sliced veneers, it is possible to include as many as 12 layers of veneer.
I first make multiple copies of the design. Using those copies, I begin to place my woods in each layer where they are needed. Then I fill in the gaps with a scrap veneer so there are no voids inside the packet. I am careful to keep the outside corners of the design for proper orientation. I usually include at least two different species of woods for each flower, which gives me the option at the end of selecting the proper woods for the best effect.
Working from the back of the packet, I first start with a 3mm back board and a layer of grease paper. The back layer of veneer is always the back ground, which in this case is ebony. Note I have colored on the design those parts of the background which are isolated and would tend to get lost if I didn't pay attention while cutting.
 |
| Layer F (Background Veneer) |
(Note there is no ebony veneer in this photo, since it was used in the project.)
Each of the following photos shows the design for that layer on the left and the layer of the packet on the right. Since this example is one I use in class, I have covered the layer of veneer with clear packing tape, and you are looking at the back of the layer for clarity, since it is covered with veneer tape on the face which holds everything together.
The next layer is generally either a layer of green or brown for the branches or leaves:
 |
| Layer E |
 |
| Layer D |
 |
| Layer C |
 |
| Layer B |
 |
| Layer A |
I make a final drawing and use it when I cut out the packet. This design shows me all the information I need to select the proper layer of wood from the plug of veneers, each time I cut them out. The rest is discarded. I keep only the woods I need for the picture.
 |
| Cutting Guide |
One of my students, Paul Miller, seems to have also found this process interesting. After he returned to his workshop and built his chevalet, he sent us a card with the photo of this etude on the cover:
 |
| Paul Miller's Card |
I really appreciate it. Soon he will be performing Schubert!
Saturday, August 30, 2014
Jewel Cabinet Backstory Revealed
 |
| A Little Pride Showing |
This Jewel Cabinet was first exhibited in the SAPFM member's exposition, "Contemporary Classics: Selections from the Society of American Period Furniture Makers," at the Telfair Museum in Savannah, Georgia, and I distinctly remember it as being the only piece of European furniture in that show. Subsequently, it was also on exhibit here in San Diego, at the Mingei Folk Art Museum, as part of the "Forms in Wood and Fibre" exhibition. I must say it also stood out from the rest of the show, as being from another planet. My good friend, John Lavine, editor of Woodwork Magazine, was kind enough to place this cabinet on the back cover of issue #101, October 2006. It is in a private collection today, and I get to see it from time to time. The last time I looked at it, my first comment was "I could do much better today!" Then I realized that my thoughts should best be kept to myself. This craft is an amazing thing: you spend 45 years working every day trying to master it only to find out that there are still many more things to learn.
The art of French polish is a good example. Once, in the most prestigious restoration shop in Paris, I approached a worker who had spent 10 years in that shop and his only job was polishing. As he was working on a beautiful mahogany table, rubbing away, I watched his darkly stained hands moving expertly over the surface and asked, "Can you tell me some of the secrets of French polishing?" As I understood his response, in French, I heard, "I've been doing this every day for 10 years, and I still have a lot to learn."
As the photo of this Jewel Cabinet is an iconic part of this blog, I thought it was time I should explain what led me to make such a thing. Also, since Paul Miller just wrote me and asked if he could use my piece as an inspiration for him to make something similar, I want to post some more details for him to use. I have no problem with others copying my work. I have done the same thing all my career. The difference is that the craftsmen I choose to copy have all been dead for a couple centuries.
In any event, I first saw this cabinet in London, at one of the most well known and expensive antique dealers in that city. I will not name the company, for reasons which will become obvious in this post. As I walked through their showrooms, I was impressed with the quality of the objects and the perfect condition they appeared to be in. In one room I was stopped in my tracks by a wonderful marquetry cabinet with ivory feet and pulls. I asked the salesman for more information, as I "might have a buyer" and he obliged by handing me three glossy 8 x 10 photographs and the price sheet.
Here is the description on the price sheet: (Dealer name covered by blue tape)
 |
| Name Deleted to Protect the Dealer |
There are several points raised by this sheet to consider. First of all, it is attributed to "France, circa 1690." Secondly, it is called a "Cartonnier." Third, it is very strongly attributed to Boulle, without exactly saying so. (The word is "comparable.") Forth, it is 116cm wide (this fact will soon be recognized as very significant.) And, finally, it is 18,500 British pounds.
As soon as I was able to return to my library and do basic research, I found this document:
 |
| The Evidence Exhibit A |
I doesn't take a lot of conjecture to imagine a person buying this desk, throwing away the base section (since it needs a lot of work), adding ivory feet and pulls to the upper section and calling it French. The motive is simple: you double your money.
My first suspicion that something was not right, was the term the dealer provided for the object: "Cartonnier." I know from my reading and visiting museums that a cartonnier in French furniture is a different shaped cabinet which stood at the end of the bureau plat. In simple terms, it was a filing cabinet for the paper work. Generally quite tall and shaped to match the Louis XV forms popular at the mid century. The dilemma faced by the dealer was what to call it, since it no longer was associated with the Flemish desk that used to support it.
In any event, here are the photos supplied by the dealer and what I did with them:
 |
| "Comparable to Outstanding Boulle Marquetry" |
 |
| Rough Drawing of Original |
 |
| Final Drawing of Marquetry |
I cut out the solid woods for the carcase, using quarter sawn white oak and beech. I rough out my stock and set it aside, with stickers, for a season (at least one year) to adjust to my climate. I cut out more pieces than I need, so I can pick the best ones when it comes time to build the piece. While the wood is set aside, I turn my attention to cutting out the marquetry panels, using the Painting in Wood process. I remember there are 18 panels plus the running bands on the face. Several of the panels are identical in design but inverted in polarity so as to appear different.
For example, the two large panels on the top ends are the same design, but mounted left and right, with the individual colors of the elements selected as opposite colors. The 8 drawers are made from only two drawings. One has an orchid in the corner and the other has a rose. By flipping the images left and right and changing the woods, it appears that there are 8 different designs. There are 32 different wood species and all of them are natural colors, except the blue and green woods which are tinted using traditional methods. Of course all the veneers are sawn material I purchased in Paris from Patrick George and are 1.5mm thick.
Here is the top of my cabinet:
 |
| Top of Cabinet |
 |
| Legal Ivory |
I might mention that I like to use full blind dovetails for my cabinets and boxes which are veneered. This way the dovetail pins do not telegraph through the surface over time. I did the same for this cabinet. Everything was hand surfaced and toothed so I could press the veneer in place. After the panels were laid down, the cabinet was glued together and the ebony and boxwood banding applied.
Here is the front of the original cabinet:
 |
| Made by Hand in Antwerp late 17th Century |
 |
| Made by Hand in Southern California 21st Century |
 |
| Back of Cartonnier |
 |
| Credit for Design to Louis XIV Coffer |
All told, I spend 800 hours building this cabinet and it sold the day it was finished to the first person who saw it. Life is good. There is still a lot to learn.
Thursday, August 21, 2014
New Furniture?? Not My Problem!
 |
| Me Looking At New Furniture |
Then they call a refinisher to see about getting it "restored." Of course, these people are people who actually have jobs and hobbies and spend their time doing other things than looking at furniture like they were in love with it.
So I have a series of simple questions, like: "What wood is it?" When they don't know, I ask the back up question: "Is the wood red (ie. possibly mahogany), brown (walnut?) or yellow (oak for sure).???"
Another series of investigation starts out "What do the feet look like?" To which the standard answer is "I don't know, I never looked."
The final question is the most obvious: "How old is it?" And I always get the same response: "It's old!" Which, of course, is meaningless. Old compared to what? Your car? Your dog? At this point I hit them with my best shot: "Is it an antique?" That is when they always say, "I'm not sure, but I know it's old. I got it from my grandmother." Always the same type of response. In the end I insist that they send me a photo since that is the only way I know what they have.
I anticipate the email with photos so I can find out exactly what kind of work is involved. The majority of the time it is disappointing, and some of the time amusing (to me; not to the client I'm sure) and in rare instances it is amazing and exciting. A good example happened this week when a caller asked about repairing water damage to their dining table. Here is the photo I received:
 |
| "Water Damage" |
Clearly, if you have a table made of MDF with paper thin veneer and finished with a conversion varnish, it is probably not the best idea to use it outdoors in the rain.
I am writing this post since there were three instances this week alone which made me think of the consumer and modern furniture production.
The first one was a call which mentioned a Mission Oak Dining table and "several mahogany pieces." When I arrived I was shown a Mission Oak table which was very clearly brand new. The finish on the entire top had peeled away from the wood, leaving large bare spots all over the table. The finish which was not peeled was cracked and ready to delaminate. When I asked how old was the table, they informed me that they had bought it two years ago, new. The "mahogany pieces" were actually mahogany (African) and old (1940's). I sent them to another refinisher.
Then something exciting happened. A young couple came in and purchased 4 nice New York dining chairs from me. These chairs were made in 1850 and were solid Brazilian rosewood, with the original seat upholstery. They told me they had been buying IKEA furniture, but it always fell apart after a few years, so they wanted to "do the right thing" and buy something with a "low carbon footprint." I think that furniture manufactured over 150 years ago must have a very low carbon footprint. Actually, I think at that time it was a whale oil footprint.
When I delivered the chairs, they immediately placed their IKEA chairs out on the curb and, within 5 minutes they had disappeared. Talk about recycling!
But the most amazing story just happened here at work. The door bell rang and I opened it to find an older gentleman. He asked me if I could fix his drawers on two chests he had. I started to explain that wood drawers often wear out on the lower edge of the sides and the wood runners would also need some repair. He said that wasn't the case. I then said that some more modern drawers have a center slide under the drawer, and if that was not in the right place the drawer would be hard to open.
He said "No. Actually there are metal slides for the drawer."
"Oh, I see. What you have is more like office furniture?"
"No," he replied, "It's high end furniture I just bought it, and I paid a lot of money for it."
At that point I told him that I couldn't help him. But he said that what was wrong was the screws holding the slides were coming out and he could see that they were in the way.
"Why don't you just screw them back?" I asked.
"Because it would void the warranty," he insisted.
"But, if it's high end furniture and under warranty, why don't you just have the store fix it?" (I suppose this was a dumb question, but I was now in new territory.)
"They have already sent out a repair man twice and he can't seem to fix it!" He was exasperated. All I could mutter was "I am sorry, but I can't help you."
As I closed the door of my workshop, I was relieved somehow that it was actually closing out the modern world, and that I could return to my glue pot and workbench in peace.
Subscribe to:
Posts (Atom)