Saturday, March 30, 2013

Simple Things: Dovetails

It was obvious from the first day I decided to become a furniture maker that I would need to make dovetails.  Everything I read about the craft, and everyone I talked to who practiced it seemed to regard the dovetail joint as a religious experience.  It was an iconic "rite of passage."  A hand cut dovetail was one of the most mysterious joints and, at the same time, was the basic standard element of traditional furniture.

So I set out to make a dovetail joint immediately to see what the challenge was and how difficult it would be.  The first decision was whether to make the tails first or make the pins first.  Half the people I talked to said one thing and half said the other.  I really don't think it matters, and after all these years, I just do what I feel like at the time.  As for the transfer of the lines, that is a question of technique and tool choice.  Which method works best is determined by personal experience.  The best argument I have for cutting tails first is that it is easier to adjust the pins last since they are end grain.

I remember Frank Klausz on his video talking about the first time he made a drawer, and his father took it and threw it into the corner.  When I completed my first "drawer" test with full dovetails and half blind dovetails, I threw it into the corner.  Since I have never moved the shop in 40 years, it still sits in the corner, reminding me of my start.  Here is a photo of that effort.

My First Dovetail 1969

Soon I will be on a national television show, which the non disclosure contract I signed prevents me from naming.  It is a new "reality" show on a network which is just entering the reality show genre for the first time.  The show is about determining if something is real or fake.

I was asked to analyze a Civil War table and determine if it belonged to Lincoln or not.  Before I went to the taping, I searched out the patent copy for the Knapp dovetail, since that distinctive dovetail was typical of the post Civil War furniture.  You see, the Industrial Revolution transformed all aspects of furniture making during the mid 19th century, and creating a machine to make a dovetail was the last task that was resolved, first by Mr. Knapp, and soon after by many others.  The first patent by Knapp was 1867, but the 1871 patent was the one which made him famous, and his invention was quickly adopted by factories and used on most furniture for a decade after that.  I'm sure you have seen it.  It is a half round shape with a pin in the center.


Knapp Patent Dovetail

The instant I pulled out the drawer and pointed out the distinctive dovetail, I concluded that Mr. Lincoln did not live long enough to ever lay eyes on this table.  The director stopped me and said that, since the show was an hour long, I would have to find some way to delay my conclusion and focus on other aspects of the table.  That's called "leading the witness."


Layout Is Important

Today I started framing the carcase for my fifth tall case clock, with the period works by Daniel Lecount.  I mentioned these works some time back on this blog, and now have the time to build the case.  I am duplicating a case which I found online that is by Lecount, and it is like the other marquetry clocks I have built in the past.

Small Marks Prevent Problems

Building a tall case clock starts with the back board.  That is the spine which all the other parts are attached to and it is the best place to start.  Tall case clocks are rather easy to build.  You have a box on the bottom, a box with a door in the middle, and a box on top which covers the works.  All the rest is just surface decoration.

Note The Mitre Edge

Today I made the bottom box.  I am using white oak for this clock.  In the past I used beech, pine, tulip poplar or white oak.  I do not use red oak.  Just don't like it.  White oak is nice, but the French oak is even better, if you can get it.  I am using American white oak, since I have some left over from a recent job making a desk.
Pins And Tails Properly Cut

The box on the base of the clock has horizontal grain.  If you use vertical grain there is a good chance it will eventually crack and spoil the marquetry.  With horizontal grain, the clock just becomes slightly shorter as it ages.  Less chance of cracking, in my opinion.

Nothing To See Here

This also allows the use of full blind dovetails in the corners of the box.  Full blind dovetails are perfect for making something which is veneered.  They are structural, but do not telegraph through the surface veneers as the wood moves.  The corners are nicely mitred and make a clean surface for the veneer.  I use thick sawn veneers which are 1.5mm thick, but even at that thickness I have seen antique furniture where the dovetail pins show under the veneer as the wood ages.

Making full blind dovetails is a neat and rewarding job.  It requires careful measurements, clean cutting with sharp chisels, and good sawing technique.  Actually, I find it doesn't take much longer than a regular half blind dovetail, once you do it a few times.

The really cool thing about it is that, once it is done, it is never seen again.  Only the maker knows about it and there is no reason to show it off or point to it with pride.  It is the perfect zen joint.  It takes skill, knowledge and confidence to accomplish, and then disappears forever.

Talk about the "mysteries of the trade!"

Tuesday, March 19, 2013

Simple Things: Glue Blocks

Making Glue Blocks


One of the constant pleasures of restoring period furniture on a daily basis is learning from the "old guys" how they were trained to do things by hand.  I find it difficult to imagine how a young aspiring woodworker today can learn as much from school and books as I have over my career just working on antique furniture, day in and day out.  Sometimes at night too.

As I work to repair and recreate period furniture, I try to put myself in the shoes of the maker, standing at his bench, working a typical pre industrial work week, 11 hours a day, 6 days a week.  Thank goodness that the employer had to supply candles!  My habit is to work 12 hours a day, 7 days a week, but I am slightly obsessive about my craft, and have no other hobbies to distract me.

I have noticed simple tricks over the years, which are so obvious to me that I don't place a high degree of importance on them.  However, sometimes when I mention them to other woodworkers, I see the interest in their eyes, and that reminds me not to take anything for granted.

So here is one of those "obvious" tricks: Glue Blocks.  Need I say more?

Glue blocks are everywhere on antiques.  Wherever you need a support or added strength in cabinetmaking, you find a glue block.  They are simple blocks of wood, generally soft wood, which are placed inside the cabinet, under the base, behind the crest, under the drawer runners, as drawer stops, etc.  Everywhere.  They are in places where it is impossible to use clamps.  They rarely, if ever, have nails and never screws, as it is a waste of hardware, and not necessary to hold them in place.

They are attached using the "rubbed joint" process with hot animal hide glue.  Essentially, the fast tack feature of the glue allows the worker to just apply the glue to the block and press it into place.  Sliding it back and forth slightly a few times removes the air and pushes out the glue, and then it sticks.  Takes about 10 seconds to install.  Ends up stuck as much as if you had applied a clamp.  Neat and efficient.

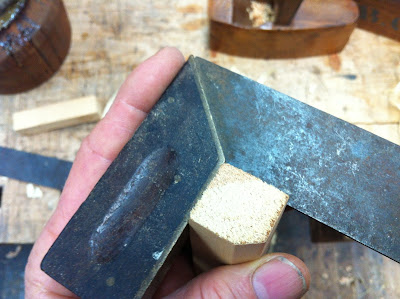
I got to thinking about these glue blocks.  Making a single block is a bit of work.  Making a lot of blocks is much more efficient.  You need a stick of soft wood, usually about 1" square, but the dimensions depend on the final project.  Using a jointer plane, you shoot it in length on all sides to make it true.  Make sure that at least two adjacent faces are square, and these faces are toothed the length of the stick, using the toothing plane.

Check The Corner For Square


To finish the job, you take the plane and chamfer the opposite corner from the toothed sides.  This chamfer is the clue that led me to understand exactly how this process worked "back then" in a typical three man shop.  I saw this chamfer on all the glue blocks I looked at in early furniture.  At first I thought it was just the worker being neat or showing off, not leaving a rough edge to the blocks.  Then I realized that time and effort was precious when you are working for a dollar a day, and there is no reason to "finish" off a simple glue block which will never be seen by the client.

Tooth Two Adjacent Sides


That made me think that it was the job of the young apprentice boy, working in the shop, helping out.  It would be a good learning experience for the apprentice to prepare these blocks in advance.  He would gain practical experience with the jointer, toothing plane, square, and bench.  He would make long sticks with toothed sides, planed sides and a chamfer, then saw them into short pieces and place them in a box, ready for use.

When the journeyman needed a block, he just reached into the box and grabbed a few, ready to use.  The chamfer was a tactile and direct way for him to determine which two sides needed the glue and were toothed.  He didn't need to waste time looking at each block every time he needed to use it.  Just feel the chamfer and add the glue, press it in place and continue working.  Fast and efficient.

All the clues are there on antique furniture, if you know where to look and how to interpret what you see.  Instead of reading books, I recommend you start reading the original object.

Monday, March 18, 2013

WoodTreks Videos

Keith Cruickshank is a very cool guy.  I met him some years ago at an event where us old guys were standing around talking about woodworking (what else?)  He asked me if he could shoot some video at my shop, and that he was posting these videos on the web.

I have had lots of different video shoots "on location" at my workshop over the years.  Once I even had a shoot for a famous men's clothing catalogue (like Peterman on Seinfield) and they paid me.  I had to wear a shirt and it took 4 hours and a team of 6 people to get "the right shot."  People think that professional models have it easy.  Take it from me, it's a pain in the asperger's syndrome.

Anyway, Keith has a Mercedes Sprinter van, like mine, so we had something in common, and I said "fine."  He explained that he did things differently.  He worked alone.  So we had that in common.

He showed up with the minimum amount of very professional equipment.  The camera was hand held, and there was no extra effort to light the place.  Since my workbench is in a very small room with terrible lighting, it actually was amazing how good the videos turned out.

These videos were all done in one day, and there was enough material to cover three different topics: my workbench, working with protein glues, and hammer veneering.

I haven't posted these here before, and it occurred to me that it was important to include them on my blog.

Here is the link to the videos:   WoodTreks Videos


Keith has many more videos and I am sure you will enjoy his approach.  Thanks, Keith!

Tuesday, March 12, 2013

Best Of The Best

PHILIPPE GUERIN'S "TROIS MONDES"


One of the great things about living in other countries is learning how things are done differently than here in the United States.   I appreciate a great deal about the country of my birth, but it is certainly not perfect, and I am always first in line to express my thoughts about how to improve it.

While living in Paris I grew to rely on the superb public transportation system, from the buses to the metro to the trains, it is just not necessary to own a car or drive at all.  In fact a car is a liability, since there is really no place to park it and forget about the price of gas!  Since they use the metric system, the price of a liter is about the price of a gallon here, but it takes 4 liters to make a gallon, so you end up driving only if necessary.

Another feature of living in France is the way their health system works.  American is really in the dark ages when it comes to health care.  For example, if you have a simple problem, just go to the local corner pharmacy, and tell the person behind the counter what you need.  He then sells it to you without a prescription and at a very reasonable price.  For more serious problems, just walk into the hospital.

I had personal experience with the hospital, as my wife needed medical attention during one of our stays.  We were not French, and yet we were treated immediately and completely for our problem and walked out without paying anything.  It was amazing.

There is also something spectacular about the government.  I was watching TV one evening and the news reported that a protest by the fishermen in Brittany had gotten out of hand.  A historic 17th century library had caught fire and burned completely to the ground.  The next day everyone was upset and they showed a well dressed man standing in the rubble talking about how the government was going to pay to restore the building and all its contents.  He was the Minister of Culture.

It occurred to me that America doesn't actually have a Minister of Culture.  Then I wondered what exactly is our distinctively American "culture?"  Is it the movie industry?  Baseball?  Apple pie?  I thought, what if Paramount Studios burned to the ground.  Would the government rebuild it?  Not likely.  However, we were quick to bail out Wall Street, so perhaps that is our culture.

One of the duties of the Minister of Culture is to support the crafts, like cheese, wine, bread, and, of course, marquetry.  They do this by having regular competition, with knowledgeable judges, and a set of strict rules, open only to French citizens.  Winning one of these national competitions is exactly like an actor winning the oscar.  It is a universally recognized award, and sure to boost the reputation of the artist.

There are also regular shows, for marquetry for example, in different districts of the various cities around France during the years.  I went to dozens of shows during the few years I was there.  These shows were sponsored by private groups and supported by the government, both local and state.  I got to see a lot of marquetry and meet a lot of artists at these shows.

THIS IS MY COPY OF "THREE WORLDS"

In 1994, I was at a show and stopped at the booth of Philippe Guerin, who had been awarded the "Meilleur Ouvrier de France Marqueterie" for that year.  Translated, this award is for the "Best Worker in France in Marquetry."  That competition is held every three years.  A design is produced by the state and all the competitors are required to execute their version of the same design.  Philippe won first place.  That means he can post the sign "Meilleur Ouvrier de France" above the door to his workshop so that all his clients can appreciate his talents.

Philippe is a very talented individual but also very humble and shy.  When I entered his booth, he was standing quietly in the corner.  His work was amazing.  He said very little.  I noticed a wonderful piece called "Trois Mondes," or "Three Worlds" which was after a M.C.Escher drawing.  It had a fish swimming under a lake of animal horn tinted blue, and there were hundreds of leaves floating on the surface of the water.  You could see the complicated reflection of three large trees in the background.

He said it had taken him two years to make.  He had made two copies only at the same time.  He had kept one and the other was on the wall of his booth with a price tag of $3,000.  It was the most talked about marquetry panel at that show.

Several years later, I happened to see him again at another show, and asked if he had sold the work.  "No," he said, quietly.  I said that it was a shame, and I would find the money to buy it for myself.  After I returned home, I saved the money over time, and finally sent it to him at the end of that year.  

He called me when it arrived and said that he had just had a baby girl born the same day.  He was as happy as a person could be, and thanked me for buying his work.  I told him that I wished I could pay more, as I was the one getting the bargain.  

It hangs on my wall at the school, over my desk, and I look at it every day.  It has many layers of meaning for me, and I like to imagine the three worlds living together simultaneously in harmony.

I wish we had a Minister of Culture.

Sunday, March 10, 2013

ASFW Invades MASW

Demonstrating at Timken Museum in 1990
There are so many ways to make marquetry, you could fill a book.  Actually, Pierre Ramond has filled 5 large books, including his recent publication in French of the work of Andre Charles Boulle.  You can use chisels, knives, fretsaws, jigsaws, lasers, punches, overhead saws and, of course, the famous "chevalet de marqueterie."  I think by now you know which method I prefer.

Pierre's first book, "Marquetry," was published in 1989 by Taunton Press, and was the first handbook I got my hands on which explained the proper use of the chevalet.  Prior to that, I had found the rare reference to this obscure tool in a few other books, but none of them seemed to know what they were describing.  I recommend "Marquetry" as the first and only book necessary to understand this ancient craft, and note, with some unease, how the prices for this out of print book have risen over the years.

Note to students: There is also a Vial edition published in France which is in English, and a reprint of the book in English, published by the Getty Museum in 2002.  All editions have identical copy and the only difference is in a few of the photos, which change from edition to edition.

Pierre published this important book after he got his PhD and included much of his research with a wide range of photos, essentially making him the world's expert on French marquetry.  However, he still had more material, and as he was allowed to actually trace designs of famous marquetry examples in many museums, he continued to publish a series of 3 volumes over the next few years, called "Masterpieces of Marquetry."  This three volume set was translated into English and published by the Getty Museum also in the year 2000.

The French edition of "Masterpieces" was published much earlier, and I still remember on one of my trips to Paris, in February 1996, walking into the conservation lab at the Musee des Arts Deco, and being greeted with congratulations by my friends.  Not knowing why I was so special, they presented me with the newly published Volume II, which had just been released.

There, on page 62, was my photo, and some copy which read, in part: "The perpetual transfer of techniques between continents can be illustrated by Patrick Edwards's (sic) equipment."  He goes on to discuss how I was able to acquire an historic foot powered frame saw and build my own chevalet.  In my talks with Pierre, he encouraged me many times to introduce woodworkers in my country to the traditional French methods of work, including the "chevalet de marqueterie."

That is exactly why I have established the American School of French Marquetry in San Diego.  I realize how special and fortunate it was for me to attend ecole Boulle, and it was my duty to make that experience available to others in any way I could.

Demonstrating at Getty Museum in 2000

When I started the school, I doubt that there were more than a couple of chevalets existing in North America.  I knew of a few European trained workers who had personal tools in New York, San Francisco and Los Angeles, but their shops were closed to the public.  In fact, the Getty Museum had two examples made for their purpose and I was able to see these tools in storage.  When I first opened my school, the Getty was generous enough to loan me one of them, until I could build more of my own.  That particular tool has now been loaned to the Philadelphia Museum of Art for their use.

The ASFM has two goals in teaching students: first, introducing the student to the chevalet, and second, transmitting the traditional French methods of making marquetry surfaces as taught to me by Pierre.

I often use a musical metaphor when I teach about the tool.  For example, if you were given a violin and a bow and had no knowledge of how to hold it, tune it, or read music, it would be very difficult to learn how to play it properly.  Therefore, the first class, Stage I, is designed to fit the student to his personal chevalet, how to adjust the blade tension and angle, and how to follow the line.  Also, the student is provided with three simple exercises to execute, so that they can learn the process from initial design to final picture.

By the end of the first week, they have a choice to proceed to Stage II and work on the Classic Method, or do a Painting in Wood exercise, depending on how accurately they can follow the line.

We have had hundreds of students from dozens of countries complete our classes.  All of them have been surprised to learn how easily the tool functions, and what amazing things can be accomplished with it.  Nothing in my experience allows the precision and comfort that the tool is designed for.  It actually becomes a direct extension of the body, after a few hours of practice.

In addition to the 6 chevalets, of different sizes, that I now have in the school, I am currently building a 7th tool, which I expect to be available by June's classes.  One of the tools is left handed, but it is my experience that the majority of "left" handed students prefer working with the right handed tool. After all, how many left handed violinists are there?  (OK: Jimi Hendrix and Paul McCartney are exceptions.)

Now for the exciting news.  After some time discussing with Marc Adams the possibility of teaching at his school, we have come to an agreement.  He has purchased 8 chevalet kits and is building new tools for his school, where I will teach my first class in October.  Unlike his other classes, this marquetry class will be strictly limited to 8 students at a time.  I understand that he already has 6 students registered, so there are only 2 spaces available.

I expect that, now that his school has invested in these tools, I will be able to teach there more often than once a year, and even that his staff will be able to develop classes themselves, after some instruction.  This will be the second school in North America with chevalets!

Here is the link for the class:

Painting in Wood Class

In addition to that one week class in October, I will be also teaching two one day classes that weekend. The first is all you need to know about using protein glues.  I have sort of become the leading "authority" on these organic glues, so this should be interesting.

Here is the link for that class:

Working With Protein Glues


Finally, the last class I teach will be on French polishing.  This is a difficult class to teach in one day, but I will cover the basics and get you started on a life long pursuit of the most beautiful finish you will ever struggle to accomplish.

Here is the link for that:

French Polishing Class

The gluing class is limited to 20 and the polishing class is limited to 18.  That should be interesting.

If you can't make it to San Diego and ASFM, I hope to see you in Indiana at MASW.

Sunday, March 3, 2013

A Simple Vector Clamping Repair

NOT a simple Vector Clamping example


When a client presents a job, I always take the time to fully explain every detail of the work that needs to be done and then, if they want to do it themselves, they can make that decision.  Part of the reason I do that is to educate the consumer, and the other part is that I would be happy if they decide that they want to actually do it.  For whatever reason, over the many years I have repaired furniture, very few clients make that decision.  In the end, they are always happy to pay me to do it.

When it comes to gluing curved surfaces, I need to explain that it is necessary to make clamping parts which they will never see, just to hold the clamps in the right position.  Often they note the hundreds of different clamps hanging on the wall near the bench, and they conclude that it will take that many to do the job.  However, as I explain the reason I need to make these special shaped wood clamping parts, I point out that, properly done, the joint can be pulled together using only one clamp.

The "secret" is that that single clamp needs to put pressure directly perpendicular to the center axis of the joint face.  On a straight break that is simple.  On more complicated breaks there may be several different faces and all the vectors need to be considered, so several clamps will be required.

In the past I have posted photos of this type of clamping.  Recently I posted a picture of a chair for the "Why Cuban Mahogany?" post.  In these photos there are many clamps and it may be difficult to easily understand which clamps are doing what.

In this post I selected a very simple repair.  This project is a lyre shaped mirror support for a late Victorian bureau.  It is made of walnut with a face veneer.  It broke at the weak part of the grain.  The break is fairly straight and clean, and it has not previously been repaired with synthetic glue.  I think it is a clear example to illustrate the Vector Clamping procedure concept.

First I determine a line (vector) which is perpendicular to the center of the break.


Second I cut some wood clamping parts of a wood that is softer than the walnut, like pine or poplar.  These parts have "legs" which allow them to be attached to the walnut in the right position, and a "purchase" for the clamp to sit, directly in line with the vector.


Third, I use plexiglass on each side of the repair to keep the faces flush.  The plexiglass doesn't stick to the glue and allows me to see the joint as I work.  I apply warm Old Brown Glue and the long clamp which pulls the joint together perfectly.  I grin as the glue squeezes out evenly on all sides, indicating my calculations were correct.  After the joint closes, I apply a final tightening of the plexiglass clamp.


It is so easy, when you know what you are doing, that even the client could do it.