Showing posts with label tools. Show all posts

Thursday, July 10, 2014

Shop Tour!

Ring the Bell
The front door at my business used to have a stained glass transom window above it.  It was lovely, as it faced West and the setting sun would shine in through the glass.  My wife, Kristen made it, back in the "hippie" days and it really gave the front room class.

However, two things conspired to change that.  First of all, the transom was held in place with a chain, which allowed us to open it and let the air in.  One day that chain came loose and the window fell completely open, hitting me on the head.  Of course, I fixed it, but the bump left a mark.

The real reason was that KFC built a "restaurant" across the street, some 30 years ago, and connected their sewer line to the main line which runs directly in front of my shop.  Before KFC, my business was the first building on the end of the line, and there were no problems.  As soon as KFC began to operate, I found large quantities of "effluent" bubbling up out of my front toilet.  In fact the front room, which was full of antique furniture, had 6" of standing sewage when I arrived the next day.

Of course, KFC denied any involvement, and the city inspector accused me of putting "something" down the toilet, threatening to shut me down.  My damage claims were denied, and I had to clean up the mess.  The only good news was that KFC quietly relocated their drain to the larger commercial sewer directly in front of their store, instead of the smaller residential line in front of mine.

The city inspector determined that, since the sewer line had a very shallow slope, and that the front toilet was on a slab at ground level, it was easier for overflow to come out the toilet instead of lifting the manhole cover.  That was the news that signaled the end of the stained glass transom.

At that time there was news that a contractor in Los Angeles had laid a new basketball court improperly, and it had buckled severely and needed to be replaced.  This floor was made of 3/4" T/G hard maple, and finished with all the basketball lines and such.  The contractor had taken a saw and simply cut the floor into 12' x 8' chunks and piled them outside.  They were free for the taking.

Several of us guys (the ones with trucks) drove up there in a caravan and loaded up as much flooring as we could lift.  I remember my truck sitting on the axle, as I drove home with my headlights pointing to the sky.

Soon, I had a beautiful new hardwood floor in the front room, which raised the floor (and the toilet) over 6" (more than enough to solve the overflow problem).  The result was that I now hit my head on the transom window, which needed to be removed.  That meant I had to build a new front door, which ended up nearly 8 feet tall.
3815 Utah Street

That was over 35 years ago, and I still miss the light coming through the window.

The rest of the building has been changed and adapted to my uses over the years.  Thanks to Asa, at Fine Woodworking, I can invite you to take a tour.  This link will take you to a short presentation.

3815 Utah Street Shop Tour

I hope you enjoy it, and if you are ever in San Diego, please ring the bell and visit.

Tuesday, April 23, 2013

Cross Grain Molding

A Good Day's Work
©Antique Refinishers, Inc.


When I was a young cabinetmaker, I did not have a lot of money.  Actually, I still don't have a lot of money.  However, I do have a lot of clamps.  I was joking with my wife today and said that if I just sold all my clamps for a dollar each, we could pay off the mortgage.  Almost.

I was fairly smart back in the 1970's to invest in tools and clamps.  There was a store, which was way before WalMart, Costco, or any of those "big box" stores which cover the landscape these days.  It was called "Fedco" and you needed to be a member to shop there.  The prices were great, and since I was employed part time as a teacher at the local colleges, I was eligible to join.  Something like $25 or so, as I recall.

We bought everything there, from kitchen sinks and paint to cameras and film.  One of the most important acquisitions I was able to find there was a beautiful woman in the Kitchen section, who was kind enough to become my wife.  But I digress...

Each time I went there to get something, I budgeted $25 dollars on clamps.  They had a neat hardware section, and the large iron "C" clamps were $3.99 each and the Jorgensen Pony clamps were not much more, depending on the size.  So I always returned with 5 or 6 clamps, no matter what.

Over the years, I eventually got hundreds of clamps.  One of the nice things about clamps is that they don't need sharpening, hardly ever break, and make money.  I used to tell my clients that they could pay me $75 to glue their broken chair or $5 per clamp, which would actually cost more.

From time to time, other cabinet shops in my city would go out of business, due to the economy.  I would show up at the sale of tools and watch as all the other woodworkers rushed to buy table saws, routers, sanders, drills, and diverse power tools.  I went straight to the clamp pile and immediately staked my claim.  Often they were sold as a lot for $1 each.  Gee, I wonder if I could pay off my mortgage?  But I digress...

The past few days I have spent some time preparing the molding for the Lecount clock.  Since the grain of the molding is usually cross grain on clocks from this period, it is usual to cut the stock and glue it onto some long grain backing.  I know what you are thinking.  Cross grain and long grain will eventually come apart.  Exactly.  Take a look at any late 17th century clock or cabinet in any museum.  If it hasn't been restored, there is always a gap between the edges of the short grain molding elements.  That's authentic work.

The reason they used cross grain was so that the wood grain would be vertical and add a visual height to the design.  It was also because they were a little crazy about doing things the most complicated way possible.  Note that with a complex molding profile, and cross grain wood, you cannot use standard molding planes to make the molding.  You must carve it by hand and finish off with a shaped scraper.  Take a look at the first clock I made, a copy of the Tompion clock at the Metropolitan Museum.  All the molding was hand carved.  I earned my stripes on that job.

This clock has much more simple profiles, and the olive is contrasted with ebony molding, which will naturally be done long grain.  There is no reason to use ebony short grain, since it is absolute black and you cannot see the difference.  With the olive, the figure is so strong, it becomes a very decorative element.

So I cut a lot of olive into short grain elements, and used Old Brown Glue to press these onto oak sticks the proper size for each of the molding lengths.  Each stick had a single clamp to pull the pieces together and individual clamps for each piece to hold them in place. Using the OBG allowed me the longer open time I needed to get everything properly positioned.


Rolling Work Table with Clamps
©Antique Refinishers, Inc.

The next day I removed all the clamps and put them on my rolling work table.  Just a note here about the table.  I have used this table during my entire career.  It is just one of the most practical "tools" in the shop.  It is low and on wheels.  The top is covered with a rubber linoleum which has survived 40 years of abuse, glue and chemicals.  I use it to hold work while I upholster, sand, glue, finish, or clamp.  Then I use it to hold all the clamps, so I can push it around as I place the clamps back on the wall.  You need one of these.

Cross Grain Molding Blanks
©Antique Refinishers, Inc.
Here is a shot of the molding elements, roughly cleaned up.  They will now be shaped to the final profile and cut to fit the case.  There are three of each profile.  The long one is for the front and the two shorter ones are for the sides.

It is a good day at work when you run out of clamps.

Wednesday, April 10, 2013

Graham Blackburn Videos

I remember when MTV first appeared and for the first time we could watch music videos on our TV.  Then YouTube was developed and we could watch videos on demand on our computer, and eventually, on the portable devices which everyone in the world now seems to have in their pocket.

All this is recent history, and I seem like an old guy when I talk about "when I was young..."  However, this is not the world of video which I entered in 1973 when I taped my series on CBS.  I had ten shows at that time, tracing the evolution of furniture design from the pilgrims to the victorians.  What I remember most was the cameras.  There were three cameras, each about the size of a Volkswagen, and they were on these wheeled tripods, moving slowly around the room, following the action.  You didn't move too quickly, or you would miss your blocking and the operator couldn't focus fast enough to capture the information.

Talk about the dinosaur era of video.

Technology has changed all that, of course, and it is now possible to "film" using hand held cameras with natural lighting, and sound.  (I wonder how long we are going to use the term "film" to talk about these digital files...)

I have done a lot of video over the years, and am trying to make these past efforts available online.  I am still working on Roy Underhill to get his episode, and he assures me that, when he gets some time to put it together, that will happen.

In 2007 I worked with Graham Blackburn to shoot some material in my shop.  He was very easy to work with and the result was very informative and professional.  Graham has been involved in traditional woodworking as long as I have, and I have always had the deepest respect for his work.  I was honored to have him in my workshop and we really enjoyed each other's company.

The result was a series of video "magazines" which were called "Woodworking...in action!!!"   They were available on a subscription basis, and each issue included a long list of diverse workers and their work.  I was featured in Issue 6 and Issue 8.

I had forgotten about these videos until recently.  That was when I found out that Popular Woodworking had purchased them and was making them available again.  I contacted the publisher, Kevin Ireland, and floated the idea of linking to my videos directly from this blog.  He was very supportive and generously made it happen.

Popular Woodworking has posted my two videos on a private YouTube link, which you can access directly from this post.

Here is the link.  There are two videos on "Recreating a Process" which include part one (handtools and veneer) and part two (pickers and chevalets).  Just scroll down from the first video to see the second.

Blackburn Videos


Be sure to thank Popular Woodworking for making these videos accessible.

Tuesday, March 19, 2013

Simple Things: Glue Blocks

Making Glue Blocks


One of the constant pleasures of restoring period furniture on a daily basis is learning from the "old guys" how they were trained to do things by hand.  I find it difficult to imagine how a young aspiring woodworker today can learn as much from school and books as I have over my career just working on antique furniture, day in and day out.  Sometimes at night too.

As I work to repair and recreate period furniture, I try to put myself in the shoes of the maker, standing at his bench, working a typical pre industrial work week, 11 hours a day, 6 days a week.  Thank goodness that the employer had to supply candles!  My habit is to work 12 hours a day, 7 days a week, but I am slightly obsessive about my craft, and have no other hobbies to distract me.

I have noticed simple tricks over the years, which are so obvious to me that I don't place a high degree of importance on them.  However, sometimes when I mention them to other woodworkers, I see the interest in their eyes, and that reminds me not to take anything for granted.

So here is one of those "obvious" tricks: Glue Blocks.  Need I say more?

Glue blocks are everywhere on antiques.  Wherever you need a support or added strength in cabinetmaking, you find a glue block.  They are simple blocks of wood, generally soft wood, which are placed inside the cabinet, under the base, behind the crest, under the drawer runners, as drawer stops, etc.  Everywhere.  They are in places where it is impossible to use clamps.  They rarely, if ever, have nails and never screws, as it is a waste of hardware, and not necessary to hold them in place.

They are attached using the "rubbed joint" process with hot animal hide glue.  Essentially, the fast tack feature of the glue allows the worker to just apply the glue to the block and press it into place.  Sliding it back and forth slightly a few times removes the air and pushes out the glue, and then it sticks.  Takes about 10 seconds to install.  Ends up stuck as much as if you had applied a clamp.  Neat and efficient.

I got to thinking about these glue blocks.  Making a single block is a bit of work.  Making a lot of blocks is much more efficient.  You need a stick of soft wood, usually about 1" square, but the dimensions depend on the final project.  Using a jointer plane, you shoot it in length on all sides to make it true.  Make sure that at least two adjacent faces are square, and these faces are toothed the length of the stick, using the toothing plane.

Check The Corner For Square


To finish the job, you take the plane and chamfer the opposite corner from the toothed sides.  This chamfer is the clue that led me to understand exactly how this process worked "back then" in a typical three man shop.  I saw this chamfer on all the glue blocks I looked at in early furniture.  At first I thought it was just the worker being neat or showing off, not leaving a rough edge to the blocks.  Then I realized that time and effort was precious when you are working for a dollar a day, and there is no reason to "finish" off a simple glue block which will never be seen by the client.

Tooth Two Adjacent Sides


That made me think that it was the job of the young apprentice boy, working in the shop, helping out.  It would be a good learning experience for the apprentice to prepare these blocks in advance.  He would gain practical experience with the jointer, toothing plane, square, and bench.  He would make long sticks with toothed sides, planed sides and a chamfer, then saw them into short pieces and place them in a box, ready for use.

When the journeyman needed a block, he just reached into the box and grabbed a few, ready to use.  The chamfer was a tactile and direct way for him to determine which two sides needed the glue and were toothed.  He didn't need to waste time looking at each block every time he needed to use it.  Just feel the chamfer and add the glue, press it in place and continue working.  Fast and efficient.

All the clues are there on antique furniture, if you know where to look and how to interpret what you see.  Instead of reading books, I recommend you start reading the original object.

Monday, March 18, 2013

WoodTreks Videos

Keith Cruickshank is a very cool guy.  I met him some years ago at an event where us old guys were standing around talking about woodworking (what else?)  He asked me if he could shoot some video at my shop, and that he was posting these videos on the web.

I have had lots of different video shoots "on location" at my workshop over the years.  Once I even had a shoot for a famous men's clothing catalogue (like Peterman on Seinfield) and they paid me.  I had to wear a shirt and it took 4 hours and a team of 6 people to get "the right shot."  People think that professional models have it easy.  Take it from me, it's a pain in the asperger's syndrome.

Anyway, Keith has a Mercedes Sprinter van, like mine, so we had something in common, and I said "fine."  He explained that he did things differently.  He worked alone.  So we had that in common.

He showed up with the minimum amount of very professional equipment.  The camera was hand held, and there was no extra effort to light the place.  Since my workbench is in a very small room with terrible lighting, it actually was amazing how good the videos turned out.

These videos were all done in one day, and there was enough material to cover three different topics: my workbench, working with protein glues, and hammer veneering.

I haven't posted these here before, and it occurred to me that it was important to include them on my blog.

Here is the link to the videos:   WoodTreks Videos


Keith has many more videos and I am sure you will enjoy his approach.  Thanks, Keith!

Wednesday, February 27, 2013

The History of the Chevalet de Marqueterie

When I started restoring marquetry on antique furniture in 1969, I looked at Diderot and Roubo for information on what kind of tool the French were using.  What I found was called a donkey, and it had a seat, a foot pedal and jaws for holding the veneers in a packet.   At that time I was traveling each month to the midwest to buy antiques for resale.  During one trip I found a harness maker's bench, which looked exactly like the donkey illustration in Roubo.  The only difference was the jaws were perpendicular to the worker, not parallel.  I paid $150 and brought it home, took it apart, made a new seat and remounted the jaws to work for veneer.  I spent nearly 10 years riding that donkey, with a hand held fret saw, struggling to create marquetry like I saw on 18th century furniture in museums.

I have posted previously here about how and when I first saw a real chevalet.  I call that discovery "pre industrial espionage" in my lectures.  In short, when I saw the saw frame support, I immediately understood how important that part of the tool was to keep the blade perpendicular to the work.  I built that tool, which is called a chevalet, and used it for nearly 15 years before I was accepted at ecole Boulle.

When I asked Pierre Ramond about the history of the tool, his response was not precise, either because of my poor understanding of French at that time, or because the actual facts of the development of the tool are "secret."  One thing is certain: the knowledge and use of this tool is not wide spread, and seems to be limited to workers in Paris and those who learned the trade there.

I am fortunate today to have the internet and a partner, Patrice Lejeune, who is really a talented researcher, among other things.  His wife, Agnes, shares this talent, and has just received her PhD in Art History from the Sorbonne, in Paris.  Patrice was able to search through early French books online and found some important facts about this tool.

The only reference I have found to the chevalet in English publications is in the book, "The Gentle Art of Faking Furniture," by Herbert Cescinsky.  He was a noted furniture historian, and published this work in 1931, with a second edition published in 1969.  I treasure this book, and many others which I have collected on the subject of fakes, not only for its unique first hand perspective on the trade, but also since it includes photos and information about French marquetry.

On page 89, he states: "The marqueterie-cutter's saw, in its guides, with the 'chops,' which open and close by foot pressure, to hold the veneers while being cut, and his seat at the end (the 'donkey,' as it is called), have hardly varied at all in two hundred and fifty years."  If you believe this statement, then the tool was used as early as 1680, suggesting that Mr. Boulle and Mr. Gole and all the rest of the late 17th century ebenistes could have used it.

Here I need to make an important distinction.  Roubo, writing in 1769, illustrates an "Ane" in his famous "L'Art Du Menuisier," Volume IV, Plate 291 and 292.  This illustration shows a tool without the saw frame support, and the translation of the noun, "ane," is "donkey."  When the tool is shown with the additional saw support, it is called a "chevalet."  We are talking about two different tools, which do the same job, and are often called the same name, incorrectly.

The term "chevalet" is interesting by itself.  Pierre Ramond specifically asked me to find a better translation for the tool than "donkey" when he retired from teaching.  I looked up the term "chevalet" in a French dictionary, and found the answer.  "Chevalet" is a "stand, support, trestle, frame.  "Chevalet de scieur" is a sawbench, sawhorse.  "Chevalet de peintre" is an easel.  All of these terms have a common function: something to hold the work in place while it is being worked on.


Patrice made an important and significant discovery during this search for the origin of the tool.  He found a book online, "Des Principes de l'Architecture, de la Sculpture, de la Peinture, et des Autres Arts qui en Dependent.  Aved un Dictionnaire des Termes propres a chacun de ces Arts."   This book was published in Paris by Jean-Baptiste Coignard, in 1676, and reprinted in 1690.  The first edition published in 1676 has a full page illustration in Volume III, page 457, that shows clearly two important things: a two man veneer saw and the wood clamp holding the veneer log, which rises from a hole in the floor, and a pair of "anes" or "donkeys" with slight differences.  These donkeys each have a foot operated clamp, and are shown holding the packets of veneer in the jaws.  There is a tray to catch the parts, and the "bocfil" or fretsaw is resting on the floor.

This proves conclusively that the donkey existed during the time of Boulle and Louis XIV, and that the illustration in Roubo, some 70 years later is essentially the same tool.

What I am now researching is the precise time when the saw frame arm was added to this tool.  Clearly, the size and complexity of marquetry which was produced during the third quarter of the 18th century would suggest this tool was used, but I haven't yet found the "smoking gun."  It is evident that the "chevalet" with the arm existed during the 19th century, and I have many references for that.  I will post any new discoveries on this site as soon as they appear.

At the same time, you will note in the above illustration that the tool is referred to simply as "appareil special pour decouper la marqueterie."  Translated that means "apparatus (or tool) special for cutting marquetry."  This is from a catalogue of tools for sale by La Forge Royale, published during the first decades of the 20th century.  It is interesting they did not use the term "chevalet" so I wonder when that term became associated with the tool.

The donkey and chevalet were not the only tools used to make marquetry of course.  In addition to the hand held fretsaw, there was a foot operated frame saw, like I used in making the AIC video.  I was trying to be conservative in deciding to use that saw, instead of the chevalet.  One reason I suspect that Boulle would have also used that saw is the sheer weight of the packet when using brass, pewter and shell, as Boulle did.  It is very hard to hold it in a vertical position without breaking blades, as would be required if it were cut on a donkey.  Therefore, I suspect that these large and heavy packets were cut on a table, horizontal, using a foot powered frame saw with a vertical blade.

It is interesting when you view all three videos on the last post (The Art Institute of Chicago Project) to see each of us using different tools.  I am cutting with a foot powered frame saw, Patrice is using a hand held fret saw, and Yannick is using a chevalet.  I suspect that workers in the period used a wide range of methods to achieve the amazing results we see in museums today.  The great tragedy of that time is that Mr. Boulle's workshop burned to the ground at the end of his career, and all the work, tools, materials and designs were lost forever.  It is left to the historians to speculate and the researchers to discover the secrets of the past.

POSTSCRIPT:  I just received an email from Filip in Belgium adding confirmation to my decision to demonstrate the Boulle method using the foot powered frame saw instead of the chevalet.  I haven't had the money yet to purchase Pierre Ramond's latest book, "Andre-Charles Boulle, ebeniste, ciseleur et marqueteur ordinaire du Roy," published by Vial in 2010.  However, my friend Filip has a copy and sent me images from page 24 and 25 where Pierre concludes that Boulle used a foot saw.  Here is the image with the text:


Those of you who read French will note that on both illustrations Pierre concludes that Boulle probably used a tool like this.  We had made this decision based on the size and weight of the packets that were cut, and the technology available at that time.  It is always rewarding to have my independent research supported by my professor, and the person I believe knows more about French marquetry than anyone else alive.


Tuesday, November 13, 2012

A Tool You Don't See Everyday

If you have spent the time to read my early posts on this blog, you know that I first got interested in antique restoration by visiting an 80 year old upholsterer from New York and watching him work.  The way he manipulated the materials was fascinating.  His workshop was just around the corner from my house, and I would stop by just to sit and watch him do his job.

He was at the end of his life and career, but his hands were amazing.  They were huge and strong and looked like they belonged to a much younger man.  The way he would stretch the webbing, spit some tacks and sew the springs in place was like music.  A constant and fluid movement of work, without any wasted effort.  He would take several strands of Italian cord at the same time and tie the coiled springs into position, pushing them down with one hand while he quickly tied the cord into knots with the right.  Eight knots per spring.  I remember him telling me that "some guys only use 4 knots, but that won't hold long."

The most wonderful part of the job was working the horsehair into its place, stitching it perfectly in place to form the appropriate support and form.  He would pull and pick the hair with both hands so that it resembled a hairstyle from the 1950's, sitting up some 8 inches in the air.  Then, when the upper burlap was tacked in place and the final stitching was done, it pulled down magically into a firm support which was only a few inches thick.  Pulling the tufting twine over a hard cake of wax, he would use either a large curved needle or a double pointed long needle to work along the edge, stitching different rows of twine to properly shape the hair foundation.

Most workers these days don't even know where to get horsehair, and, if they had some, wouldn't know what to do with it.  Foam has transformed the trade.  I don't even want to talk about using staples.

From time to time I will get a call from a client who wants to get rid of an old horsehair mattress.  They know I can use it and don't want to just throw it away.  Years ago there was a good business in the East Coast cities where traditional mattresses were made by hand.  These mattresses were expensive and time consuming, and consumed a lot of horsehair.  Again, foam has replaced this work, and these mattresses have no value.

However, I like to recycle them.  I follow a process that allows the hair to be used again safely.  First, I have the mattress fumigated for 48 hours in a chamber using methyl bromide gas.  This kills all the bugs, if they exist.  Then I open the mattress, and remove all the twine and any cotton batting, separating the hair.  This hair is placed in a large clean plastic trash can and washed with Tilex.  Then the hair is placed on a long rack with a wire screen to drip dry in the sun.

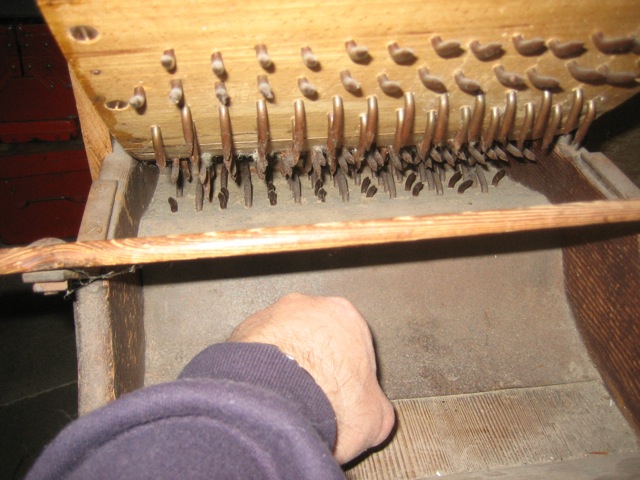
When dry the hair needs to be pulled apart and the perfect machine for that is a "cardeuse."

Not everyone has one of these available.  Generally, they are found more often in regional festivals in rural parts of France.  Sometimes in museums of trades.  Google "cardeuse" and see for yourself.

My first experience with this tool was over 30 years ago.  There was another upholsterer in town who had a similar machine, but it had a large drum studded with sharp spikes and the bed was also studed with spikes.  By turning the handle the drum would spin at a large rate of speed and you would feed hair into the spikes with the other hand.  It was like one of those chipping machines that eat trees.  Scared the crap out of me.  Out the other side of the drum the hair would fly in all directions, filling the room with horsehair.  What a mess.  I immediately thought I would like to have such a tool, but he refused to even consider selling it.

This particular cardeuse belongs to a dear friend of mine, who also graduated from ecole Boulle.  She moved to San Diego and practices traditional upholstery out of her home.  Last week, when I paid a visit to see her, I noticed that her tool needed a little work.  Since I would like to use it, she gladly let me take it for repair.   Note it was made in Paris, probably in the 19th century.

The worker sits on the bench and moves the sliding arm back and forth.  The bed of the tool has lots of iron spikes in rows, bent into hooks.  Half of the hooks go away from the worker and half go towards the worker.  The sliding arm has a ratchet system to raise and lower it relative to the bed, depending on the type of hair being carded.

The sliding arm has a similar arrangement of spikes, which are in rows that pass through the rows of spikes on the bed.  This action, you can imagine, shreds the hair completely.

So, I sit down and start putting clumps of hair into this machine and moving the arm back and forth.  It is a very interesting pastime.  Hair goes everywhere.  You are constantly reminded about the dangers of the spikes.  There is no temptation to daydream while you work.

Lockjaw is not a pleasant way to go.

POSTSCRIPT:  The internet is an amazing system for connecting like minded individuals.  I have a friend in Belgium, Filip, who is an ebeniste and marqueteur.  He took the time to travel to San Diego and visit my studio, which was valuable for both of us to share our common experiences.  I had no idea he was into upholstery.  After this post, he sent me an email telling me that this machine is missing an important part: the safety guard.  Kind of like a table saw without the guard.  As I do not want to be the cause of any injury which may happen by some other person building such a machine without the safety guard, I am adding this photo he sent me to show the part.  It is a bar, held by metal straps which prevent the user's hand from getting too close to the spikes.  Very interesting!


Wednesday, October 24, 2012

Where's My Government Bailout?

I build and sell Chevalets.  I am no different than General Motors.  Well, there is a slight difference of scale, but a Chevalet is still a Chevalet.  And, like General Motors, I am losing money on each unit sold, I am sliding into a financial hole where it would be nice for the Government, and you, the tax payer, to consider bailing me out.

You see, I sell Chevalet kits.  First of all, since most people who don't read this blog, haven't a clue what a Chevalet is, it is rather hard to sell them a kit.  However, every once in a while, I get a call or a student decides to purchase one at the end of a class.  That occasional sale is important to me, since I need to put out a lot of money up front and then wait for a rather long time to recover my investment, as the sales are slow.

This is not the best business model, I admit.  Lots of investment, long wait for turnover, high overhead, low profit, lack of demand, consumer indifference...

Gee, as I write this, I am getting depressed!

In any event, I notice that the Chevalet is being talked about on certain other blogs, like Lumberjocks.  Boy, am I happy to see that.  Any interest is great.  On the other hand, I need to clarify something I noted the other day while following the thread.

There was a discussion which was about building your own Chevalet.  It was pointed out that Pat Edwards sells the kits for $500.  The next response was something like, "Why would I pay that when the hardware is only about $75?"  That got me thinking, just how much am I spending on these kits?

Well, if you consider I spent a bit of time drawing the blueprints years ago, and that was "free" and I need to drive all over town to get the elements of the hardware from different stores, and I had to design the special parts for the machinist to create, and all that work is "free" time, then let's just add up the hard costs for each kit.

The special parts, which are essential, are made by a talented machinist, using state of the art equipment.  The sliding arm is perfectly straight and has expensive bushings.  The blade clamps are tempered, and the other parts are also custom:

Next, I put together all the metal parts for the tool.  This means each bolt, nut, washer, screw, chain, eyebolt, hook, and pivot shaft is counted out and put into a bag.  Then add the 2 dozen German blades, which I need to import in a large quantity since they are 16cm long and not available in the US.  Then I add the full scale blueprints, which are metric and include every detail of the construction.  For good measure, I copy the plans from Pierre Ramond's book, "Marquetry," and include those, so you can have a typical cut list for the wood.


So, I sat down and added up the actual unit cost for each of these elements for the kit.  It comes to $416.  As I said, that excludes my time and gas and brains.  $416 total.  I then make a wood shipping box and ship it anywhere in the US for $50, fixed price.  That clearly doesn't make much profit.


I sell this kit for $500, plus $50 for the shipping.   Not the smartest decision in the business world.  Not going to even pay for one of the utility bills I have each month.  Certainly not enough to buy a private island somewhere...

I do it for love.  And I do it because I want others to discover how cool this tool is.  And I really don't expect the government to call me anytime soon and send me money for my efforts.  It would be really something if the president would decide to set up a French marquetry atelier in the White House, but I'm not holding my breath.


Thursday, October 18, 2012

Chevalet Anatomy Lesson

I am encouraged that more and more American woodworkers are interested in a weird, highly specialized veneer cutting tool that the French developed during the 18th century and perfected in the 19th century and managed to keep relatively secret over all those years.

I give credit to Dr. Pierre Ramond, who was the first to publish plans and explain what this tool did in his ground breaking book, "Marquetry," printed in English by Taunton Press in 1989.  Even though there was a French edition of this book published in Europe years before, it was the Taunton Press edition which first hit the American market big time.  This edition is now out of print, and the Getty Press reissued the same volume with a new cover and some added photographs in 2000, and that edition is now also out of print.  Fortunately, we have the internet and book search engines.

I began making and selling hardware kits and blueprints for a chevalet when I opened my school, the American School of French Marquetry, in that same year, 2000.  Many of my students purchased kits and went on to build their own tools, and those tools have encouraged other woodworkers to build their own versions.  As this tool gains acceptance in the marquetry world (admittedly a small world), I get calls and emails asking about how the tool works and to explain certain features of the tool or explain some obscure detail of its operation.

The initial problem is that it is usually the case that the builder has never used this tool and won't realize what parts of the build are important until he uses it.  I did this on my first tool, which I built in the 1970's.  After spending time in ecole Boulle and learning more about it, I modified that first chevalet several times.  It had so many changes that, today as it sits in my school, it is named "Frankenstein."  (By the way, Frankenstein swings both ways, right and left handed!)

The biggest problem I have in discussing this tool with someone is terminology.  What are the parts named?  In Pierre's book, the cut list for the plans include generic English translations of the names, which are sometimes confusing.  Therefore, I propose to create some terms here for common usage, so that when others ask me I know what they are referring to.


There is really no problem with the names of the lower half of the tool.  You can see the seat, which has a front and back leg, as well as a foot pedal.  There is also a lower stretcher and a large foot or base which stabilizes the structure.  Mounted on the seat, in front of the worker, is the vertical column, which supports the pressure arm.  This pressure arm is connected by a chain to the foot pedal which moves up and down and clamps the vise on the packet.  Note the foot pedal and the top of the base in front of it should be level when compressed to avoid foot fatigue.

The first thing a builder needs to consider is the size of the chevalet.  Workers traditionally made their own tools to fit their bodies for comfort, like a custom bicycle.  The turned knob on the saw frame should rest at about the same height as the base of the neck of the worker, when sitting on the tool.  Therefore the tool size is measured from the top of the seat to the saw blade, in metric length.  This tool is a 62cm size, which is tall and should fit a normal person about 6' or so, depending on his upper body height.  Note that the actual size can be changed slightly up or down by changing the replaceable vise faces, which are either glued or screwed in place.

Here you can see the horizontal arm which supports the saw guides.  This arm can be moved in or out for different size saw frames.  Normally a worker builds at least two saw frames, medium and large, and changes them depending on the work.  Note also that the saw frame is essentially horizontal to the tool, and the blade axis and the sliding rod axis are co-planer.   We usually clamp a piece of wood on the arm to hold our working tray (right side of photo).  Note that placing your coffee on the arm will result in a wood dust flavor.

This tool is for right handed workers.  The support arm is on the right of the person sitting on the tool.  If a person wants to build a left handed tool, the arm is on the left.  In both the left hand and right hand tools the vertical adjustment is on the inboard (nearer the worker) and the horizontal adjustment is on the outboard side (away from the worker).  The majority of students I have had who were left handed end up cutting fine on a right hand tool.  How many left handed violinists do you see?

This  is the important part of the tool, which was added to the basic Roubo "donkey" at some point still not fully researched.  In other words, Roubo shows the tool with a seat and foot clamp, but  the saw is hand held.  At some point, certainly by the early 19th century, probably earlier, the arm was added to support the saw frame guide, with its adjustments.  This modification took a good idea and made it perfect for the job.  Cutting absolutely perpendicular is an essential feature of French marquetry, and this saw guide allows for that to happen.  There is a short upright post  on the horizontal arm which is connected to a guide support cross member.  On one end (the left side) of this cross support member is the vertical adjustment element, and the other side (right end) has the horizontal adjustment element.  Both of these elements work together to hold the metal sliding saw guide in place.

 The saw is attached to the lower rod of this guide and the upper rod has sliding bushings attached to it and swings back and forth on the pointed screws which hold it at each end.  On this support cross member I have placed a sample piece of wood which we use to test the accuracy of the alignment.  Note the keyhole pieces which have been cut in this wood, proving the adjustment is correct.

This is the horizontal adjustment.

This is the vertical adjustment.  It has been modified to gain more height, as the tool ages and the wood moves, it is often necessary to raise this arm.

Here we see the cutout in the upright leg which catches parts sometimes.  There is a plywood attached to one side which supports the saw frame when not in use, or changing blades.  The two vise faces, with the "V" notch are replaceable, as they are often cut up during work. One fact which is not obvious is that you adjust these vise pieces to meet around the "V."  Use a piece of paper clamped in the jaws to adjust the pressure.  The paper should be tight around the "V" and loose on either side.  This means the packet will rotate nicely around the blade when you cut.

 You can see the custom metal elements to hold the blade, called blade clamps.  These are tempered steel, and the front clamp (where the turned knob is) is fixed in place, while the back clamp (on the left) has a long threaded bolt and wing nut.  I designed this back clamp to slide in and out by supplying a brass "U" sleeve.  This sleeve is put into the wood saw frame, with a press fit or a bit of epoxy and it allows the clamp to remain in position for using different blade lengths.  We use German blades which are 16cm long.

Note the turned knob is only for pressing against the shoulder when tensioning the blade.  The worker holds the saw frame near the knob on the flat part of the frame when sawing.
This is a set of saw clamps.  You can see the brass sleeve.  I sell these as a single package for $150.  They are tempered steel and include the wrench.  I also sell the complete hardware kit, which includes all the metal elements for a chevalet and a set of full scale blueprints for $500.  Believe me, selling these kits does not make me rich.  I am just happy to make the technology available.  I hope this post answers some questions and if I missed something, just let me know.

Sunday, February 26, 2012

Chevalet Mechanic Tips


I love fast cars and I love fast chevalets. I am fortunate to own a fast car and I am also fortunate to have a stable of chevalets. The primary difference is that I pay a mechanic to work on my car, but I am the mechanic for the chevalets. That is probably because the car is German and the chevalets are French. This seems weird to me today, as I reflect on my life, since I passed my language proficiency in college in German, and never took a class in French in my life. However, my French is much better than my German (unless you ask my partner, Patrice, what he thinks...something I usually avoid.)


Back to the point. Owning a few marquetry cutting tools requires a bit of normal maintenance. Now that others in this country are discovering the advantages of this unique tool, it might be instructive to pass on some tips for the owner/user to make their experience more enjoyable. When I have classes, I spend a bit of my time adjusting these tools for the students, and there are some normal things to consider to keep them working properly.

The first question is: does the size of the chevalet fit the worker? Traditionally, the worker would build his own tool, so it would be built to fit his sitting height, and whether he was right or left handed. The height (or size) of the chevalet is measured in metric centimeters from the top of the seat to the blade, when the saw is resting in the chops. In the school I have 6 different sizes, from 54cm (the size illustrated in Pierre's book) to the largest which is 61cm. That is about a 3" difference in height. The best height for a worker is determined by where the saw sits relative to the body, when the worker is sitting normally on the bench. The saw should be at about the same height as the base of the neck, or the collar bone. The reason is that to adjust the saw blade tension the worker pulls the frame together with his arm, pressing the knob of the saw against his shoulder. Thus, it should be low enough for that to be comfortable. At the same time, it needs to be high enough for the worker to see the blade in front of his eyes when sawing.

If the tool is not the right size, then it is often possible to replace the wood jaws of the clamp to better fit the worker.

The next step is to determine if the saw is cutting exactly perpendicular to the work. That test is done from time to time, or when it seems that the tool is no longer cutting properly. Use a piece of wood about 1/2" thick, and I prefer tulip poplar, since it is easy to cut. Mark the piece "front" and cut a keyhole test. Pierre describes this test in his book on page 207. The test cut should pass easily in and out of the wood from either side. If the top edge is not parallel, then an adjustment is made to the horizontal support for the saw carriage. If the cylinder is cone shaped then the adjustment is to the vertical. Note that there is a relationship between both the vertical and horizontal adjustment. Usually, it is mostly one and a little of the other. Continue cutting test pieces until it works properly. Another tip: using a very small blade makes this adjustment more accurate, before using a larger blade to cut the project.

When the tool is new, it is normal for the saw frame to work properly in a horizontal plane. Over time it is common for the saw frame to warp or the chevalet arm to bend slightly. It doesn't take much deflection to change the accuracy of the cut. That is why older chevalets have a saw carriage tilted up on the vertical adjustment, which you would think is bad. Not so. The only thing that matters is if the test cut is proper at the face of the jaws.

There is another adjustment that I make from time to time. Since the packet is manipulated around the saw blade, it is important that the chops or clamps press only in the center, where the blade is cutting. If the clamps grab the packet on the edges, then the pivot point is moved away from the blade and it is more difficult to get a smooth cut. Thus, I take a piece of paper (see photo above) and put it only in the center of the jaws and clamp it shut with my feet. It should grab. Then I test the paper on the edges of the jaws and it should pass freely. To make this work, I use sandpaper or a rasp to remove some wood from the jaws on the edges, so they only press in the center.

Finally, when I sit down to cut, there is usually dust on the sliding rod for the saw carriage. I wipe it clean with a rag and add a small drop of oil to the bushing. I also add a drop to the pivots at each end of the carriage which allow it to operate smoothly. These pivots should not be tight. There should be a little "end play" in the pivots to allow the carriage to swing easily.

Following these tips should make the driving experience more enjoyable. Remember, speed counts, but don't go so fast that you go off the line and crash the project.

I'm thinking of either a seat belt or air bags for my chevalet??

Sunday, February 19, 2012

I Am Not a Carver...But I Play One in Real Life.


If you have seen any of my work, you will notice that the primary decoration is flat surface veneers, and that there is an obvious lack of carved elements. It is not for lack of tools.

When I started buying tools nearly a half century ago, it was a different world. Tool "collectors" and "users" were rare, and the dealers who offered them hard to find. Most of the antique wood tools were found sitting on the floor, under the table, in the back of the antique shop, next to roller skates and abandoned toys. They were universally priced from $5 to $10 dollars, without any concern that they might be rusty, missing parts or museum pieces. The fun was in the hunt. But you had to cover miles of junk to find anything.

During the 1970's there was a change in the market, as tools became recognized for their merits and value. They went from the independent antique shops to specialized dealers who know what each tool was worth and its history. Books were written on the history and function, including names of makers, with dates and research into the types of tools that were made. This period saw the rise of the tool "collector" who was, in many respects, like a coin collector. They gathered collections which were designed to include every type of a specific tool ever made. Stanley tool collectors, for example, searched frantically for the number 1 plane to complete their series, regardless of the fact that the number 1 tool is essentially useless for woodworking. ( I know this statement will generate some hostile comment, but I am not a Stanley collector. Sorry.)

I began "collecting" wood spoke shaves during this period. However, I soon realized that there was an infinite number of variations of this tool, and eventually quit buying them when I had collected nearly 500. Since I had paid an average of $20 for each spoke shave, I now wonder what I could have done with that $10,000 instead, if I had just bought 3 or 4 good ones and quit looking? Now, I try to imagine what my kids are going to think when they open one of my 8 tool boxes and find drawers and drawers of wood spoke shaves. I think they will say, "No wonder there is no money left!"

Starting in the 1980's there was a shift in the marketing of these antique tools, with the emergence of the specialized tool catalogue. Don and Anne Wing were some of the first to create this method of focused selling, with their regular catalogue, called "The Mechanick's Workbench." These catalogues were professionally printed, with excellent photos and descriptions of tools carefully selected for their value and quality. They were priced accordingly.

The distribution of these catalogues was done in a staggered way, geographically, so that they would (in theory) arrive at all points of the country on the same day. Most of them were sent from the East Coast and I lived in San Diego, so naturally mine usually arrived after everyone else. The instant that I got a new offering in the mail, I would read it cover to cover, budget my money and make a list. Within hours I would call in and find that 75% of my preferred tools were already sold.

At the same time as Don Wing, there was Bud Steere, and soon after that Richard Spurgeon, Tom Witte and Martin Donnelly, among others. By then, it was impossible to find any tools at the local antique shop, since they were all bought up by pickers who then sold the best to these centralized distributers. Simultaneously there appeared regional tool collecting groups where you could meet other like minded collectors and buy and sell or trade for what you wanted.

There are a couple of tools which historically have been hard to find. The first is clamps. It seems that no one wants to sell their clamps. The other is good quality carving chisels. They are expensive to buy new. The new chisels are not as good, and most of the old chisels have been used to open paint cans at some point. I don't want to think of the chisels which have been repeatedly sharpened on high speed grinding wheels...

In one of the early catalogues, I was able to buy a set of carving chisels that was amazing. I bought a set of 75 Addis (English) carving tools, all from the same carver, for $11 each. That was a big purchase for me at the time, and I wonder where I got that much money since I was earning about $15/hour. Sometime after that, I found another collection of 75 tools for sale, at a price of about $15/each, which were used by O. Highley, master carver working in California around 1920, who specialized in rococo carving for the churches.

The amazing thing is, when I set out all the 150 chisels on the bench, that there were very few duplicate shapes. It was like they each did different things and, combined, I had purchased a rather complete collection of Shieffeld tools, mostly made early in the 19th century.

I built a wood case for the wall to hold these tools. It was made of three doors, held with piano hinges. It closes nicely on the wall, which both hides the tools and keeps them handy near the bench when I need to use them. I have them organized in the racks with the different sweeps assorted according to size. Each tool has a small number stamped in the handle, so I can put them back when done. This also keeps the tips from being damaged.

Obviously, the internet has replaced the printed catalogues, and the excitement of opening the mail box to find the latest offering. For me, some of the excitement of the search and find is gone. But, that may be also because I have all the tools a woodworker could ever want.

Thursday, January 26, 2012

ADA Chevalet


One of the highlights of my various trips to Paris to study with Dr. Pierre Ramond at ecole Boulle occurred in the spring of 1996. I had just arrived and was visiting my friends at the Musee des Art Decoratifs, next to the Louvre. As I walked into the conservation lab, each of the workers walked up to me and shook my hand, congratulating me on my success. I had no idea what they were talking about.

I was shown a copy of the newly published volume II by Pierre, "Chefs D'Oeuvre des Marqueteurs" (Masterpieces of Marquetry) which included my photo and a brief paragraph on page 62, talking about marquetry cutting saws.

It read: "The marquetry donkey is a typical instrument of the Faubourg Saint-Antoine. Unknown to provincial and foreign marqueters, it is remarkably light and easy to move." And: "The perpetual transfer of techniques between continents can be illustrated by Patrick Edwards' equipment." I was being celebrated for exporting the particular Parisian technology of cutting marquetry using a chevalet.

Later, when I started the American School of French Marquetry, I built several different sizes of chevalets for the students, and hired a machinist to make the specialized hardware elements for this tool, putting together in a kit all the hardware and blueprints for sale. This made it possible for interested woodworkers to easily put together a chevalet for their own use.

Over the past decade I have sold nearly 50 kits, so I can only wonder how many of those are built and operating in North America where there were essentially none before. I know that this tool has been kept "secret" over the years, and there were a small number of artisans who knew about it or had one for their own use. However, with the internet and the classes being taught here, it has become more mainstream. The reception has been fantastic. Everyone that sees it is amazed by its operation and wants to try it.

After coaching hundreds of students in its use, I realize that since it requires some physical abilities, I must adapt my methods to a wide variety of human limitations. In ecole Boulle, all the students are young, energetic and able to operate the tool without any difficulty. In my school, we accept all ages and abilities and some of my students arrive with "limited" physical abilities.

One of the requirements of using this tool is arm strength. To set the blade tension you need to grab the outboard arm of the wood saw frame and pull it towards your body, using the biceps muscle. The knob on the inboard side of the saw frame is placed on the upper chest and the saw is squeezed together and held while the other hand tightens the saw blade screw. When released the tension of the blade is tested by plucking it to hear the pitch. It takes some dexterity and a certain amount of arm strength to do this, but, when mastered, it means the blade can be set up easily and quickly.

Another requirement is good eyesight, as well as eye/hand coordination. Using the Optivisor solves the eyesight problem, but coordination is another problem. Either you have it or not.

Probably the most "comments" I receive involve the wood seat. People who lived in the 18th century loved the solid wood seats on Windsor chairs. They were everywhere, they were durable and they were comfortable. I wonder if people who lived at that time had harder butts...One thing is sure, people today have soft butts.

Anyway, we have an assortment of cushions here for some students to use while cutting. There is no shame. When I built my first chevalet in 1976, I upholstered the seat in leather. All the chevalets I have built since have standard wood seats. One of the problems with the upholstery is that it is difficult to slide around and change your position as you work. Also, like riding a bike, after a few hundred hours of working on a wood seat, your body "adapts."

Another requirement for using the chevalet is using your feet. The feet need to rest on the pedals and hold the clamps tight against the work. Therefore, a person who was paralyzed from the waist down couldn't use the traditional tool.

I had a student who was able to walk but not able to lift their leg over the seat. I was asked to design a chevalet which would allow them to sit on their own stool and not require them to lift their leg over the bench seat.

It took me some time to work out the mechanical details, but this is the tool I just finished. It is a traditional chevalet except for the seat. I needed to add a second foot for stability, but it seems to work fine. In addition, it takes up less space in the shop, and you can use any type of seating that is comfortable for you.

So, pull up a seat and get to work.

Wednesday, November 2, 2011

7 Billion People and 2 New Toothing Planes


The birth of the unknown child yesterday which pushed the world's population above 7 billion made all the news. When I was born there were 6 billion. Hard to imagine...

I would like to announce another birth. The birth of two lovely toothing planes. I received the notice from Jack Ervin by email, along with two photos. They are charming and perfect, as all newborns are supposed to be. I wish them a long and productive life.

Congratulations Jack! You should be proud.
Patrick,

I am attaching photos my first attempt of toothing planes. I was first inspired by your video on Woodtreks about your workbench and the maintenance of the top. What you said about flattening made more sense to me than what others said regarding the subject. When I discovered your blog and read what you had to say in general about toothing planes got me to researching how to procure one. The old tool route was there but distances away. Then I hit on the idea of using a new iron and make my own. Here is the results. The bodies are 6-1/8" and the irons (Lie-Nielsen 212 18 & 25 TPI) are bedded at 80 degrees. I laid out what seemed to be right for the mouth location and used a
large draftsman french curve for the side profile. I have used them for flattening extra figured cherry glue-up panels and will use them to maintain flatness on my bench top.

Thanks for the inspiration from the videos on Woodtreks and your blog. I visit your blog regularly and need to reply more to keep you encouraged.Your site is making a difference in a positive way at least to me.

Jack Ervin

Sunday, August 21, 2011

The Picking Machine


The history of French inventions is full of objects which Americans believe were invented here. Unfortunately for our culture, Americans are an ego-centric animal who believe all thought and ideas begin and end within our borders. I am sure, if you asked people walking down the street, who invented flight, cinema, photography, bicycles, submarines and the Xerox machine, the clear majority would respond: "USA!"

It is easy to click on google and discover pages and pages of inventions which came from France. I just discovered, for example, that the taxi was invented in 1640, in France. Amazing!

Add to this list the concept of the duplicating machine, normally referred to by its American corporate name: Xerox. It was created in France to solve a difficult problem which was essential for the evolution of the craft of marquetry.

Before Louis XIV, all the historical methods used to create decorative surfaces were developed in the Mediterranean Sea, from Egypt to Italy. The most interesting at that time was cutting several materials in a packet, using a fret saw held at a perpendicular angle, so that all the elements and background were cut simultaneously. This method was called "tarsia a incastro" by the Italians and renamed "Boulle" by the French.

However, Louis XIV and his successors wanted to elevate the craft of marquetry to another, more complicated level, and keep the secrets of that trade all to themselves. They devoted money and time to all the trades, from furniture making to tapestries, from sculpture to architecture, to insure that France would be the most highly sophisticated country in Europe during the 18th century. And they succeeded.

The primary problem with Boulle method is that the drawing is placed on the packet and cut along with the material. Therefore, the drawing is destroyed in the process. Of course, no matter how carefully you were, it was impossible to exactly duplicate the design by hand. A method of making exactly precise copies of the drawing was needed.

The inspiration was provided by the traditional Fresco painters, who used a piece of paper punched with holes to transfer the design to the wet plaster. By placing the paper on the surface and pouncing a colored powder over it, the dots of the design would remain for the artists to use as a guide. The idea was simple; the transfer of that method to woodworking was more complicated.

At first, paper was picked by hand, in a laborious process that must have driven artisans to drink. It is not recorded when the picking machine first appeared, but by the 19th century they were manufactured in French workshops and sold in supply houses for the trade. I have three antique machines in my shop, made in Paris and Lyon. I have a fourth machine, made in 1980's in Paris for Dr. Ramond at ecole Boulle, which is driven by a motor.

All the antique machines use a foot pedal to turn a large drive wheel in the lower cabinet. The cable which travels up through the hollow brass tube transmits this energy to a series of gears, which adjust the speed, and on down the front tube to a small crankshaft in a box near the end. This crankshaft converts the continuous rotary motion to reciprocal motion, which is connected to the needle shaft, making it move up and down very nicely.

The needle has a stop which can be adjusted so that it moves only slightly. The needle is a "number 12 sharp" which is very hard to find. It must be adjusted to that it only passes through three layers of paper, no further or it will hit the table and damage the tip.

The design, which is hand drawn, is pinned to two layers of Kraft paper, 48 grams weight. The needle is traced around the entire design, punching holes through all layers of paper. It is important that all the lines are traced, and no duplicate lines are punched. The spacing of the holes is important: too close and the paper will tear, too far apart and it will not serve the job.

When the design is fully punched, the middle layer of paper is removed and the back side is abraded with a pumice stone to clean up the paper tear out around the holes. This piece of paper becomes the master design, which will remain in the shop for decades, and can be used over and over.

The master design is then placed over some white Kraft paper and a pounce is used to apply "bitume de judee" which is a fine, oil impregnated dust. The bitumen leaves a dot of power at each hold, and it is necessary to fix the powder to the paper to make the design useable. The paper is placed across a heated piece of metal and the heat melts the powder to the paper. Thus the essential idea of a Xerox machine.

Using a picking machine allows the worker to make dozens of copies of the original drawing, each design exactly like the other. The use of a picking machine along with the creation of the chevalet allowed the French to perfect the "piece by piece" method of marquetry, which has many advantages over all the other methods. This method they kept to themselves for almost two centuries.