Friday, January 13, 2017

Carpenters, Electricians or Plumbers?

I have quite a few clients who are doctors.  Now that I think of it I also have had quite a few doctors as students.  Years ago (many years ago) I taught a series of classes on Decorative Arts at my alma mater, U.C.S.D.  In one of these classes I had a distinguished looking gentleman who always sat in the front row, directly in front of me, and asked very intelligent questions.  After several lectures, I asked him who he was and he responded, "I'm Dr. U".  It impressed me, since he confirmed that his last name was the singular letter "U".  I asked him what kind of doctor he was and he replied "brain surgeon."

As my degree was in High Energy Particle Physics, I thought this was interesting.  I can see the headlines now: "Rocket Scientist teaches Brain Surgeon."

In conversation after class, I asked him why he would take the time to sit through my lectures, as he must be rather busy with his profession.  He complimented me very much when he simply replied, "You are a good teacher."

Some years later I noted in the news that a difficult medical case had been treated at UCSD Medical Center, where a tumor was removed from a patient's brain in a 23 hour procedure.  The doctor who stood in one position for 23 hours and patiently cut away the tumor, stitching each vessel with 10 microscopic stitches was Dr. U.

When I taught my first class at Marc Adams School of Woodworking I had the school make 8 chevalets, and I thought they would be in different sizes.  However, they made them all the same size, 61cm tall, which would be perfect if the student was 6'2".    Naturally all the students were different heights, so I had to make risers for the seats.  In that first class I had a very enthusiastic woman who was 4' 11" tall.  Her name was Pepper and she was a medical doctor.  Doctor Pepper.  She was an exceptional worker and impressed me with her attitude.  Out of the 8 students 3 were medical doctors and one was a medical nurse.

At some point (I can't remember who or where) I had a client who was a doctor tell me that "We're all either carpenters, electricians or plumbers."  I thought that was a rather humble description of one of the most important professions on earth.  "Carpenters" fix broken bones, "Electricians" repair damaged nerves and "plumbers" solve leaky pipes.  (I don't want to be more specific...)

If I had entered the medical profession I would be a good doctor.  I would be a "Carpenter" since I understand how to repair structural damage, with the least invasive methods.  When I fix something it is fixed.  I spend a lot of my work repairing the damage caused not only by the accident but also (and much worse) the damage caused by amateur attempts to repair it, before it was brought to me.

I have posted before about Vector Clamping.  It is my way of teaching about proper methods of applying pressure on a glue joint.  When the joint is straight and even and the clamping surface is parallel to the joint, it is obvious where to clamp.  However, when the repair involves complicated curves and many different breaks it becomes more difficult to visualize where to apply the clamps.

This is where amateur woodworkers get in trouble.  Either they don't have enough clamps or the proper clamps, or the proper glue, or they try to just flood the break with glue, thinking it will fill all the gaps.  In any case, the repair is usually horrible.  By understanding Vector Clamping theory the repair will be easy, and the minimum number of clamps will be needed.

Vector Clamping means that a single clamp must be applied in the center of the joint and perpendicular to its surface.  On curves this means an additional scrap piece of material must be attached temporarily to properly provide a place for the main clamp to do its work.

Repairing a curved leg on a tripod table is a good example.  This nice early table came in last week with a broken leg.  An effort to repair it involved a large dowel going sideways, lots of yellow glue and a lot of missing wood.  The person who had attempted to repair it had damaged much of the surface of the joint so that it was no longer useable.

I used a toothing plane to clean up the glue residue.  You must glue to clean wood.  You cannot glue to dirt, old glue (unless it is a protein glue), or any other contaminant.  The success of the repair depends on the wood to wood surface contact.  This is why dowels are not as good as tenons.  Dowels present a circular surface which contacts as much end grain as side grain.  Tenons contact a larger area of side grain than end grain, so are stronger.

To begin the repair I fashioned pine clamping jigs, which are attached to the leg and foot.  If you study the photo you will see only two of the clamps do the actual work on the repair.  The vertical center clamp holds the piece in position while the diagonal clamp (on the back of the leg, difficult to see) is pulling the foot towards the leg. The rest of the clamps are used to hold the jigs.

Wood Elements Added for Vector Clamping 

I used a pattern to determine the shape of the new piece.  In this case I used a piece of recycled Cuban mahogany, as the table was made in that wood.  Note the tenon extension I provided which fit into the foot element, as there was not enough end grain on the foot piece to guarantee strength.

Foot on Left Photo, Leg on Right Side, Pattern for Repair

This shows the repair after the clamps were removed:


Cuban Mahogany Element Before Shaping 
Looking at the leg from the end to be sure it was straight:

Looks Straight To Me
A second piece of mahogany was added to the bottom of the leg for extra strength across the weakest part of the repair:

Second Piece of Mahogany Added to Bottom of Leg
This is the repair before finishing:
Note The Curve Is Continuous and Smooth
I actually don't like the term "Carpenter".  I am not a "Carpenter".  Carpenters build houses and use nails to fasten wood together.  For the purposes of this post I will not complain.  It is a metaphor.

I am a Problem Solver.


Friday, January 6, 2017

Antique Furniture Forensics

One of the reasons that antique furniture is less and less appreciated these days is that few people are left in the business who are "experts" with real "experience" in the field.

40 years ago, when I travelled the country, stopping in every antique shop I could find in every town, I would usually find a dealer in the shop who was an expert in something.  It might be porcelain, silver, art, carpets, books, tools or furniture.  I learned a great deal from those dealers.  They would take the time to explain as much as they knew about what they were selling.

As I gathered data on the regional characteristics of American 19th century furniture, I would pointedly ask "what furniture do you have in the store which was made locally and what features can you identify that prove your theory?"  I gained a real understanding of what made Texan furniture different from Tennessee or Connecticut from Ohio.  Everywhere I went was an education.

A terrible transformation occurred over the next few decades, as individual dealers either retired or closed their stores, due to less demand and more expensive overhead.  What took the place of the owner operated stand alone antique store was the "antique mall."  This new marketing venue was a direct result of the success of yard sales and flea markets, where less knowledgeble sellers would offer items of unknown origin to bargain hunters.  Each mall was managed by a single person at the front, and walking through these "stores" was as miserable and disappointing as you might think.

Each seller would rent a stall and fill it with junk.  After all, it was cheaper than renting a storage unit, and there was always the possibility that someone would want to buy something.  If you, as a shopper, found something interesting you would take it to the front desk and make the purchase.  The manager or sales clerk knew absolutely nothing about the item.  Only which stall and how much.

There was no possibility of learning anything.

Over time, even these pitiful excuses for antique stores became obsolete.  They have been replaced by online sites like Craig's list and eBay.

Antique buyers need help.  I have always believed in educating clients and prospective collectors about the process of understanding how early hand made (pre industrial) furniture was made.  One of the methods is to have lectures, with examples that students can examine and touch.

For over 30 years I have been associated with Nancy Martin, ASA.  Her career began in science, as did mine, and we think alike.  Always looking for evidence, details and facts which can be used to identify the specific origin of an objects.  Looking at tool marks, construction features, wood analysis, hardware, and other materials provides the best basis for determining the origin.  It can be a fake, a reproduction, or an antique that is original or repaired.  It is not always obvious but careful examination will ultimately provide sufficient evidence to indicate the proper date and origin.

Next month I will again be sharing the podium with Nancy Martin.  We are jointly teaching an ASA class for appraisers at the Huntington Library in San Marino.  ASA members as well as non-members are welcome.  Here is the link: Antique Furniture Authentication Presentation

If you are in the Southern California region and wish to learn more about antique furniture in a wonderful environment, send in your reservation.  I hope to see you there.

I guarantee you will learn something useful.

Saturday, December 31, 2016

Time is of the Essence


Always Time to Work


It is normal at this time of the year to reflect on the past and look forward to the future.  I find this very strange.  I enjoy my life and craft and find myself in my shop at the bench working on something every day.  I do not see any difference between week days and week ends, holidays and non holidays.  What changes is the trash pick up schedule, whether the school across the street is open or not and if there is any mail in the box.  Other than that, no difference.

Since I work and live in North Park, an older historic commercial district in San Diego, this day to day normalcy is compounded by the fact that the weather rarely changes.  Except for a few weeks of the year when it rains a bit and other weeks when the temperature drops to 60, there is no indication of the seasons.

I have enjoyed this lifestyle, earning my keep by restoring antiques for 47 years now, with all but a few the early years in the same location.  I walk to work and open the door at 7am, read my emails and turn on the glue pot, remove the clamps from the day before and then, promptly at 8am turn the "open" sign around in the window.  When I feel like it, somewhere between 6pm and 7pm, I turn the sign to "closed" and walk home.  It's a nice routine.  On some days I ride my bike instead of walking.

In any event, I cannot fail to notice the news and talk that another year has ended.  As Pink Floyd
sang on The Dark Side of the Moon ("Time") "The sun is the same in a relative way but you're older, shorter of breath and one day closer to death."  I turned 68 two weeks ago and I now have approximately 32 years left to finish all the projects I started in my life.  I am not sure that I have enough time...

So, this post is about "time."  Something that we can measure but cannot see.  Of course, we can see the effects of time.  Things get old and die.  But we cannot hold time in our hands or feel it with our fingers.  Time is ephemeral, as the wise men would say.  We are aware it exists and cannot ignore it.  It rules our lives.  We are subject to its rule.  Time is our master.  It will exist long after we all are gone.

Jim Croce sang "If I could save time in a bottle."  For me the solution is to put time in a box.  I make clocks.  Mechanical, old fashioned pendulum clocks, the kind which were first invented around 1650.  Using lead weights to convert potential energy to kinetic energy, driving a precise set of gears with a constant escapement to turn the hands of time.  Using gravity instead of electricity as a power source.  Using human power to raise the weights every week and letting the earth pull them down.

I have made 5 clocks in the past 15 years.  Each one found a home before it was completed.  I did not advertise any of them.  Over the year it takes to complete a good clock, some person would discover it and meet my terms for adoption.  Each clock is different, but I tend to make clocks that stylistic date from 1690 and have square brass dials.  I like olive wood and it produces a dramatic surface with a nice polish.  It is getting harder to find, as is most of the old stock exotic woods.

Clock #6, Completed and Standing Tall


I have just completed clock #6, which has been a project for the past year.  The origin of this clock is a clock I was asked to restore some 20 years ago.  It was the property of a famous actress in Hollywood, and she had owned it all her life.  It was from a world famous clock collection, the Wetherfield Collection, and had been sold by Arthur S. Vernay in New York, when that collection was broken up in 1928.  At one point, after I had restored it for her, I managed to secure a cash offer of $175k from an English clock dealer, which she refused.  Even though I encouraged her to take the offer, she just said, "I would rather have the clock."

I understood exactly what she meant.  When you entered her home, the first thing you saw was this clock.  It spoke immediately of class, culture, education, maturity, and stability.  It had a heart beat, which quietly permeated the home, and would announce the hours with a charming bell.  It had a face, and hands, feet and a waist, and the face was surrounded by a bonnet.  In every aspect it was a person.  A physical presence and reminder that we are all humans, measuring time's passing.

Waiting under the Plastic is Clock #7


This clock had a dramatic surface, decorated with boxwood and ebony pinwheels of all sizes and covered in figured sawn olive wood veneers.  All the moldings were carved across the grain, giving it a vertical thrust, forcing your eye to travel from the feet to the top, relishing every detail of the construction.  It was made by Joseph Windmills, in London, around 1690.  In the book, "The Wetherfield Collection of English Clocks" it is illustrated on page 22 as figure #14.

Joseph Windmills, London 1690


I started this project by finding online a period set of clock works in good working condition.  I then had David Lindow, in Gravity Pennsylvania, fabricate a new brass face, which was then engraved by Valdemar Skov, in Maine.  David also made a fine set of hands to complete the works.  I had the works cleaned and adjusted by Paul Smith, who has been in business here in San Diego nearly as long as I have.

I always start building my clocks with the back board.  In this case, all the secondary wood is tulip poplar.  Historically, English clocks are made of oak, but I cannot find the proper old growth white oak here in California, so I use poplar or beech.  There can be no confusion in the future as to the possibility that my clocks could be sold as period clocks, even if some dealer were to remove my name.

It takes many weeks of work to apply the skin.  All my clocks are covered in sawn veneers which are quite thick, 1.5mm.  All elements are glued using animal protein glues.  All the molding is hand carved across the grain, which takes some time.  I cannot use simple molding planes, since the grain is going sideways.  It must be carved and then scraped and sanded to shape.  The profiles were taken from the original clock, when it was in the shop for conservation.


Progress around July 2016

On the sides I use sausage sawn veneers and oyster sawn veneers.  On the front I use oyster sawn veneers, with highly figured cross banding.  In the pinwheels I used Gabon ebony and English boxwood, with each triangle trimmed to fit by hand with a hand plane.  The nice thing about using sawn veneers is that you can work the edges like real wood.


Clamps on...Clamps off

It takes a lot of clamps...Fortunately, I have a lot of clamps.

This clock has a very special owner, now that it's completed.  She is 101 years old.  I have worked for her and her family since she was my age, nearly 4 decades.  I have carefully moved her from one residence to another, as necessary, transporting all her precious antiques personally.  She has kept together a great collection of art and antiques from her ancestors, and lives surrounded by beauty.

Her daughter purchased one of the Treasure Boxes, first series, and it sits in the main room in a place of honor.  They both desired a tall case clock made by me and I thought that this would be the year to fulfill their wishes.  I am pleased that I was able to complete the task by the end of the year.

They have recently purchased a nice condo in the older part of San Diego, where this clock will be delivered.  I expect to have it in place, beating away the seconds, in the next few weeks.

The photos that follow detail the surface decoration:


Today I stand at my bench, working on wonderful projects, at the end of another year.  I know that next year will start tomorrow and I will be faced with more wonderful projects to complete.  There is always a good reason to come to work and a genuine satisfaction every day when I decide to go home.  The one inescapable truth is that, regardless of how much more time I have left, it is time itself that will survive.  I hope and believe that my clocks will also survive me, beating away the seconds for centuries yet to come.  I know Joseph Windmills had similar thoughts back in 1690.

Life is good.

Wednesday, November 30, 2016

More Upholstery Conservation


Mahogany Armchair 

I want to show another project in the shop which is being restored.  In my normal business operation I work each week on similar projects for maximum efficiency.   One week will be repairs, another will be veneer or marquetry, the next may be surface preparation and then a week of polishing.  At that point the shop is usually clean so I can do some upholstery.

This past week has been upholstery.  Hence the post yesterday.

Today I want to follow up with an armchair made in the Great Lakes region around 1890.  These lather covered chairs were popular with the railroad and land barons of that Gilded Era.  This one is covered in black oil cloth, which is no longer made so it will be restored in leather.

Missing wheels.  Original wood finish.

Looking underneath I found the label of the last person to work on it.


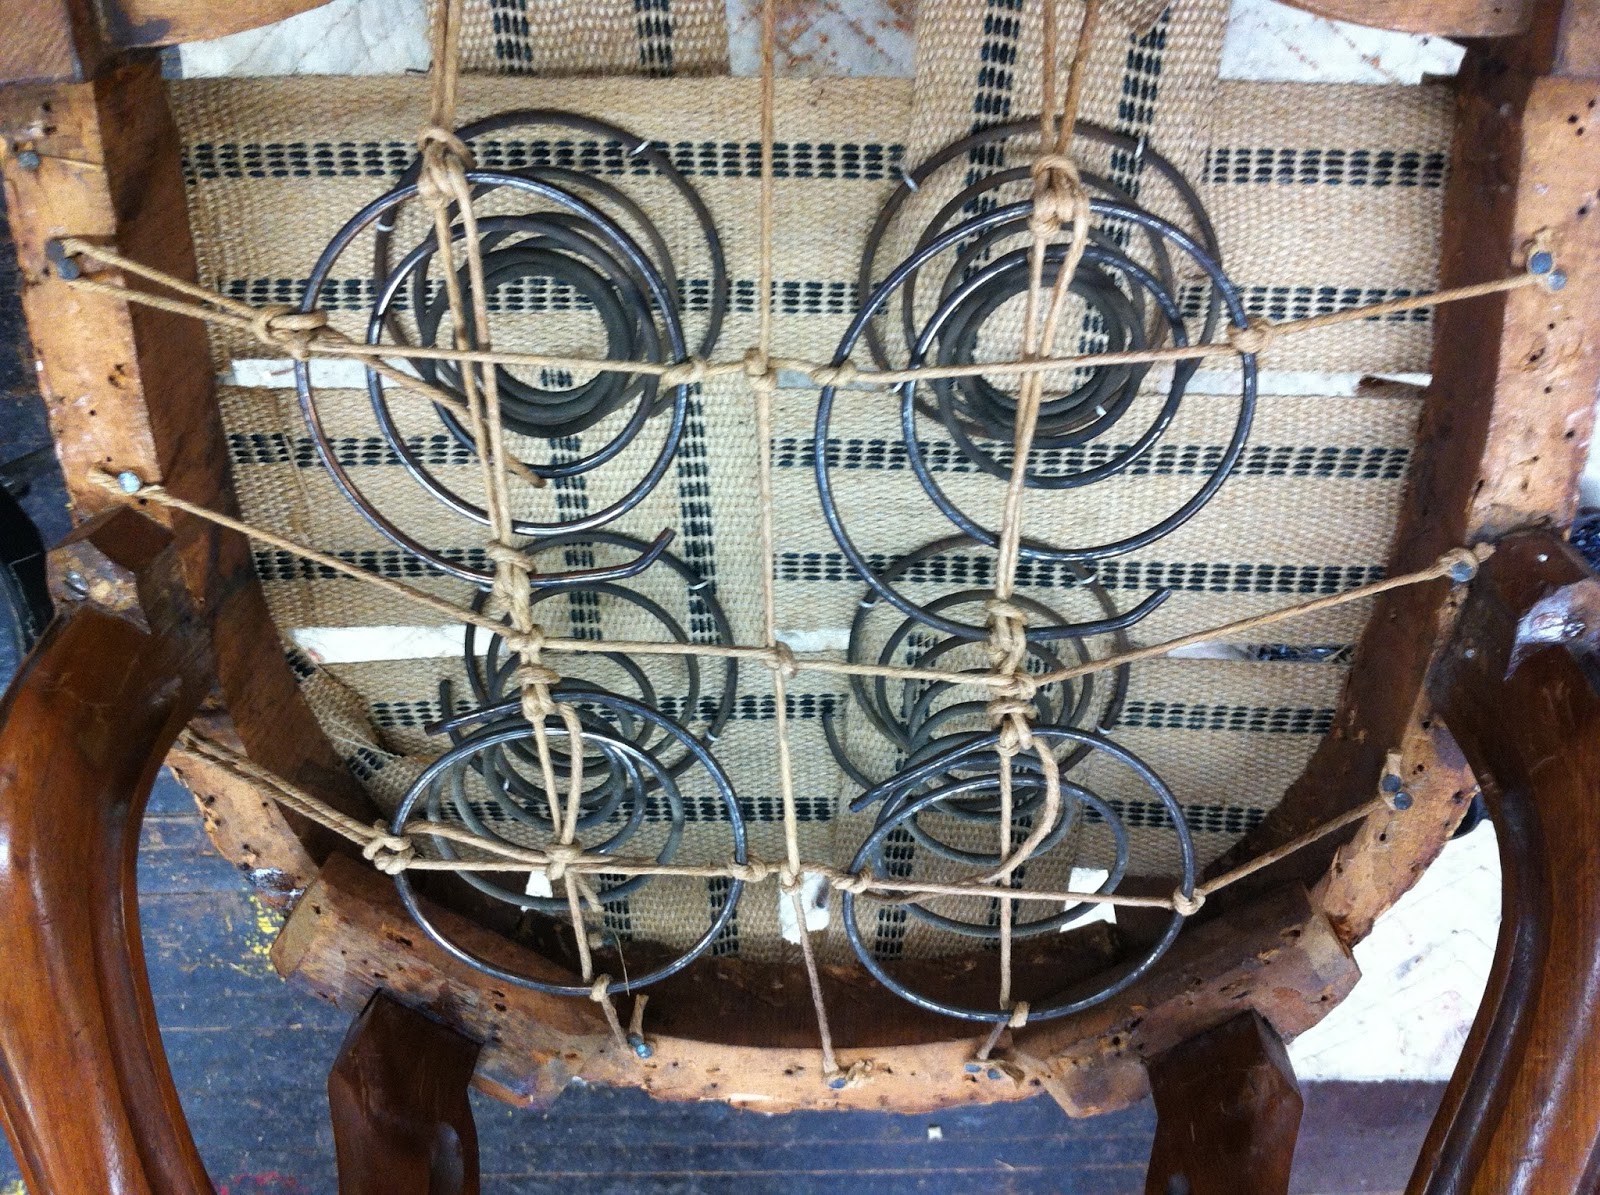
He was trying to repair the springs by replacing the webbing only.  Note my comments in the previous post on why this is not the best approach.  However, his repair got the chair this far, only because it was in storage for most of that time.

Poor effort to sew springs to jute

One problem with just replacing the webbing is that it is difficult to properly sew the springs in place.  This photo shows his effort, which was insufficient to do the job.

Seat springs from top
This shows the springs after the seat foundation is removed.  Springs are not in proper position and cord is broken.  I removed them, cleaned up the area with a vacuum and used tufting twine to properly sew them in place, tying the tops with 8 no† Italian cord.


Starting the removal of upholstery foundation

Here I have already removed the side arm stuffing.  Next is the careful removal of the seat and back, layer by layer, tack by tack.


Jute webbing failure to support springs

One of the great things about traditional upholstery is that you can learn how to do it by careful observation of the process during deconstruction.  Removing layer by layer teaches the worker how to put it back in the same way.  The main goal is to conserve springs and stuffing while replacing jute, burlap, muslin and cotton.

Front of back spring package
On the back the original method was to secure the smaller springs only with twine, cover †hem with burlap and then sew them to the burlap.  This saves time and money.


Chair laying down with new burlap

Seat foundation material


At this point the original stuffing can be cleaned of tacks, vacuumed and carefully positioned in its original location.  New muslin is tacked over this.

Nice and even work


Getting ready for final stages of work.
Now I need to get some leather and begin tacking the cover.  I can also spend some time on cleaning and waxing the wood.


Tuesday, November 29, 2016

Simple Upholstery Conservation Lesson


American Victorian Louis XV Parlor Chair


I am always pleased when the client understands at what point they should stop sitting on upholstered antique furniture and find a good traditional upholsterer who can save the stuffing.  Restoring the quality of the seating comfort on antique furniture depends completely on saving the original stuffing, whether it is horsehair, Spanish moss, shredded wool, straw, excelsior or any other period material.

When I was a young man and wanted to restore cars I got some valued advice from an expert mechanic.  I thought I could just get away with a valve job, and spend my money only on the head.  He informed me that, if I only repaired the top end, considering the miles on the engine, then it would be soon that the rings would fail, burning oil.  If I was to repair the valves, it would be a good idea to replace the rings and have the cylinders done.

He was right.

Traditional spring seats are exactly the same concept.  The springs are held from the bottom by jute webbing and tied at the top with cord.  Under normal use and age the jute sags and eventually the springs fall out the bottom.  However, at the same time the burlap on top of the springs gets old and rots.  The cord stretches and breaks or pulls loose.  Many upholsterers simply add new webbing on the bottom and do not address the top of the springs, since that means a lot more work.  What happens is that very soon the springs break through the top burlap and begin tearing into the stuffing. If the seat continues to be used it will be a short time before the stuffing is ruined.

I have always made an effort to conserve what ever stuffing was original to the object.  Over the years and after too many projects to remember, I have worked out a process that I think is appropriate.  Today I did a simple Victorian side chair, which took only a couple hours, and took the time to photograph the process for my blog.  I hope this documentation helps others to understand what is required for proper conservation of antique upholstery.

To begin with, you need to carefully remove all upholstery, tacks (or staples) and set everything aside.  It is best to wear gloves and a dust mask for this work, as it can be pretty disgusting.  When the wood frame is naked, all wood repairs need to be done.  I like to use liquid Old Brown Glue on areas where the tacks and nails have damaged the wood.


Repair the frame after Removing all Upholstery

To begin with, jute webbing is stretched across the bottom of the frame, using large tacks on each end.  The ends are folded over and a series of 5 tacks is applied in a staggered pattern to avoid splitting the wood.  The webbing is woven over and under and stretched as tight as possible with a webbing stretcher.
Tack webbing with 5 tack pattern


The springs are positioned properly and then sewn to the webbing with a curved needle and tufting twine.  The twine needs to be pulled very tight to keep the springs from moving during use.

New webbing in place, sewn to the springs

On this particular chair the springs were tied using a 4 knot pattern.  This means front to back and side to side.  I prefer to use an 8 knot pattern, since adding the diagonals means more support for the springs and burlap and a longer life for the seat.  Since I determined the original cord was still functional, I added the diagonal strips using Italian spring cord.

Original 4 knot spring cord

Better 8 knot pattern


After the springs are secured, a new layer of burlap is added, tacking to the top of the frame and using a curved needle and tufting twine, sewn to the springs.

New burlap, sewn to springs at top


Now the first layer of original stuffing is carefully examined and all old tacks or staples are removed. Also it is good to use a vacuum to remove any dust or other material which does not belong.  In this case, the original stuffing was straw, which can easily fall apart if you are not careful.

Original Straw Stuffing

Place this layer directly on top of the new burlap.  I use sand bags to hold it down while I tack the edges.  Usually the burlap is fragile and it tears on the edges.  You only need to hold it in place for a short time, since a new layer of burlap is immediately added to secure it in place.

Holding Straw package in place and tacking to frame


Notice the original pattern of stitching which shapes the edge and holds the stuffing in place.  This is what is important to conserve as much as possible.  It gives the shape to the upholstery.

Cutting a "Y" to go around wood frame

Where the burlap needs to be cut for the frame you use a "Y" cut.  This method is used for muslin and final fabric to go around the wood properly.

New burlap stitched in place over old stuffing

This new layer of burlap is stitched in place using a curved needle on the edge and a long straight needle in the center.  This new layer of burlap under and on top of the old stuffing package serves to conserve the original foundation and restore the life of the seat.


Spanish moss second layer of stuffing

The next layer of stuffing in this case was a layer of Spanish moss.  Many people do not know the difference between horsehair and moss, but if you look closely you can see that one is an animal hair and the other is a plant fibre.

50/50 cotton batting


The original cotton batting is discarded, since it is always dirty.  Cotton batting serves to provide a dust filter preventing outside dirt from getting into the seat stuffing as well as inside dirt from escaping.  It also provides a smooth surface for the final fabric.  I always use 50/50 cotton, but many other workers use 85/15.

Burlap tacked on top of frame


It is important to note that the burlap is nailed on top of the edge of the frame.  This allows the muslin and final fabric to be nailed to the face of the frame.

Muslin tacked to front of frame over cotton


On the bottom of the seat a black bottom cambric is nailed to cover the webbing, using small nails.


Black bottom cambric over webbing


After the final fabric is tacked in place an appropriate gimp trim is applied using gimp tacks.  Now you are done and it only took a short time to restore the upholstery professionally.  The seat is ready for another century of comfort.

Thursday, September 8, 2016

Am I Really Obsolete?

Tools of The "Forgotten" Trade


I remember vividly in June of 1969 meeting an old man who was a traditional upholsterer.  It was in a  shop around the corner from where I lived, and, in fact, just a block from where I still work.  He was trained in New York in the ways of making furniture comfortable and stylish.  I can still see his muscular hands, even though he must have been nearly 80 years old, pulling the cord to tie the springs, working the muslin to get it even and stitching the burlap, creating a perfect edge from the horsehair.

I remember being shocked when he casually used his magnetic hammer to pick up a bunch of upholstery tacks and put them in his mouth.  Who would even think of doing that?  As he worked he would rapidly put the hammer in his mouth and put a tack on the end, then driving it in place with amazing precision.

This was the first time I saw a worker "spitting tacks."  I had to try it, and almost immediately discovered that I could make a good living restoring upholstery on antiques.  In fact, the ability to not only work on the wood frame, but to be able to upholster as well, put me in a class by myself.  No longer did the client have to take the frame from the refinisher to the upholsterer to get it done.  One stop shopping.

Of course, during those early years a lot of places were able to supply traditional materials.  I would go shopping on a regular basis in my area and get quality muslin, burlap, spring twine, tufting cord, cambric (not the synthetic stuff...actual black muslin), pounds of 100% horsehair, 50/50 cotton batting, coiled springs in various sizes, and boxes of tacks.

Much of that list is no longer available these days as the trade has completely changed.  Foam and staples have become the standard process and more than a few upholsterers I have met have expressed shock and surprise that I don't even have a staple gun.  (Woodworkers also are surprised to find I don't have a table saw or router, but that is another story.)

I charge extra for projects which have been "converted" by other workers who throw away the original stuffing and staple on their synthetic materials.   I hate staples.  They don't hold well and removing them is a pain.  Usually I bleed from some unseen fragment of a staple which gets me as I work the job.  I think modern upholsters use their staple gun like a 2nd amendment enthusiast who goes to the gun range and fires thousands of rounds.  You cannot believe how many staples I find.

Tacks in Different Sizes, Including Gimp Tacks

The simple fact is that I have spit tacks all my life.  Hundreds, perhaps thousands of pounds of tacks. All sizes: 18, 16, 12, 10, 8, 6, 4, 3, 2, and even 1 1/2.  To be honest, any tack above #10 I don't put in my mouth.  They have a tendency to get stuck in the top of my mouth which hurts, so I just place them on the hammer individually.  However, it is rare to use such large tacks, as a skilled traditional upholsterer will understand to use the smallest tack which will do the job, to minimize the damage to the wood frame.

Spitting tacks is important.  It allows the right hand to work the hammer with precision, as the left hand manipulates the material and holds it in place.  This allows amazing speed and precision.  Most people do not even know how to work the hammer properly.  Notice the head is curved on a radius.  If you hammer from the elbow or upper arm you cannot hit precisely in the same spot each time.  You need to pivot the hammer just from the wrist, holding the upper arm steady against the body.  Since the distance from the wrist to the head of the hammer is fixed you can swing the arc exactly the same each time.

That means you can set the tack and hit it several times without missing.  Also you can work next to the polished wood frame or gold leaf frame of the chair with confidence.  People who watch me work are stunned that I never seem to miss the target and can hammer with a certain force right next to the edge, perfectly and precisely,  all day.

About 20 years ago the local supply house stopped selling tacks.  I bought all the surplus they had, but those are long gone.  I started to shop nationally and even internationally in order to keep my supply of tacks from running out.  One by one the old companies stopped production.  Nobody bought tacks so nobody made them.

As a side note, one day a ballet teacher came into my shop and showed me a #12 upholstery tack.  She wondered if I had any like that.  I showed her several boxes, each weighing a pound.  She was shocked.  "These are special tacks for ballet slippers.  They are sold in Florida and cost $12 for a package of 6!"  I handed her a dozen and said "Have a good day."

I also remember using tacks to attach my cleats to my shoes when I raced bicycles.  That is another application which is no longer done.  Toe straps are gone and you buy a bicycle without pedals!!


A Cobbler's Tray 

In desperation recently, I found a supplier in New York who said they could get me tacks.  I ordered and received 50 pounds of #3, since that is the most common tack I use.  They tasted terrible!  They were crooked and different sizes and I imagined they had been gathered up from the floor and put into a box.

I complained and received this note:

"For years our former supplier of the cut tacks "Crown Nail" of England (no longer in business) made the best cut tacks around the world and went the extra step to insure his quality and sterilized products do to the amount of 'spitters' years ago...We would not recommend doing it 'the old fashion way' i.e.; putting them in your mouth any longer as we do not have the same relationship with the Indian supplier as we had in the past with Crown Nail and we do not know the methods of 'degreasing' the products."

I can work around the lack of materials, like silk or 100% cotton damask, silk or wool mohair, and even good quality horsehair.  I cannot work without tacks.

Am I obsolete?  Is the craft of the traditional upholsterer dead?

I cannot believe I am alone in this trade.  If you read this and know of a supplier of good quality sterilized cut tacks, please let me know.


PS:  You may notice the comments to this post.  I am unable to imbed a link in the comments section so here is the link to the "Tack Spitter" Master Tack Spitter Video

Tuesday, September 6, 2016

Disposable, Renewable or Enduring?

I was raised in a very thrifty environment, a direct result of my parents working hard to hang onto the lowest rung of the middle class ladder.  I remember my great uncle telling stories about earning 10 cents an hour polishing beans for the local grocer.  I was amazed.  "Polishing beans?" I asked.

"Yes, and I was glad for the job at that time.  Beans would sell for a few cents more if they were shiny, so I would take some wax and dip my hands in the beans and work them until they were clean and shiny."

This man was the same man who never had more than 20 dollars at a time in his pocket all the years I knew him.  I suspect it was the same 20 dollar bill as I never saw him buy anything.  "Everything you need is already at the local dump.  And it's free for the taking."  It turns out that when he died, we discovered he had substantial savings accounts in dozens of banks across the country, so that wherever he visited he had some reserves, if needed.

That durable and practical generation which lived through the Great Depression is now just a faint memory.  What the world experienced in the past decade was shocking but nothing compared to the 1930's.

I have spent my life restoring historic furniture, saving it from the trash heap of time.  I have a deep respect for those who had the knowledge to select the proper tree, and be able to transform it into a beautiful and practical object using only wind, water and human power.  We could learn a great deal of important information if we would just take the time to analyze those objects and understand the process which produced them.

Antiques represent a culture which is enduring and still important for us to appreciate even centuries later.  Of course, not everything was wonderful.  There was disease, poverty, poor sanitation, uneven distribution of wealth, war and conflict.  As I list these problems, I realize that they are still part of our society today.  I guess we haven't evolved as much as I thought.

I ask myself, "What will my generation leave for the future?"  The answer is not pretty.

When I was born the United States had just dropped the atomic bomb on Japan.   I am the child of the first nuclear age, and, like others who came of age during this time, I was fascinated with the prospect of understanding the atom.  So much so that I built an electron accelerator ("atom smasher") in High School and took several awards at the Science Fair, going on to work at Brookhaven Labs and getting a degree in Applied Physics at UCSD.

I know a few things about the atom, I guess.  Enough so that I decided to walk away from my chosen career over 40 years ago when I realized that science could not solve the nuclear waste problem.  Science can create radioactivity but cannot find a way to keep it out of the environment.  Talk about an enduring legacy:  It is a fact that human generated radioactive waste will be polluting the earth thousands of years after the pyramids have fallen into desert dust.  That is what my generation will be remembered for...

At the same time, we live in a disposable society which has no concern at all about making and selling computers and phones with toxic materials, at great expense, only to make them obsolete after a few years of use.  Make, Consume, Discard.  How much longer can we sustain this business model?

It seems logical for corporations to find workers on the other side of the planet who will work for less and make something a few cents cheaper than someone else.  However, what is the real carbon footprint of that object by the time it reaches the consumer?  Take IKEA furniture, for example.  Much of the material used in IKEA furniture is manufactured using toxic chemicals and synthetic materials.  Then it is transported a great distance in shipping containers which are disposed of by the consumer in a landfill.  It is "cost effective" and serves its purpose but lasts only a few years before it falls apart and is replaced by a similar, but cheaper item.

Compare that with a piece of antique furniture.  The tree was either locally harvested by hand or transported by ship using wind power.  The wood was processed by water driven saws and shaped by human talent.  It was transported overland with water or horse power, and later by steam.  It was only when steam was created by burning coal that it started to produce a carbon footprint.

That same piece of antique furniture produced subsequent jobs for workers who repaired, polished, upholstered and restored it from generation to generation.  It created memories and connections to the people who used it, strengthening family history and direct connections to the land.  It provided comfort and a sense of culture as times changed, providing a constant reference point in a world of flux.

In simple words, it was a renewable source of material culture, and will continue to function in that important capacity as long as we respect its integrity and original purpose.  That is why I have devoted my talents to restoring antique furniture.  It gives me a great deal of pleasure knowing I have saved something from the past and that it will continue to exist long into the future.