Tuesday, December 25, 2012

Reflections Of An Old Man


Beautiful Marquetry Card from Paul Miller


Years ago, when I was much younger, these thoughts came to me as I walked home from work:

A Strong Man
           Knows when to quit.

A Great Man
           Goes beyond what is possible.

A Wise Man
            Knows his limits.
                   Paces himself.
                       And realizes his full potential in the time he has been given.


As you start another year, I would like to leave you with this "Woodworker's Blessing:"

May your chisel rest sharp.
     May your saw stay straight.
          May your plane prove true.

And

May your feet rest on shavings
     All the days of your work.


Sunday, December 9, 2012

Trash Treasures

About a month ago there was a New York Times article and video posted which showed the piano movers in New York picking up pianos and dropping them off at the land fill.  This video hit me hard.  It showed rosewood pianos with ebony and ivory keys, in good working condition, being crushed along with the garbage by a tractor.  There was no difference between the plastic sacks of crap and the carved rosewood legs of the piano as the tractor finished its work.

The story was that these pianos had no value.  They were being thrown out because no one wanted them.  The movers, who were professional piano movers, had been in business for almost a century in New York.  It was heart wrenching to watch their faces, as they pushed piano after piano off the end of the truck, where they landed with a crash on top of each other.

Beyond the fact that the materials used for these pianos, like rosewood and ivory, are listed on the endangered species list, and beyond the fact that these pianos represent centuries of skilled and dedicated craftsmanship, one can only despair the loss of pleasure these pianos provided for the performers and their audience.  I wonder what Beethoven would say if he were alive to see this.

I love music, both classic rock and classical.  Anything from Beethoven to Brahms or Hendrix to Floyd can provide me with the mental stimulation to work on creating something.  Some people don't seem to care much about music.  I cannot relate to that.  But, everyone has their passion, and mine is music.

When I saw a performer on the Ed Sullivan show play a violin, I decided to do the same.  I was about 12 years old then, and I was fortunate enough to have parents who could buy me an instrument and pay for lessons.  I joined the Civic Youth Orchestra and played in several orchestras over the years, growing up.  I was not the best violinist, but I was able to sit in the first chair of the second violin section, right under the nose of the conductor.  It was thrilling, how the conductor could pass out music, which we had never seen, then raise his baton and start the beat.  Out of nowhere came music!

When I was in college, I took some music classes, and the professor was a famous bass player, Bert Turetsky.  He listened to me play and said something which changed my life.  He said, "You are an average violinist.  I need a violist.  Your hands are too big for the violin.  Can you change?"  It never occurred to me to play the viola, even though I had spent years sitting in the section next to them.

I went back to my old violin teacher, Mr. Keeney, who had long since retired, and was nearly 90.  He agreed to help me and I started viola lessons.  In my senior year, Mr Turetsky selected me to play in the university quartet, and handed me a viola which was worth 6 figures to play.  We performed all year.  We spent hundreds of hours together practicing great music.  The final performance was Schubert's quintet in C major, which is one of the greatest pieces in the chamber music literature.  With repeats, it lasts 45 minutes, and you can loose yourself in the process.  As I walked off stage, at the end of the piece, Mr. Turetsky was there to take back possession of the viola.  As much as I was elated to have had the experience to play a great instrument for a year, I was crushed to have to give it up.

My wife, Kristen, plays her  cello every night.  I have two violins and a viola in the library, which I rarely play these days.  She also plays the piano which has been "rescued" from the threat of being thrown away.  We are fortunate to have the time and instruments and training to play when we want to.

That is why I needed to write this post today.  Last night, on the internet, I found a short video which made me cry and gave me hope.  Exactly the kind of emotional roller coaster that reminded me of that last performance of Schubert, over 40 years ago.  It was a teaser for a documentary which will be released sometime in the near future.

It shows a village which was built on trash, in South America.  The people in this village live by digging through the garbage, finding stuff and selling it.  Think about that for a moment, as you sip your coffee and read the paper each morning.  One day they found a broken violin in the garbage and decided to start making instruments out of the junk.  Now they have a music program, and the kids are all playing instruments which were made from the trash.

You can't believe how inspirational this is, if you love music or children or children playing music.  Take a couple minutes and watch this:

Land Fill Harmonic

Now imagine what kind of results our foreign policy would achieve, if we collected instruments that were not being used or thrown away and exported them to poor countries?  We are a rich country, and we need to share.  Send those pianos, violins, banjos, harmonicas, tubas, drums and old sheet music to the rest of the world.  Spread the music.

The landfill is no place for pianos.

Sunday, November 25, 2012

Forward Into The Past!

I take this job of blogging very seriously.  One thing the internet has provided the globe with is a chance to share a virtual collective consciousness.  That is why my personal contribution is so important.  Not because I am important, but that I may, in fact, contribute to the universal search for our place in the universe.  Defining our cosmology in a way that accepts truths and supports individuality.

I have had some significant influences in my life that have contributed to my own understanding of my place in time.  Some have been superficial, like music, for example.  Coming of age and forming my persona under the sound tract of Pink Floyd, Cream, Traffic, and, most importantly, Hendrix, mixed with all night visions created by the Firesign Theatre can be very mind expanding.  (If you are old enough you recognize the title of this blog as a Firesign Theatre cut.)

If you have never heard of them, take some reflective time and close your eyes, darken the room, partake of your favorite mind altering material and just listen to the mental movies that classic Firesign Theatre stories create.

There have also been personal influences, as I have written about before.  When you seek out a "master" and sit at their feet to humbly seek their wisdom and they treat you as equals, it can be very inspirational as well as educational.  There is a rare mix of humility, knowledge and confidence that makes a student ready when the time comes to evolve into a "master" in his field of experience.  Schools try to create this with educational programs that award degrees, but that does not always guarantee success.  What is important is how you live your life and what you do with your precious time here on earth.

One of the masters I learned from came to me over the television.  The first time I turned on the Woodwright's Shop program on PBS, more than 20 years ago, and saw Roy Underhill frantically working a piece of wood into something, using only hand tools and his copious sweat and blood, I was transfixed.  Here was a guy that I could instantly relate to.  His show depicted exactly what my life was on a day to day basis.  He loved what he did.  He understood the larger implications of what it meant to work by hand, with the element of risk.  He studied and explained the old ways of working in a way that was easy to understand and appreciate.  In short, he was a true brother in arms (Dire Straits).


Over the years, I watched Roy every chance I got.  I saw him build boats, cabins, chairs, tools, spinning wheels, whistles, lathes, and every thing else under the sun.  Each episode started with him walking out of the city and into his shop in the woods.  He worked the camera in a way that made me feel he was in the room with me, talking only to me.  I often found my self talking back, having a conversation with the TV.  It felt normal and still does.

I first actually met him when I joined the American Woodworking magazine traveling show.  I know he has a lot of fans, and yet, when we met, I found him to be honest and personally interested in my perspective.  One truth about a master is that he listens.

I was honored when he asked me to present my chevalet and marquetry experience on one of his shows.  I think that was in 2008, but my memory is not clear about dates any more.  I stayed with him and his wife in Williamsburg and we had long and deeply personal conversations late into the evenings.  When we taped the show, I was able to learn a great deal from him, even though I had a fair amount of television experience in my past.  He is certainly a master at presenting information in the most entertaining way possible.

Last night, I found a TED talk which featured Roy working the crowd.  It reminded me again of his skill at public speaking, while at the same time using an axe to skillfully demonstrate traditional workmanship.  I have personally seen him do this talk on several occasions.  At one of these talks, I was the person holding up the tree, while he took swings at it.  Seeing his abilities at close range make this presentation even more remarkable.  He can place the chips from the axe exactly where he wants, much like a professional golfer can place the ball on the green.  All the time blending his act with serious information and classic bad jokes.  Each time it is fresh, and he has done this thousands of time.

As I watched the TED talk, I sensed a certain resolve in his voice.  He has been "preaching" the virtues of hand workmanship all his life.  He is the most public face in woodworking for this position.  His show is the longest running PBS "how to do it" show, and yet Norm, with all his ridiculous and expensive power tools, has much more success and fame.  When Roy describes his axe as "a piece of metal on a stick" he brilliantly illustrates his position.  That "metal on a stick" can do almost anything, if you know how to use it.  Nothing illustrates more the relationship between man and tool than that axe in the hands of a man like Roy, or the image of Norm standing in the middle of hundreds of thousands of dollars worth of power tools, trying to make a bookcase.

I was raised and trained as a scientist.  I studied and worked in the field of high energy particle physics and my degree is in Applied Physics.  I grew up immersed in the world of technology.  I saw the first computers and was born at the same time television was introduced to the world.  I watched live as the first man stepped on the moon, and the first heart transplant occurred.  As a scientist, I understand that the industrial revolution has changed not only the social and economic fabric of the past two centuries, but is now actually transforming the global climate, and that it is measurable.  We cannot continue to burn fossil fuels at an increasing rate, just to satisfy our need for mass consumption of useless objects.

Roy, in his TED talk, says, rather ironically, that he was asked to represent the "Past."  He then succeeds in pointing out that the past is still relevant today.  The past is the way of the future.  We can learn from the past and use that knowledge to mitigate our footprint on the earth.  We can, and must, transform our relationship with our home planet, by better understanding our relationship with our global assets, like food, water, and air.  If we are just custodians of this planet, what kind of message are we leaving our children if we destroy it?

I am not crazy and do not want to eliminate all technology from my life.  Living an extreme lifestyle is not the answer.  I read the book, "Be Here Now" in 1971, the same year I graduated from UCSD, and I understood what a life, in "balance" meant for personal happiness.  I still follow those guidelines.  That is why I can relate so much to Roy, and what he represents.

We all can learn from what he has to offer.  He is a national treasure.

See for yourself:
TED: Roy Underhill and his Axe


Sunday, November 18, 2012

Tambour Glue

40 years ago I was the first one in San Diego to sell a roll top desk for $2500.  It was the period of Golden Oak and everyone was furnishing their houses with oak furniture.  I would drive back to Nebraska and buy a truck load.  I remember buying a dozen oak cabinet treadle sewing machines (with the machines working), numerous oak tables, both square and round, with lots of leaves to match, countless press back oak chairs, hutches and desks.  I sold them as soon as I unloaded the truck.

I was always looking for exceptional desks, and one day in Lincoln I saw this monster desk.  It was quarter sawn oak, with what looked like hundreds of small interior drawers, all different.  The outside was beautifully paneled with raised panels on all sides, even underneath where you couldn't see them.  It also had a matching chair.  This desk was so large that I could lay down on top of it and close the roll over my head.

In recent years I haven't seen a desk sell for much more than lumber, as they just are not popular any more.  Then, suddenly, three show up in my shop for repairs.  One of them was on its way to the dump and the handyman had the good sense to drive out of his way and drop it off at my shop.  Free.  The second desk was in pieces at a garage sale, and, when they couldn't sell it, they called me to see if I wanted to pick it up.  Free.  The third was a desk which was on loan to the local historic house, where it was stored in the attic office of the caretaker.  I was asked to provide a proposal for repairing this desk in 2010 and forgot about it.  Last week they called and said it had to be out by that day at 11:30.  At least that one will make me some money.

All of these desks have one problem in common:  The tambour roll is messed up.

What people don't know about a tambour desk, like a roll top, is that it needs to be used often.  When the roll is opened and closed regularly the canvas bends at each strip and flexes evenly.  When the roll is open and left in that position for a long time, there is a stress on one strip only where the sharp bend in the roll occurs at the back of the inside rack of drawers.  That one strip will then probably tear the canvas the next time it is moved.

People often try to repair these rolls with contact cement, not knowing what glue to use.  The results are predictable.

This is a typical case where the repair was made with strips of canvas glued to the old canvas with contact glue.  It did not work.

I have a system to reglue the canvas backing on tambour rolls and it works every time.  In fact, my research proves that the original makers of these tambours used protein glues modified with urea to extend the open time and provide more flexibility then hot hide glue.  That is why I find Old Brown Glue to be not only the perfect glue for this repair, but as close as possible to the original method as you can get.

I place a sheet of 3/4" plywood on the bench and clamp some strips of wood around the outside of the strips.  Make sure you are at 90 degrees so the roll slides nicely in the cabinet.  Use some weights to hold down the center of the strips and clamp some extra wood on each edge to hold them in place.

Now you can use a belt sander, with a coarse belt, to remove all the glue and canvas from the backs of the strips.  Make sure they are clean, sanding across the grain.

Take some Old Brown Glue and warm it up in a water bath.  Pour it on the strips and use a short hair paint roller to spread it evenly around.

It should look like this:

Get some heavy canvas, like you would use for a sail boat.  Cut a piece to fit the area and pour on the glue.

Spread it around evenly with the roller.

Now place the canvas, glue side down, on the surface of the tambours.  Use your hands and a veneer hammer or other roller to even out the canvas, pushing the excess glue out to the sides.  Clean up the excess with paper towels and a wet sponge, using cold water.

In simple terms, you are using the basic hammer veneering method to lay the canvas on the strips.  However, not a lot of pressure is needed, as it is working with wood veneer.  Just enough to even out the fabric and push the extra glue to the edges.

This is what it should look like when you are done.  The strip in the center, with the weights stays in place, and there are two strips of canvas which will hold the tambour together.  Let it sit overnight before you try to remove it from the plywood form.  You will find that some of the glue has leaked through the strips where there are gaps.  This is not a problem, since Old Brown Glue cleans up easily with cold water.  Just work a sponge between the strips to wipe off the glue.  Do not use too much water or you risk getting the canvas wet.  Just clean the wood with a sponge and paper towels.

One detail.  These tambours generally have a first piece (with the handles) and an end piece which are thicker than the strips that make up the tambour.  You need to glue these end pieces in a separate operation, after the tambour is assembled.  Be sure to allow surplus canvas at each end to make it possible to attach these thicker pieces.

By the way, does any one want a nice American Oak Roll Top Desk?  The roll works fine...

Thursday, November 15, 2012

Good Press Always Helps Ego

Over the years I have had the pleasure of being interviewed for different publications.  It is always nice when they act interested in what I do for a lifestyle.

As a person with a diverse background that includes journalism, I am fascinated by the specifics of how the interview is translated into notes which are then written out into a story line, which is then edited to fit the space, and matched up with a copy reader who thinks up some clever headline or kicker.

Sometimes it works well and sometimes I wonder who they were talking to when they got the facts, since it doesn't sound like me.  But, like they say, any press is good press.  Just spell my name right.

One of the national publications for the wood industry is Woodshop News.  I get this magazine free, like most woodworkers, and am amazed by the growth of the industry over the years.  I remember when the newest table saw or blade was hot news.  Now, when I look at the pages, I see machines that are the size of a small house and cost six figures to purchase.  I have no idea what these things do or what I would do with them, but they are fun to look at and wonder...why?

As I look up from the magazine, my head full of futuristic visions of the "modern woodshop," I focus on a beam of sunlight landing on my workbench, telling me I should put away my chisels and smoothing plane and get to work.  I think to my self, "A Roman woodworker would be right at home here."  I am a Luddite.

Anyway, from time to time the editors at Woodshop News contact me for a story.  I can only imagine that they look at their demographics and decide that they should include some old, traditional woodworking character who still lives in the past, to balance their general mix of power tool articles.  So, I was pleased when they sent Jennifer Hicks to interview me a few years ago.  She was pleasant and interested and spent a lot of time listening to me talk about myself.  One thing I have no problem with is talking about myself, as my wife knows too well.

When the article appeared in the magazine I was impressed by the way she presented my story.  It was extremely well written and included many of the important stages of my career, in a simple story line which was easy to follow.  I enjoyed reading it and, at times, had to remind myself that I had actually done the things she said I did.  After all, some 40 plus years "at the bench" can seem like a lifetime.

This blogging experience has required a long learning curve for me, so I am just now figuring out how to post these things.  Look for more links and videos soon, now that I can do this.  What fun it is sharing these "personal" insights with anyone who wants to take the time to click their mouse.

Here it is:

Woodshop News Article

Thanks for visiting!  Thanks also to Tod and Jennifer at Woodshop News for their interest!

Tuesday, November 13, 2012

A Tool You Don't See Everyday

If you have spent the time to read my early posts on this blog, you know that I first got interested in antique restoration by visiting an 80 year old upholsterer from New York and watching him work.  The way he manipulated the materials was fascinating.  His workshop was just around the corner from my house, and I would stop by just to sit and watch him do his job.

He was at the end of his life and career, but his hands were amazing.  They were huge and strong and looked like they belonged to a much younger man.  The way he would stretch the webbing, spit some tacks and sew the springs in place was like music.  A constant and fluid movement of work, without any wasted effort.  He would take several strands of Italian cord at the same time and tie the coiled springs into position, pushing them down with one hand while he quickly tied the cord into knots with the right.  Eight knots per spring.  I remember him telling me that "some guys only use 4 knots, but that won't hold long."

The most wonderful part of the job was working the horsehair into its place, stitching it perfectly in place to form the appropriate support and form.  He would pull and pick the hair with both hands so that it resembled a hairstyle from the 1950's, sitting up some 8 inches in the air.  Then, when the upper burlap was tacked in place and the final stitching was done, it pulled down magically into a firm support which was only a few inches thick.  Pulling the tufting twine over a hard cake of wax, he would use either a large curved needle or a double pointed long needle to work along the edge, stitching different rows of twine to properly shape the hair foundation.

Most workers these days don't even know where to get horsehair, and, if they had some, wouldn't know what to do with it.  Foam has transformed the trade.  I don't even want to talk about using staples.

From time to time I will get a call from a client who wants to get rid of an old horsehair mattress.  They know I can use it and don't want to just throw it away.  Years ago there was a good business in the East Coast cities where traditional mattresses were made by hand.  These mattresses were expensive and time consuming, and consumed a lot of horsehair.  Again, foam has replaced this work, and these mattresses have no value.

However, I like to recycle them.  I follow a process that allows the hair to be used again safely.  First, I have the mattress fumigated for 48 hours in a chamber using methyl bromide gas.  This kills all the bugs, if they exist.  Then I open the mattress, and remove all the twine and any cotton batting, separating the hair.  This hair is placed in a large clean plastic trash can and washed with Tilex.  Then the hair is placed on a long rack with a wire screen to drip dry in the sun.

When dry the hair needs to be pulled apart and the perfect machine for that is a "cardeuse."

Not everyone has one of these available.  Generally, they are found more often in regional festivals in rural parts of France.  Sometimes in museums of trades.  Google "cardeuse" and see for yourself.

My first experience with this tool was over 30 years ago.  There was another upholsterer in town who had a similar machine, but it had a large drum studded with sharp spikes and the bed was also studed with spikes.  By turning the handle the drum would spin at a large rate of speed and you would feed hair into the spikes with the other hand.  It was like one of those chipping machines that eat trees.  Scared the crap out of me.  Out the other side of the drum the hair would fly in all directions, filling the room with horsehair.  What a mess.  I immediately thought I would like to have such a tool, but he refused to even consider selling it.

This particular cardeuse belongs to a dear friend of mine, who also graduated from ecole Boulle.  She moved to San Diego and practices traditional upholstery out of her home.  Last week, when I paid a visit to see her, I noticed that her tool needed a little work.  Since I would like to use it, she gladly let me take it for repair.   Note it was made in Paris, probably in the 19th century.

The worker sits on the bench and moves the sliding arm back and forth.  The bed of the tool has lots of iron spikes in rows, bent into hooks.  Half of the hooks go away from the worker and half go towards the worker.  The sliding arm has a ratchet system to raise and lower it relative to the bed, depending on the type of hair being carded.

The sliding arm has a similar arrangement of spikes, which are in rows that pass through the rows of spikes on the bed.  This action, you can imagine, shreds the hair completely.

So, I sit down and start putting clumps of hair into this machine and moving the arm back and forth.  It is a very interesting pastime.  Hair goes everywhere.  You are constantly reminded about the dangers of the spikes.  There is no temptation to daydream while you work.

Lockjaw is not a pleasant way to go.

POSTSCRIPT:  The internet is an amazing system for connecting like minded individuals.  I have a friend in Belgium, Filip, who is an ebeniste and marqueteur.  He took the time to travel to San Diego and visit my studio, which was valuable for both of us to share our common experiences.  I had no idea he was into upholstery.  After this post, he sent me an email telling me that this machine is missing an important part: the safety guard.  Kind of like a table saw without the guard.  As I do not want to be the cause of any injury which may happen by some other person building such a machine without the safety guard, I am adding this photo he sent me to show the part.  It is a bar, held by metal straps which prevent the user's hand from getting too close to the spikes.  Very interesting!


Sunday, November 4, 2012

Typical Marquetry Restoration

I really enjoy working on period marquetry surfaces, in particular those made with sawn veneers before 1800.  The quality of the materials, range of exotic materials used and, most importantly, the thickness of those materials make conservation and restoration of those surfaces more successful, when you know what you are doing.

Last week I started the restoration of a marquetry panel on the base of an English tall case clock, made around 1700.  This clock, like most of those clocks from that period, had lost its feet along with the lower 6" of the carcase, including the side panels.  When it was last restored, in the 1920's, in London, the worker removed the surviving marquetry from the lower part of the panel and replaced the pine board underneath.  Then he replaced the marquetry surface as best he could, saving most of the elements.  He also replaced both side panels of the base, and added a double molded base where the round feet were.

Inside the case, I found a lot of powder post beetle damage, so I had the clock fumigated by a professional in a chamber for 48 hours with methyl bromide gas.  Methyl bromide gas is the best way to guarantee full kill of the eggs, as most other fumigants kill only the adult and larvae, leaving the eggs to start the deadly process over once they hatch.

Here is the clock, with the sides removed.
Here is the face of the panel, showing the problems caused by substrate shrinkage.  The lower piece which was added in the 1920's has pulled away from the panel, and there is a lot of wood loss due to the bug damage.  Much of the marquetry surface is loose, as the glue has dried up, and the only thing holding these pieces together is the mastic and surface dirt and finish.
First I carefully removed the panel from the clock, so I could work on it.  Now you can see the condition of the marquetry and finish.
On the back you can see the loss of wood, as well as the newer lower board.  There were also two small pieces of wood applied by the repair man to old the cracks together.  They didn't work and were easily removed.
A close look at the restoration effort by the London worker in 1920 shows his technique for saving the marquetry surface.  He soaked off the elements with heat and moisture and saved them.  However, the background ebony was damaged and lost.  He replaced the background with a similar dark wood but was unable to properly cut in the cavities for the original inlay.  He used various chisels to carve out larger cavities for each of the elements and then filled in the surround with a dark mastic, which has now cracked.

I first worked on gluing the substrate boards back together.  This required cleaning old glue and dirt from the joints, using a toothing plane to prepare the edge, and gluing the three boards back together.  This also required a slight adjustment of some of the surface elements, as the substrate was no longer the original size, but had shrunk across the grain, as is normal.  Once the substrate was stable I turned it over and started working on the marquetry itself.

I was fortunate to be a participant in an international group of marquetry restorers in Paris during the early 1990's.  We called our group ADEN, which was a combination of the Musee des Arts Decoratifs de Paris and the Ecole Nationale Superieure Des Technologies et Industries du Bois, located in Nancy, France.  We did a lot of research on modifying protein glues, age testing, rehydrating old glues, and other specific problems related to conserving old marquetry.

One of the papers published in March 1997 specifically discussed this problem of the clock:  Amelioration des operations de recollage des placages et de redressement des panneaux-supports lors de la restoration de panneaux decoratifs.  Short translation: how to restore old marquetry panels.

Out of this research came the idea to make and modify protein glues, which I used to develop Old Brown Glue.  Although OBG is now sold nationally and used for a wide range of woodworking projects, I developed it originally to restore marquetry, which requires a long open time and deep penetration properties, as well as the ability to rehydrate and bond to old protein glue itself.

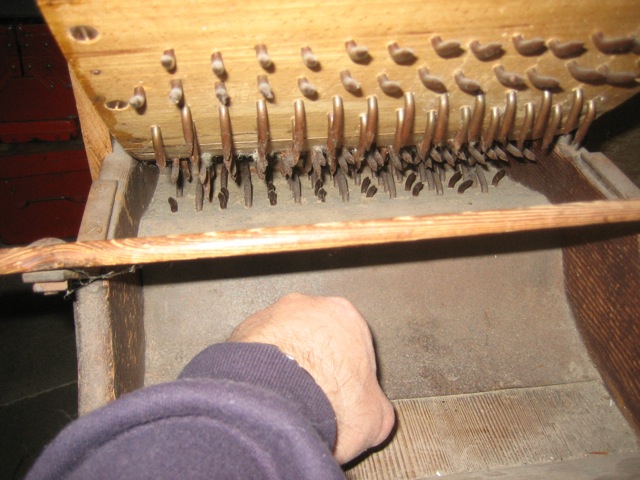
The first step is to place paper towels on the surface and add clean distilled water.  Watch and wait a few minutes or longer for the water to soak into the mastic and under the loose elements.  When you can see that the mastic has expanded and is raising up from the surface, you stop and remove the paper towels and surface moisture.  Then you flood the surface with Old Brown Glue and rub it into the marquetry.  Be careful to hold down all the loose elements while at the same time pushing the glue around, allowing it to suck under all the loose edges.


This method is usually done with the finish intact.  It is not necessary or desirable to remove the surface shellac or finish for this to work.  Note that the glue will penetrate only where the finish is damaged or lost, and only where the marquetry elements are loose or missing.  That is one of the neat features of this process.  You can conserve the original finish, if it exists and still reglue the marquetry in place.

Note I am holding down the floating loose elements with my left hand fingers while I am rubbing the glue over the surface with the right hand.


At the same time, I have heated an aluminum plate on top of a kerosene heater.  I place two layers of clean newspaper on the plate and the lay the marquetry panel glue side (face side) down on the paper.
The heated plate cannot be too hot.  If it burns your skin it will burn the glue.  150 degrees maximum.

Place the heated plate with the panel into the press as soon as possible.  I use gloves so I can hold the plate.

Place some boards on top and press.  Leave overnight.  Clean off the paper with cold water.

The next step is to create all the missing elements of the marquetry.  For this, it helps to have a French chevalet to accurately cut the elements, using sawn veneer that matches the original species.  There is a neat trick I use which works perfectly to capture the shape of a missing inlay piece.  I use thermal FAX paper, which is nearly extinct, since all modern fax machines are paperless.  I have a large supply of thermal fax paper on hand.  Place the fax paper over the missing area and burnish it with a hard smooth tool.  With experimentation you will find just the right tool.  Be sure to tape the fax paper tightly in place so it doesn't move.  After you capture the outline of the element, you use a light table to transfer that shape to a piece of tracing paper.  You cannot use the fax paper to cut the piece with the chevalet, as the heat of the blade will create a large dark shadow in the thermal paper.  Glue the tracing paper onto the proper veneer, which is held in a packet with a supporting board and some grease paper.

Place the elements in a tray, using the original fax paper as a guide so that you know where they go.


Place the new elements into the marquetry picture using Old Brown Glue to hold them.  Put again in the press with two layers of news paper and a heated plate.  Clean up the paper with cold water.


Note that there are still pieces of paper on the new elements.  This is also removed with cold water and gentle scraping.  Once the surface is clean you can begin the process of coloring the new elements to match the old.  Different chemicals, dyes and stains are normally used to balance the color and shellac is used to seal in the results.  Here is the panel during the coloring process.  It is not finished.  I will glue it onto the clock and finish all the other small repairs before I complete the polishing,  The original finish of the clock will be conserved with a French rubbing compound, called a "popote."  When the clock is done, next week, I will post a final picture.


I hope this illustrates clearly how you can approach such a project with a systematically proven process.  I am not the only person who uses this technique.  I can assure you that many workers in Europe, both in museums and private practice, are using these methods on a regular basis.  The goal is, of course, to conserve the great work of the masters for the future appreciation of collectors not yet born.

UPDATE:  Here is a photo of the clock put back together, cleaned and polished with a fresh coat of wax.


Thursday, October 25, 2012

Manual Press Operation

I first built my manual press nearly 40 years ago, and it has occupied a place in my work shop continuously since then.  Some times it just sits there and takes up space.  Other times it is full for days on end and makes me money.  I have posted images of this press before and you can use the search box to find more.

The press is made of 4 x 5" maple beams, 60" long, with 5 Jorgensen 12" veneer press screws per arm. I had a pipe shop supply threaded 3/4" pipes for each end, and I can remove the top cap to lift the upper arm off for some jobs.  I also have other pipes which are longer (32", 48", 60") and I can substitute these pipes to lift the upper arm as high as needed to clear certain projects, like cabinets.

However, since the press screws have only a 12" thread, the effective clamping distance of the screw is about 6" or so, and the upper arm needs to be relatively close to the work to operate properly.

I also have lots of different sizes aluminum sheets which I use for heating the glue.  The actual bed of the press is two sheets of 3/4" plywood, and I place the aluminum on top of that.  To use the press, I pull out the aluminum and prop it up on one end, with a kerosene heater under it.  Using scrap sheets of plywood around the edges, I can create a heat box to trap the heat under the aluminum.  With this method I can heat the press quite rapidly.  When it is ready, I just slide the aluminum back into the press, add some newspaper and place my veneer project face down on the heated caul, making sure the newspaper is in place.

You only glue your project to the aluminum once to learn the importance of two sheets of paper.

To demonstrate how this press can be adapted to certain projects, here is a short video.  This shows Patrice and I working together to press the top of a French Art Deco desk.  This desk is veneered in palm wood which is difficult to work with.  It had dried out and become delaminated over time.  We used a method to rehydrate the animal glue, which involves adding water to the surface of the veneer, waiting a short time, and then adding liquid protein glue (Old Brown Glue) over the entire surface, working it into the cracks and under the veneer as much as possible.

The desk is then placed face side down on the heated press, with paper between the top and the aluminum.  Since it was too large to slide under the clamps, we removed the top arm and replaced it after the desk was in place.  The video shows us reattaching the top arm and then tightening the press clamps in sequence.

We speeded up the video at the end, just to show the process in a short time.  We wish we could work that fast...

(Please excuse my French at the end of the video.)

Wednesday, October 24, 2012

Where's My Government Bailout?

I build and sell Chevalets.  I am no different than General Motors.  Well, there is a slight difference of scale, but a Chevalet is still a Chevalet.  And, like General Motors, I am losing money on each unit sold, I am sliding into a financial hole where it would be nice for the Government, and you, the tax payer, to consider bailing me out.

You see, I sell Chevalet kits.  First of all, since most people who don't read this blog, haven't a clue what a Chevalet is, it is rather hard to sell them a kit.  However, every once in a while, I get a call or a student decides to purchase one at the end of a class.  That occasional sale is important to me, since I need to put out a lot of money up front and then wait for a rather long time to recover my investment, as the sales are slow.

This is not the best business model, I admit.  Lots of investment, long wait for turnover, high overhead, low profit, lack of demand, consumer indifference...

Gee, as I write this, I am getting depressed!

In any event, I notice that the Chevalet is being talked about on certain other blogs, like Lumberjocks.  Boy, am I happy to see that.  Any interest is great.  On the other hand, I need to clarify something I noted the other day while following the thread.

There was a discussion which was about building your own Chevalet.  It was pointed out that Pat Edwards sells the kits for $500.  The next response was something like, "Why would I pay that when the hardware is only about $75?"  That got me thinking, just how much am I spending on these kits?

Well, if you consider I spent a bit of time drawing the blueprints years ago, and that was "free" and I need to drive all over town to get the elements of the hardware from different stores, and I had to design the special parts for the machinist to create, and all that work is "free" time, then let's just add up the hard costs for each kit.

The special parts, which are essential, are made by a talented machinist, using state of the art equipment.  The sliding arm is perfectly straight and has expensive bushings.  The blade clamps are tempered, and the other parts are also custom:

Next, I put together all the metal parts for the tool.  This means each bolt, nut, washer, screw, chain, eyebolt, hook, and pivot shaft is counted out and put into a bag.  Then add the 2 dozen German blades, which I need to import in a large quantity since they are 16cm long and not available in the US.  Then I add the full scale blueprints, which are metric and include every detail of the construction.  For good measure, I copy the plans from Pierre Ramond's book, "Marquetry," and include those, so you can have a typical cut list for the wood.


So, I sat down and added up the actual unit cost for each of these elements for the kit.  It comes to $416.  As I said, that excludes my time and gas and brains.  $416 total.  I then make a wood shipping box and ship it anywhere in the US for $50, fixed price.  That clearly doesn't make much profit.


I sell this kit for $500, plus $50 for the shipping.   Not the smartest decision in the business world.  Not going to even pay for one of the utility bills I have each month.  Certainly not enough to buy a private island somewhere...

I do it for love.  And I do it because I want others to discover how cool this tool is.  And I really don't expect the government to call me anytime soon and send me money for my efforts.  It would be really something if the president would decide to set up a French marquetry atelier in the White House, but I'm not holding my breath.


Sunday, October 21, 2012

Human vrs. Chair

Many, many years ago I worked in the garage behind my house.  I know this is not unusual.  It is a real pleasure to get up, eat and walk out the back door to work.  I share this happy activity with many fellow woodworkers who have the shop near their house.

When the kids got too big for the house, we had to move, and, through some lucky act of fate, found a larger house in the same neighborhood.  This neighborhood is a historic node of Craftsman houses on the edge of Balboa Park, and the business district where my shop is located is the first urban shopping district located East of downtown San Diego.  Every day, as I walk to work and home again, I search out the date stamps in the sidewalks, ranging from 1909 to the 1920's.  

Honestly, I know this is not "old" when compared to Boston, New York, or any European city, but, in San Diego, this is ancient.  Remember, the motto of this city is "City in Motion."  That doesn't emphasize where we were, but rather, where we are going.  I prefer to focus on the past, even though it is fairly recent.

One result of this philosophy and/or lifestyle of living in San Diego is a lack of concern for antiques in general.  First of all, the kind of antiques I work on came from the East Coast or Europe long before San Diego built its "new" downtown during the 1880's.  Before that it was mostly a small village of Spanish, Indians and Sailors who called this place home.

The reason I mention this is that I find that the residents of San Diego can sometimes be rather insensitive to the way they treat nice antique furniture.  I am trying to be nice, but I have seen real criminal activity in my time, real "crimes against antiques."

Take chairs, for example.  Chairs are one of the most difficult objects to design.  They must be stylish, fairly light in weight and construction, and yet hold up under huge stresses, as overweight people twist and turn and lean back after dinner.  This is under "normal use."  When actual destructive criminal intent is the goal, they end up in the dump.  I wonder how many chairs have been destroyed in the past century alone.  I'm not even talking about floods, fire and earthquakes; just ignorant human activity.

Here are some examples I have found just walking around the neighborhood.  Usually, I don't go out of my way looking for garage sales, but, when it is on the way to work, I sometimes stop for a few minutes.  After all, I have to walk 6 blocks each way.

One day I happened upon a young guy sitting on his porch working on this chair:

I instantly recognized an iconic Klismos chair made in Baltimore during the 1820's and probably by John and Hugh Finlay, famous chair makers at that time.  In fact, it appeared to me that it still retained all of its original surface decoration, including the gilt stenciling.

Except the top crest.

As I watched, he was aggressively sanding away the flat decoration on the crest, using 80 grit sandpaper and a pad.  I ran across the yard, yelling for him to "Stop!" He looked up from his work and asked me what I wanted.  I asked him what he was doing.  I might have used a swear word.

He said he was going to refinish the chair and sell it.  For $20.  Fortunately for the chair and the history of chair making, I had $20 and was able to rescue the poor chair from a fate worse than the dump.  I restored the crest and now the chair once again stands as a proud example of American glory in the early days of our history.

On another day, walking a different rout, I came upon a sale which, for some reason, made me stop and look.  It was strange, as mostly there was just junk and old clothes.  But, as I reached the end of the drive I noticed a paper grocery shopping bag full of old sticks of walnut.  A single bag on the ground.  Looking in more closely, I noticed chair legs, aprons, crests, and other parts of walnut chairs, all broken up in pieces.  I asked the person in charge what it was and he said, "There are 5 chairs in there.  I broke them up so someone could use the wood, perhaps for fire wood or something."  Again, I might have used a bad word.  I did have the sense to ask if he kept the seats, and he pointed to the trash can nearby.

I gave him $40 dollars and walked away with 5 New York walnut gothick side chairs from 1840.  In a shopping bag.  Did I mention that what I find is considered criminal?

After putting the chairs back together (I actually had all the pieces!), I eventually sold them to a collector who really appreciated them, and forgot about them.  That was about a decade ago.   This week that same collector walked into my shop with this chair from that set:

I examined it and found that it had broken in some new places and a few of my old repairs.  She told me that it had been knocked over backwards and broke.  She also said that they were in daily use and none of the chairs had broken until this accident.  This is the kind of feedback a chair repair man likes to hear.  Also, she had the good sense to bring it back to me instead of asking the neighbor to screw or nail it back together.

I heated up  the protein glue with some warm water, scraped the broken joints with a toothing plane iron, added some Old Brown Glue and a few clamps and it now sits on the bench, ready to go home tomorrow.

Score some points for the good guys in the war against the chair.

Friday, October 19, 2012

Daniel Lecount Project

I love clocks.  Not just all clocks, although I think they are amazing, but specifically tall case marquetry clocks. Imagine what kind of mental gymnastics it takes to figure out the drive train sequence, forces and speed necessary to transform a weight into a measurement of time passing.  The history of time keeping is full of creative methods for measuring time, from the sundial to dripping water.  To me, the Golden Age of time keeping was the last half of the 17th century.

It was Christiaan Huygens in 1656 who perfected the pendulum clock and transformed our estimation of time into a more precise system of measurement.  The pendulum is simple and effective.  Think about how accurate you can make it.  By adjusting the bob up and down as little as a millimeter, you can change the speed of the movement by several minutes a day.  It is so sensitive that moving a pendulum clock from the North to the South requires an adjustment to keep the time constant.

Clockmakers were a special breed, as I said.  The story of the first clock to be used successfully at sea, made by John Harrison in 1736, is a story that represents how interesting these people were.  John was self educated, and not an accepted member of the guild of clockmakers at that time.  He was a carpenter!  However, he solved a problem which had stumped all the other clock makers of his day.  His invention changed the world, but he had to wait years for recognition and awards.

My favorite period of clock design was during the last two decades of the 17th century (1680-1700).  This period was very creative and there was an emerging merchant class in England and Europe who appreciated the status and practicality of having a clock in the house.  The general design of the cases included square brass dials and elaborate marquetry cases, often with  exotic materials.  I have made several of these clocks and spent a lot of time on the internet looking at others and I never get tired of seeing them.

Some time ago a client brought in a tall case clock for analysis.  In general, most clocks I see are (unfortunately) marriages of works and cases, and this clock was no different.  It was a Georgian case which had had the lower section remade with very poor workmanship.  The brass works were earlier and some person had added a fake brass moon dial to the top to fit into the case.  Essentially, the only value was in the works, so I was able to purchase the works at a reasonable price and the case went away to its fate.

The works were made by Daniel Lecount, and signed London.  The most amazing thing is that they were completely original and unrestored.  It seems that the owner of this clock had owned it for some 50 years and never ran it.  He was missing the weights and never thought to replace them.  So it sat.

Daniel Lecount was a French man, who was a member of the Haberdasher's Company and relocated to London, where he was "made free of the Company 29 September 1676."  That is, he was accepted into the Worshipful Company of Clockmakers in 1676 and remained in that position until 1693.  He was most well known for his watches, but he made several tall case clocks as well.

At that time, the clock makers usually did not make the cases.  They would make the works and then hire some local cabinetmaker to make the cases.  That accounts for the wide range of quality and design  that you find on these cases, even for the same maker.  During this period the major influence on case design was the Dutch influence on the marquetry.  The general method used was Painting in Wood, and the veneers were sawn from a wide variety of imported exotic species, newly discovered in the far reaches of the world.  Oyster and sausage cut veneers were common as well as tinted bone and horn.

Here are some images of the works.  It is interesting that the dial is 11" square, and not the common 10" that is on almost all the clocks from this period.  All the parts are original and unrestored.

Here is a shot of the works, which still have the old catgut cables.  Note the fake brass moon dial attached to the top, which has been removed.

After looking at several documented clocks made by Lecount, I selected one which I like.  I have been working this week on the drawings for this case, and the drawings for the marquetry.  I have decided to use sawn olive for the primary groundwork, with yew oysters on the door background.  I really like the boldness of the spiral carved columns and the little touches of gold leaf on the capitols, bases and lenticle surround.

Here a close up of the bonnet.

I will post on this blog, from time to time, as work progresses on this project.  It will be a happy day when Mr. Lecount's masterful clockworks are housed in a case that is more appropriate and historically accurate.

By the way, I know that there are people out there who know more about clocks than I do.  If any of you have more information on Daniel Lecount and his work, I would appreciate knowing about it. As usual, time marches on.


Thursday, October 18, 2012

Chevalet Anatomy Lesson

I am encouraged that more and more American woodworkers are interested in a weird, highly specialized veneer cutting tool that the French developed during the 18th century and perfected in the 19th century and managed to keep relatively secret over all those years.

I give credit to Dr. Pierre Ramond, who was the first to publish plans and explain what this tool did in his ground breaking book, "Marquetry," printed in English by Taunton Press in 1989.  Even though there was a French edition of this book published in Europe years before, it was the Taunton Press edition which first hit the American market big time.  This edition is now out of print, and the Getty Press reissued the same volume with a new cover and some added photographs in 2000, and that edition is now also out of print.  Fortunately, we have the internet and book search engines.

I began making and selling hardware kits and blueprints for a chevalet when I opened my school, the American School of French Marquetry, in that same year, 2000.  Many of my students purchased kits and went on to build their own tools, and those tools have encouraged other woodworkers to build their own versions.  As this tool gains acceptance in the marquetry world (admittedly a small world), I get calls and emails asking about how the tool works and to explain certain features of the tool or explain some obscure detail of its operation.

The initial problem is that it is usually the case that the builder has never used this tool and won't realize what parts of the build are important until he uses it.  I did this on my first tool, which I built in the 1970's.  After spending time in ecole Boulle and learning more about it, I modified that first chevalet several times.  It had so many changes that, today as it sits in my school, it is named "Frankenstein."  (By the way, Frankenstein swings both ways, right and left handed!)

The biggest problem I have in discussing this tool with someone is terminology.  What are the parts named?  In Pierre's book, the cut list for the plans include generic English translations of the names, which are sometimes confusing.  Therefore, I propose to create some terms here for common usage, so that when others ask me I know what they are referring to.


There is really no problem with the names of the lower half of the tool.  You can see the seat, which has a front and back leg, as well as a foot pedal.  There is also a lower stretcher and a large foot or base which stabilizes the structure.  Mounted on the seat, in front of the worker, is the vertical column, which supports the pressure arm.  This pressure arm is connected by a chain to the foot pedal which moves up and down and clamps the vise on the packet.  Note the foot pedal and the top of the base in front of it should be level when compressed to avoid foot fatigue.

The first thing a builder needs to consider is the size of the chevalet.  Workers traditionally made their own tools to fit their bodies for comfort, like a custom bicycle.  The turned knob on the saw frame should rest at about the same height as the base of the neck of the worker, when sitting on the tool.  Therefore the tool size is measured from the top of the seat to the saw blade, in metric length.  This tool is a 62cm size, which is tall and should fit a normal person about 6' or so, depending on his upper body height.  Note that the actual size can be changed slightly up or down by changing the replaceable vise faces, which are either glued or screwed in place.

Here you can see the horizontal arm which supports the saw guides.  This arm can be moved in or out for different size saw frames.  Normally a worker builds at least two saw frames, medium and large, and changes them depending on the work.  Note also that the saw frame is essentially horizontal to the tool, and the blade axis and the sliding rod axis are co-planer.   We usually clamp a piece of wood on the arm to hold our working tray (right side of photo).  Note that placing your coffee on the arm will result in a wood dust flavor.

This tool is for right handed workers.  The support arm is on the right of the person sitting on the tool.  If a person wants to build a left handed tool, the arm is on the left.  In both the left hand and right hand tools the vertical adjustment is on the inboard (nearer the worker) and the horizontal adjustment is on the outboard side (away from the worker).  The majority of students I have had who were left handed end up cutting fine on a right hand tool.  How many left handed violinists do you see?

This  is the important part of the tool, which was added to the basic Roubo "donkey" at some point still not fully researched.  In other words, Roubo shows the tool with a seat and foot clamp, but  the saw is hand held.  At some point, certainly by the early 19th century, probably earlier, the arm was added to support the saw frame guide, with its adjustments.  This modification took a good idea and made it perfect for the job.  Cutting absolutely perpendicular is an essential feature of French marquetry, and this saw guide allows for that to happen.  There is a short upright post  on the horizontal arm which is connected to a guide support cross member.  On one end (the left side) of this cross support member is the vertical adjustment element, and the other side (right end) has the horizontal adjustment element.  Both of these elements work together to hold the metal sliding saw guide in place.

 The saw is attached to the lower rod of this guide and the upper rod has sliding bushings attached to it and swings back and forth on the pointed screws which hold it at each end.  On this support cross member I have placed a sample piece of wood which we use to test the accuracy of the alignment.  Note the keyhole pieces which have been cut in this wood, proving the adjustment is correct.

This is the horizontal adjustment.

This is the vertical adjustment.  It has been modified to gain more height, as the tool ages and the wood moves, it is often necessary to raise this arm.

Here we see the cutout in the upright leg which catches parts sometimes.  There is a plywood attached to one side which supports the saw frame when not in use, or changing blades.  The two vise faces, with the "V" notch are replaceable, as they are often cut up during work. One fact which is not obvious is that you adjust these vise pieces to meet around the "V."  Use a piece of paper clamped in the jaws to adjust the pressure.  The paper should be tight around the "V" and loose on either side.  This means the packet will rotate nicely around the blade when you cut.

 You can see the custom metal elements to hold the blade, called blade clamps.  These are tempered steel, and the front clamp (where the turned knob is) is fixed in place, while the back clamp (on the left) has a long threaded bolt and wing nut.  I designed this back clamp to slide in and out by supplying a brass "U" sleeve.  This sleeve is put into the wood saw frame, with a press fit or a bit of epoxy and it allows the clamp to remain in position for using different blade lengths.  We use German blades which are 16cm long.

Note the turned knob is only for pressing against the shoulder when tensioning the blade.  The worker holds the saw frame near the knob on the flat part of the frame when sawing.
This is a set of saw clamps.  You can see the brass sleeve.  I sell these as a single package for $150.  They are tempered steel and include the wrench.  I also sell the complete hardware kit, which includes all the metal elements for a chevalet and a set of full scale blueprints for $500.  Believe me, selling these kits does not make me rich.  I am just happy to make the technology available.  I hope this post answers some questions and if I missed something, just let me know.

Sunday, October 14, 2012

Woodworking in America Show

I just returned from the Woodworking in America Show at the Pasadena Convention Center.  The first thing that comes to mind about the experience is, "I'm not as young as I used to be."

I have never been to the Pasadena Convention Center before.  I have driven by it many times and it looks absolutely beautiful from the outside.  At the risk of insulting someone in Pasadena, I did not find the inside to be as functional as the outside was beautiful.

The exhibit hall where the show was set up had three events at the same time.  Our event was in the center room.  On one side was an event featuring Japanese food and drink for most of the Japanese population of the West Coast.  On the other side was a wedding which must have cost some poor dad a million dollars, and essentially shut down Colorado Avenue for the day.

There was no bathroom in our hall, so we had to either walk through the Japanese event or the wedding event to find comfort.  In either choice, I think we stood out from the crowd.

For delivery and set up, we had to go down a long ramp and into the dungeon basement of the center, where large people who never see the sun toil endlessly loading, unloading, moving, dumping, and just moving around from one locked door to another.  We never found two of these people who agreed about any of the rules.  Either they didn't know, or they just find it sporting to contradict the information the last person gave out as the way things are done.

My wife disappeared for a long time to find out who was actually in charge and came back with the news that she had talked to "Shack" and he said just do what we wanted, park where we liked, and, if anybody asked us what we were doing, say "Shack said it was fine."  That particular bit of information saved our ass on several occasions.

We set up our booth and went to bed at the hotel, ready to start the event on Friday morning, bright and early.  Our booth was in the back corner, way back in the corner, away from most of the action, and we liked it that way.  These shows rely on tools.  Lots of tools.  The kind of tools that plug in and require a small nuclear reactor to power.  They make a lot of noise, and dust.  It is difficult enough to talk in a cement room which has 30' ceilings, industrial air conditioning and walls that are cement, but when you add a few stores of power equipment...well, I will just say that it is not like standing at my workbench.

At one of these shows, we actually had a booth directly behind our curtain which was selling planers.  All during the event, we would be standing with wood shavings falling down on our heads like snow.
(I accidentally unplugged their booth a few times while trying to plug in my coffee maker.)

We were relieved to find at this show that the booth behind us was set up for the "Modern" woodworker (whoever that is) and remained empty during the show, except for some cards on their table.  I still ended up loosing my voice after two days of talking.

Not everything was bad about the show, I need to add.  Many years ago I did these shows more often, and it gave me an opportunity to meet and become friends with the outstanding woodworkers in America.  So I was pleased to have the time and chance to meet many of them this weekend, and, like old friends do, discuss the state of the world and the news from our business.

People like Christopher Schwarz, Paul Schurch, Adam Cherubini and Roy Underhill have all influenced my work and encouraged me by their creativity and knowledge.  If it wasn't for these shows bringing them all together, I would never get the chance to see them.  In a very real sense, we need each other.  Together, we have devoted our lives to a career in a special aspect of woodworking, and are truly keeping alive the spirit of craft in the modern age.

This morning, as I recover from the physical effort, and the late night drive, the fresh memories of seeing good friends wash over me, and I know that it was important to make the effort, not so much for those who visited me at the show, but for me, personally, to remember why I do this.


Wednesday, October 10, 2012

Why Reversibility?

I have always tried in my career to follow accepted museum practice for proper conservation of antique furniture and other wooden objects.  I have naturally had some independent conclusions which differ from certain methods I have seen used in museum labs, such as using modern upholstery methods and materials on antique furniture, and I have discussed that issue previously on this blog.

Also, I have resisted using modern, experimental chemicals, glues and finishes, which are commonly accepted in many conservation labs.  Part of that decision is driven by the experiences I had in European workshops and museums, where traditional methods and finishes are more standard.  Part of that decision goes to the basic reason I started this career in the first place.  I was involved in some of the most high tech projects in my field, high energy particle physics, and had my "mid life crisis" at the age of 25.  I walked away from my research lab and into the 18th century.

I believe, absolutely, that the highly trained craftsmen working in the pre industrial age knew exactly what they were doing.  They had excellent materials, basic hand tools, and the experience of their ancestors, passed down over the ages.  They also had the financial support of a very rich class of merchants and royal patrons, who recognized quality at a very high level.

In any rate, the reason I am posting today is that I have recently been asked again about the reversibility of animal protein glue.  A basic rule in all museum restoration is that, whatever is done, it should be reversible.  The reason is that, in the case where future research indicates a better method is possible, the restoration could be removed and replaced with the better repair.

More importantly, it is essential in building furniture which is functional that repairs can be made when the object breaks.  Any furniture maker who thinks his creation is never going to be damaged or broken is not dealing with reality.  Objects which are designed to last centuries will be damaged.  That is a fact and that is why I never run out of work.  I can't count how many chairs I have repaired in 40+ years, and how many different types of damage they suffer.

Therefore, when a broken chair or other object arrives and there is nails, sheetrock screws, epoxy or, worse, "the strongest glue on planet Earth," I need to inform the owner that it will cost more and the repair will be less successful than if it had not been repaired or if it had just been glued with protein glue.

Fish glue, bone glue and hide glues are all reversible.  You need to understand what that means to effectively work with these glues.  They are all water soluble.  They need water combined with heat to change from solid to gel to liquid and back again.  Each has specific working characteristics, but they all have the same thing in common:  Adding heat and moisture reverses them.

Fish glue is somewhat different, as it is liquid normally at room temperature.  It cleans up easily with water.  Adding heat liquifies it easily.  It is designed to be used for holding materials together which expand and contract differently with environmental changes, like gluing metals to wood, or horn, ivory, bone and shell to wood.  It "relaxes" somewhat during heat/moisture cycles, and then sets again when stable, holding tight.

Bone and hide glues are normally dry and need cold water to be hydrated, then heated to be used.  Thus, they set initially by losing heat and then by losing moisture.  Each gel strength has a different rate of set and gel point, which is why I like to  use 192 gram strength.  It works well for all applications.

When I decided to modify my 192 glue with urea, my goal was to simply lower the gel point slightly, so that it could be used from a bottle.  The result is Old Brown Glue, which is currently carried by Rockler, Lee Valley, Tools for Working Wood, and several Woodcraft locations.

Fine Woodworking Magazine did an independent testing of OBG as well as other glues in their issue #192 (August 2007).  According to their tests, OBG was stronger in all tests than the "strongest glue on planet Earth."  I guess that makes it the "strongest glue in the universe?"  I should point out that, since it is non toxic and reversible, if you get it on your hands, just wash it off.  On the other hand, if you get polyurethane glue on your hands, you need to wait for several months while the skin falls off and you grow new skin.

That fact alone makes reversible glue attractive.

Here is the link for the pdf of the Fine Woodworking Test:

"How Strong Is Your Glue?"

If you are in Pasadena this weekend, stop by our booth at the Convention Center.  We are participating in the Woodworking in America show, and you can pick up some of our glue and see a French chevalet in action.

Saturday, October 6, 2012

Revolution

First of all, I want to note that it has been 5 months since I sat down to post a blog.  I have no excuse.  "I've been busy" is not really an excuse.  As it has been pointed out many times to me by close friends, it is just a matter of priorities.

That is not to say that I don't think posting my thoughts is not a priority.  I sincerely believe that old "masters" need to pass on their experience for the benefit of the next wrecking crew.  In fact, I am encouraged by the many emails and messages which ask about my absence and reinforce my hope that what I post has value to them.

The past 5 months has been eventful and I promise to start posting about events with a renewed energy.  We completed an interesting project for the Art Institute of Chicago, which opens a new show at the end of this month.  I was able to spend some quiet time in the mountains of Montana, which was covered in smoke from the fires and dry from lack of water.  I have been working on several projects that I can report on, and other activities have kept me away from the computer.

Recently, I have been watching a new series on NBC, called "Revolution" which is an American version of a French science fiction book, by Rene Barjavel, "Ravage," published in 1943.  I love science fiction, and grew up reading amazing books from the 1950's.  There is nothing more stimulating than science fiction which seems to accurately predict a future that may, in fact, happen.

In this TV series, there is the usual stress and tension of fighting and egos, which is typical American script writing.  However, under the predictable and required amount of action is a basic plot premise, derived from that earlier French novel.  That is, what would happen if all the electricity in the world suddenly stopped working?  How would that change civilization?  Would be become savages?  Hence the killing...

I would like to point out that civilization survived for thousands of years before we plugged in.  I know it's hard to imagine, but I would guess that the percentage of time humans have lived with electricity compared to the total time we have lived on earth is rather small.  Very tiny.  Almost zero.

In fact, if all the power went out in my shop,  I could easily continue to function normally.  I would miss the radio and I suppose I would have to use a wood stove to make coffee and glue.  I couldn't work much after dark, so my wife would see me more at home, over candle light.  That might not be so bad!

I am thinking mostly of cutting on the chevalet, quietly making marquetry art.  Only the sound of the blade as it cuts through packets of ebony, and other exotic materials.   If you have read anything on this blog, you already know I have a certain affection for the chevalet.

That is why I made an effort to introduce this tool to North America some 15 years ago by creating the American School of French Marquetry and selling kits.  Now that I have sold some 50 kits, which are all over North America, people are starting to understand what it is all about.

In most cases, the student or marquetry artist builds his own chevalet.  However, it requires some amount of timber framing and woodworking skill to build, and marquetry art is essentially working with tiny pieces of wood; quite the opposite skill.  That is why I expected, at some point, to find those workers who would specialize in making the tool itself, to sell or give to others, as a supplier.

This is, for me, the true revolution.  The time when American woodworkers would produce pre industrial wood tools for consumption.  Full circle.  Post Industrial Revolution.  Return to real hand workmanship (a term which has been "slightly overused" in recent times.).

One of my students, Paul Miller, lives on Vancouver Island, British Columbia, and has a lot of experience in boat building and other diverse woodworking skills.  He recently made several videos, and has produced several chevalets.  He is well known on the Lumberjocks site.

Here is his independent review of his experience in our school (sent to a prospective student):


First to answer your specific questions.

Lodging:
Not too bad. I took the course in Feb (they are also offered in Sept and June) which is more off-season than the others and I shared accommodation with another Lumberjock, Mat Nedeljko. We got a suite at the Sommerset Inn and split the cost. It would be a long walk but doable. There are accommodations in North Park nearer by but it didn't matter to me as I had a car. I spend winters in Az so I drove over. Patrick's literature will suggest several options and there's always the internet. I think Mat got picked up at the airport by the hotel limo. The school doesn't do that. they only have a max of six students at a time. When we went it was four.
Hours of work:
You are in Patrick's shop. He arrives around 7:30 and classes start at 8:00 as I remember. There's an hour off for lunch. (You don't have to go) Shutting down time varies but we stayed late a few days (an hour or so) Anyway you get all you can absorb. and it will be more than the advertised 40 hours.

Cameras are fine / encouraged. He's not jealous of his techniques at all.

Tarsia geometrica is parquetry. Boulle is a form of packet cut marquetry.

Experience:
No experience is required. Both Mat and I had built and used our own chevalets, in my case for almost a year, but this was the first time Patrick had taught a class where people already owned chevalets. The course work is exactly the same experience or no and even though I was going over a lot that I already knew or thought I did, I still got full value from learning the little nuances that make everything work better. Look at my LJ projects before and after last Feb and you will see a jump in quality and complexity.
Curriculum:
There are some lecture periods but mostly you are working on three increasingly difficult Boulle pieces. You will complete all three but as I said you will learn many little tricks and nuances along the way that really make it worth while. You will also get a demo on hammer veneering, a lecture on hide glue and a French polishing demo. (Be prepared to chuck the tightbond when you get home)

Chevalet advantages:
In a word, control. You are in a comfortable position looking straight ahead, not stooped and looking down. You have complete control over the blade in your right hand and the packet in your left. Hard to explain but you can just do things that you can't on a scroll saw. IMHO.

It's not cheap if you have to travel and stay in a hotel but you have to decide how that works with what you hope to do with the knowledge. For me, driving from Green Valley Az and staying in a hotel, shared, it cost just under $2000. My latest piece, that I could never have done without the course, is worth that a few times over (maybe). I will be biting the bullet and going back this winter and will be happy if I only refine my cutting, sand shading and french polishing techniques.

I guess that if I had to make one point about the value I'd say this. Someone like me could teach you most of what you will learn there but the difference is that this a unique experience to learn from two real masters who, for some reason are willing to take time from their busy lives to teach hobbyists and inexperienced wanna be's like us. You get more by osmosis around that shop than the price of admission.

I'm not in Patrick's employ, but I am an admirer of the man and the artist. He's a very cool guy.


He also has made some videos about his work on chevalets, including a valuable video which demonstrates how you adjust the tool for accuracy.  This involves cutting a keyhole shape from thick material.  If the keyhole piece passes out of the packet in both directions, then the blade is perpendicular to the packet.  If not, then you either adjust the vertical or horizontal or both until it works.


Here are other videos by Paul:
http://lumberjocks.com/shipwright/blog/31246

Here is a video by one of our students, Mat Nedeljko, working in class:
http://www.youtube.com/watch?v=KvL4G4BSDD4&feature=related

I am encouraged to make some videos of my own and will keep you posted.  Thanks for sticking with me during this "pause" in my posting.